One Click POS - ERP Module
Discover the power of the One Click POS – ERP Module, a comprehensive solution crafted to streamline and optimize business management across various industries. Our ERP module offers seamless financial tracking, precise stock control, and efficient office operations, all within an intuitive, user-friendly platform. This system provides the foundation for effective and scalable enterprise management.
Key Features:
- User Access Control: The One Click POS – ERP Module allows for up to two unique user roles:
- Owner Access: Complete control over all system features.
- Manager/Administrator Access: Restricted access based on customizable company configurations.
Unlock the full potential of your business with the One Click POS – ERP Module, tailored to enhance productivity and operational efficiency.
The ERP Module has a Web version available for use on any device (11.12.24). See demo here: ERP on the Web

Table of Contents:
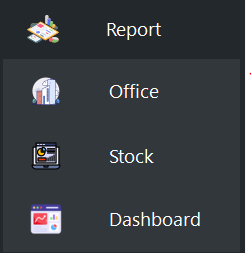
Report
–> Office
–> Stock
–> Dashboard
–> Sales
–> Stock
–> Product
–> Expense
–> Summary
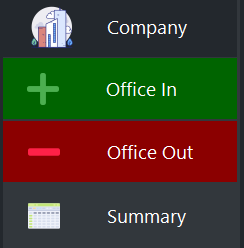
–> Company (03.12.24)
–> Office In
–> Office Out
–> Summary
Office
In (company inflow)
–> Office In
–> Client In
–> Bank to Office
Out (company outflow)
–> Office Out
–> Supplier Out (17.11.24)
–> Office to Bank
Neutral (no net flow)
–> Bank to Bank
Summary
Bank
–> Bank Out
–> Manage Bank
–> Add Bank
Client
–> Pending (28.02.25)
–> Discount
–> Manage Client
–> Add Client
Supplier (Released: 17.11.24)
–> Pending
–> Add Invoice
–> Credit Note
–> Manage Supplier
–> Add Supplier
Branch
–> Sales & Stock Report
–> Transactions
–> Stock In
–> Weighted Average Costs (28.08.24)
–> Purchase (12.07.25)
–> Credit Note (22.01.25)
–> Sales Report
–> Inventory
–> Stock
–> Product History & Audit (13.07.25)
–> Create Quote (15.02.25)
–> Manage Quotes (15.02.25)
–> Stock Count & Reconciliation (04.11.24)
Product
–> Manage Product
–> Add Product
–> Sort Product
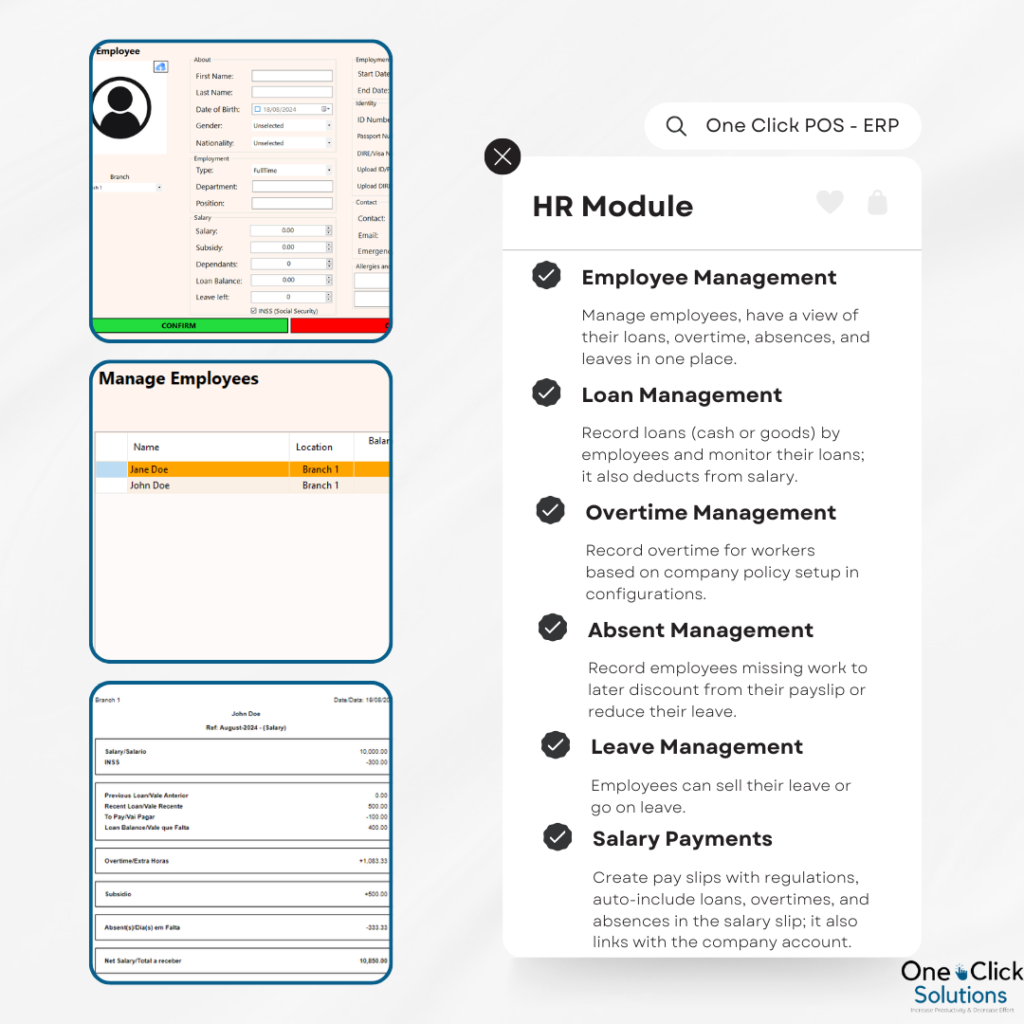
HR (Released: 18.08.24)
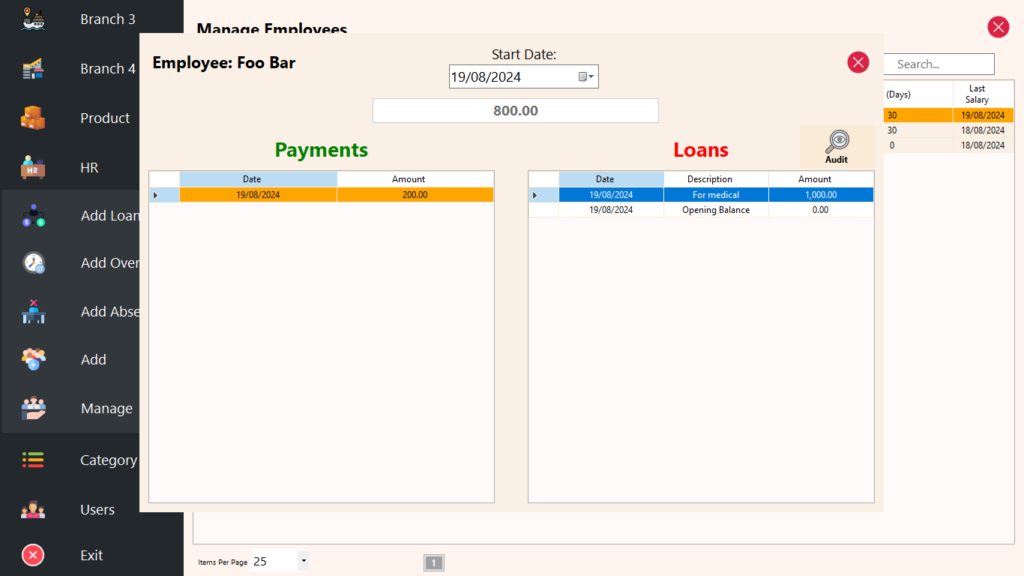
–> Add Loan
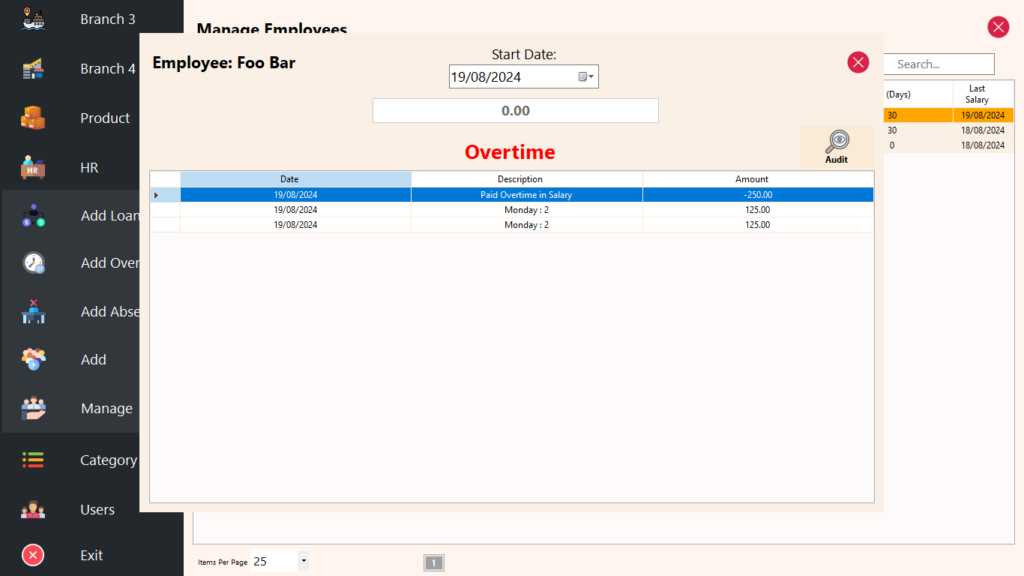
–> Add Overtime
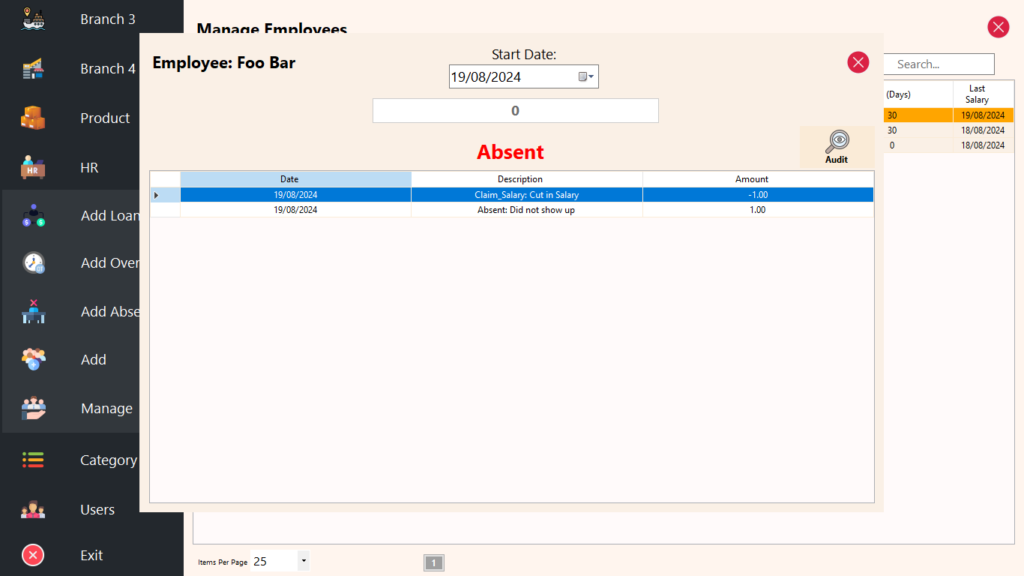
–> Add Absent
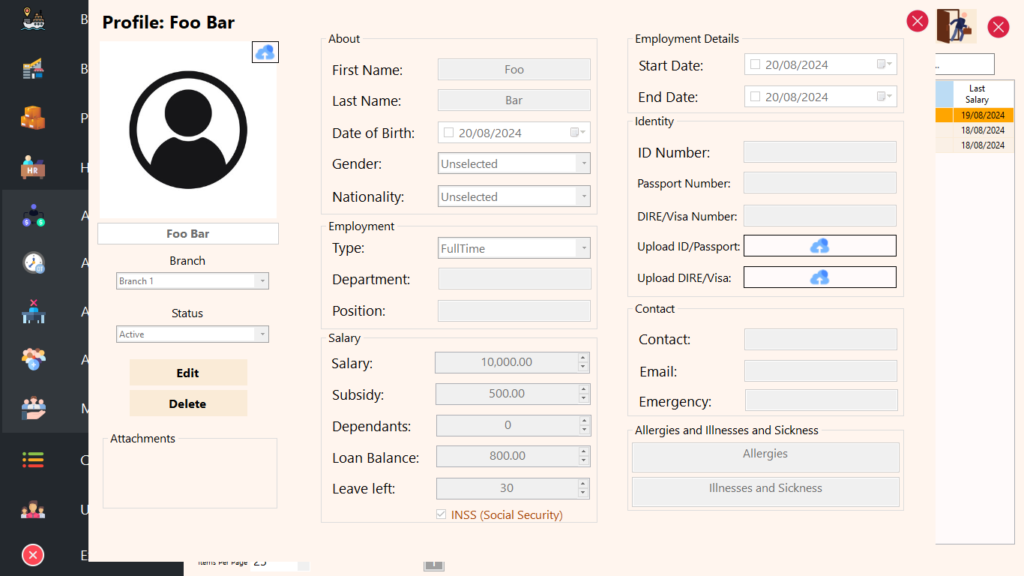
–> Add [Employee]
–> Manage [Employee]
Bill of Material (BOM) (Released 14.09.24)
Configurations/Settings
Restaurant Settings
Petrol Station Specific (05.12.25)
–> Tank Reconciliation
–> Manage Pump
–> View Client
–> View Inventory
Property Management (Hotel, Motel & Conference Hall) Specific (05.12.25)
–> Manage Room Types
–> Manage Rooms
–> Check-in & Check-out Times
–> Client Custom Pricing
Report
The Reporting sub-module within One Click POS’s ERP Module offers a real-time snapshot of company cashflow and stock levels, providing a day-to-day overview of branch operations. Dive into detailed performance insights on specific days and access the centralized dashboard for a comprehensive view of your business operations.
Office
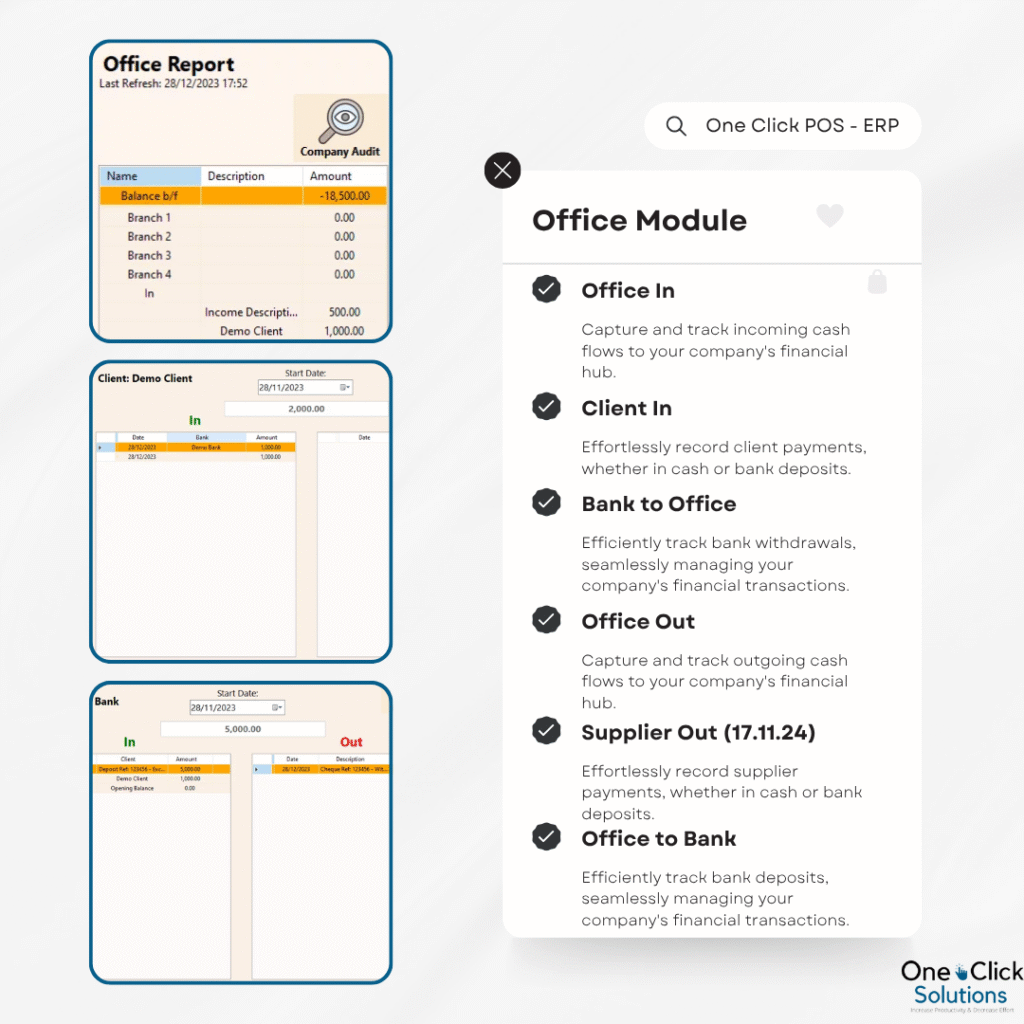
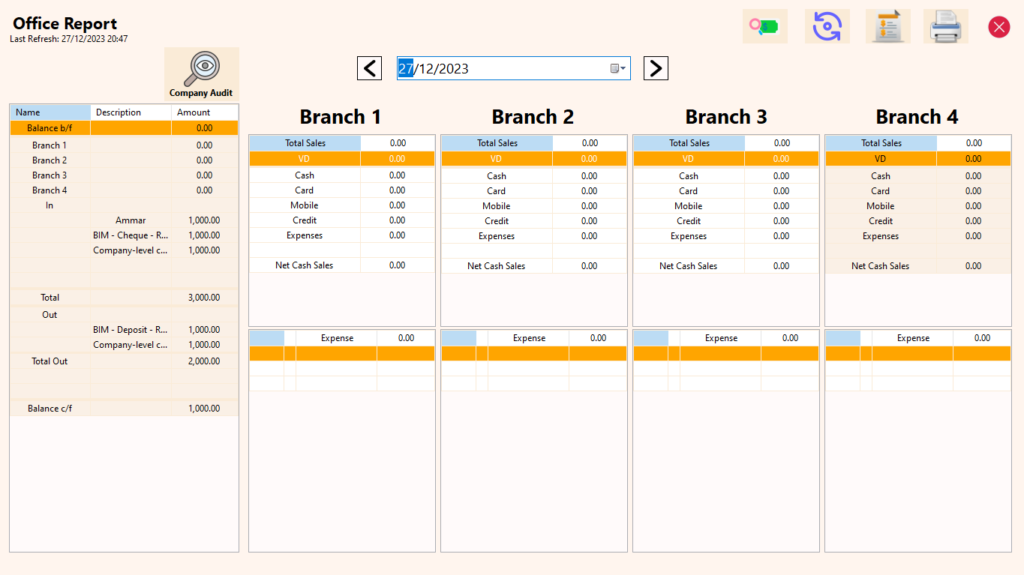
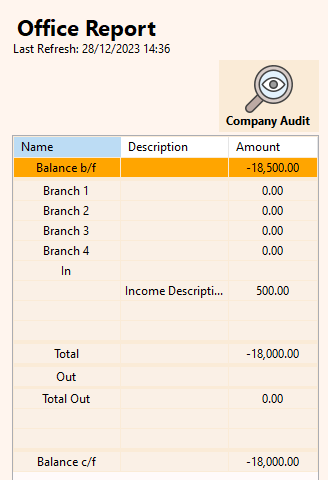
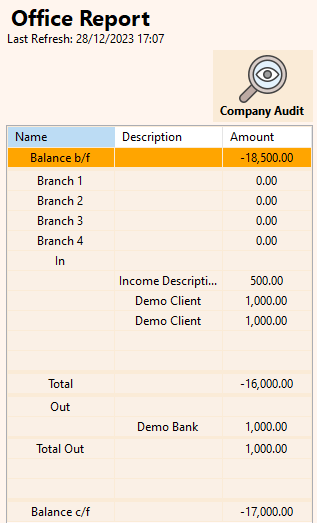
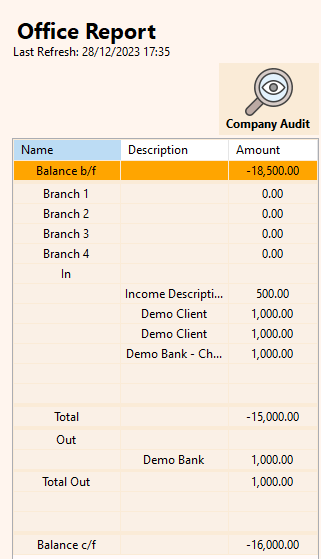
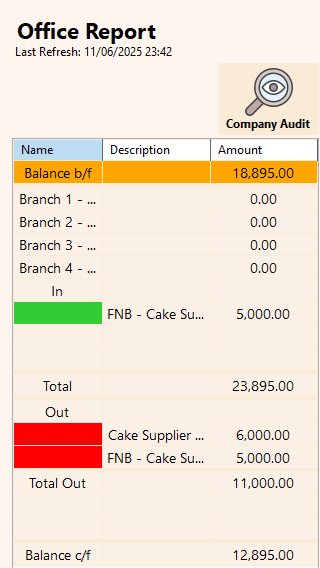
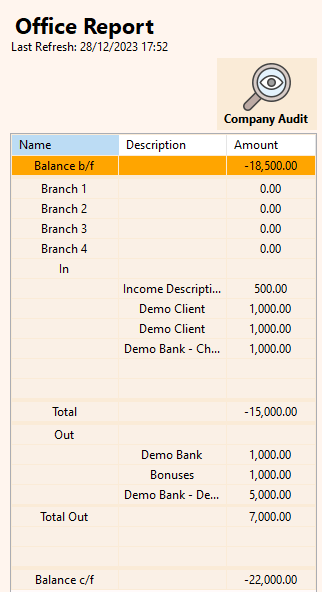
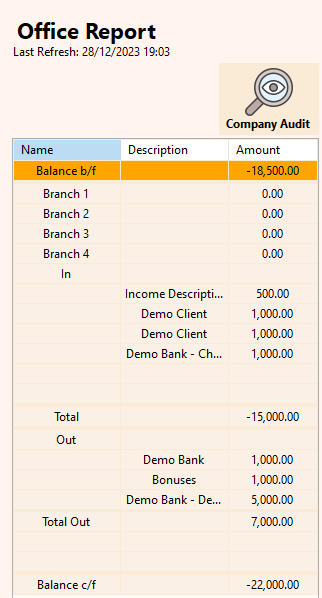
Office Reporting: Gain insights into your company’s financial health with the Office Reporting feature. This overview includes the company’s cash balance, providing the flexibility to assess financial performance on any given date. Detailed breakdowns encompass cash sales from branches/divisions, client payments, bank withdrawals, company cash income, company cash expenses, and bank deposits.
Branch-Level Performance: Navigate the performance of individual branches effortlessly. Obtain date-specific overviews, examining the types of clients (public, client, or stock transfer) and various sales types (cash, card, mobile, credit). This reporting also encompasses registered expenses for a comprehensive understanding of each branch’s financial and operational dynamics.
Additional Features in Office Reporting:
-
Audit Functionality: Perform a comprehensive audit to verify the accuracy of the company’s balance. The audit calculates all inflows and outflows within the company’s cash account for a thorough financial assessment.
-
Quick Search Capability: Conduct rapid searches on office cash transactions, facilitating efficient navigation and access to specific financial data.
-
Resync Function: Easily resync the page to retrieve the latest data. While the page doesn’t auto-refresh to conserve data usage, it can be customized to auto-refresh at specified intervals for real-time updates.
-
Printable Cash Account: Generate a printable copy of the company’s cash account, providing a tangible record for further analysis or documentation.
-
Printable Page Option: Create a printable copy of the entire page (screenshot), offering a snapshot of the current financial status for offline reference or reporting purposes.
-
Seen Status Feature: Owners can use the “Mark as Seen” option for expenses and office inflows/outflows, providing a convenient way to track reviewed entries. Administrators also have the capability to mark expenses as seen, with their designation displayed as an “x,” while owners’ marked entries are highlighted in yellow or blue, depending on the owner.
Stock
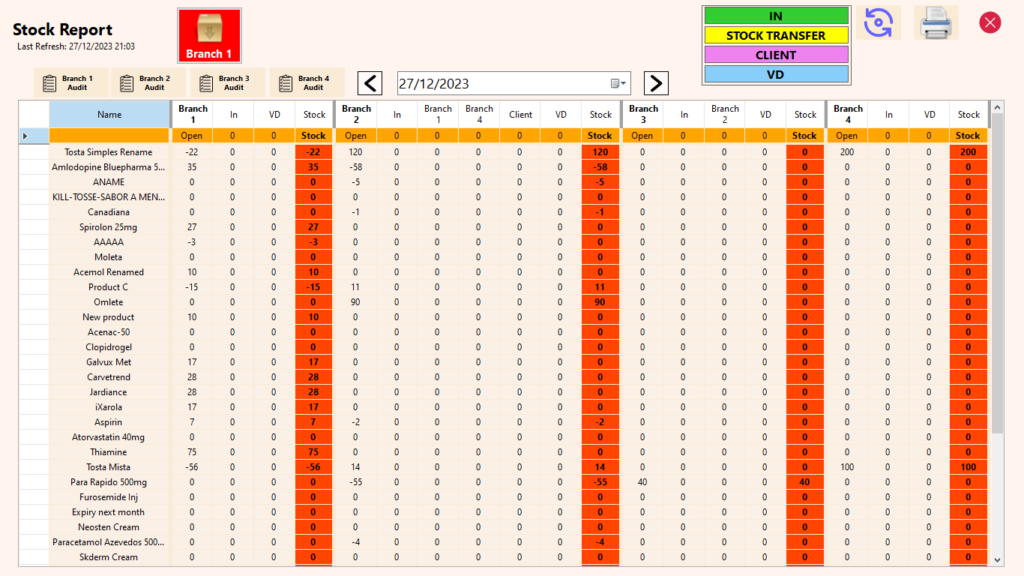
Stock Reporting: Navigate your company’s stock position effortlessly with the Stock Reporting feature. This comprehensive page provides a real-time overview of the stock position in every branch, allowing you to assess stock levels at any given date. Each branch’s stock report adheres to specific business rules (configurable in the company settings), governing sales permissions.
Key Features:
- Opening Balance: Displays the initial stock balance.
- Stock Entry (In): Tracks stock additions.
- Stock Outflows: Illustrates how stock was utilized – through public sales, specific client transactions, or stock transfers.
- Total Value: Highlights the total value for each case at the top row for each branch.
- Current Stock: Provides a snapshot of the current stock position.
- Stock in Transit: Represents stock being tracked when in transit between branches, displayed in red boxes.
- Confirmation Loop: The stock report doesn’t show stock entry (“In” column) for stock transfers until the receiving branch confirms receipt, closing the loop and ensuring accurate tracking even during transit.
This feature not only facilitates efficient stock management but also ensures compliance with branch-specific sales regulations defined in the company configuration settings.
Additional Stock Reporting Features:
Stock Audit: Conduct meticulous stock audits for each branch, verifying the accuracy of the stock in the system. This feature utilizes all transactions (in and out) to calculate the stock, ensuring precise and reliable stock information.
Resync Function: Similar to the office reporting, easily resync the stock page to fetch the latest data. While the page doesn’t auto-refresh to conserve data usage, it can be customized to auto-refresh at specified intervals for real-time updates.
Print Functionality: Utilize the print option to generate hard copies of the stock table, offering a convenient way to create physical records for audits, analysis, or documentation purposes.
Dashboard
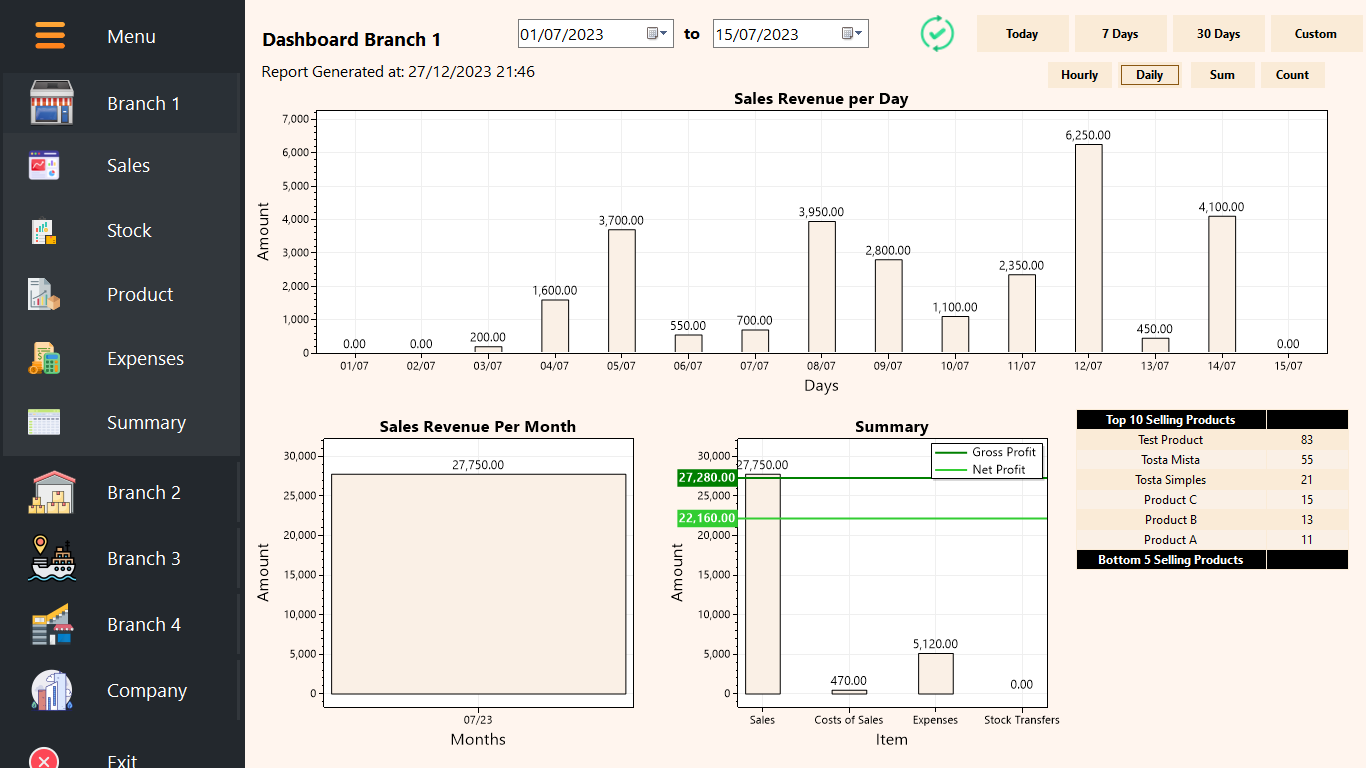
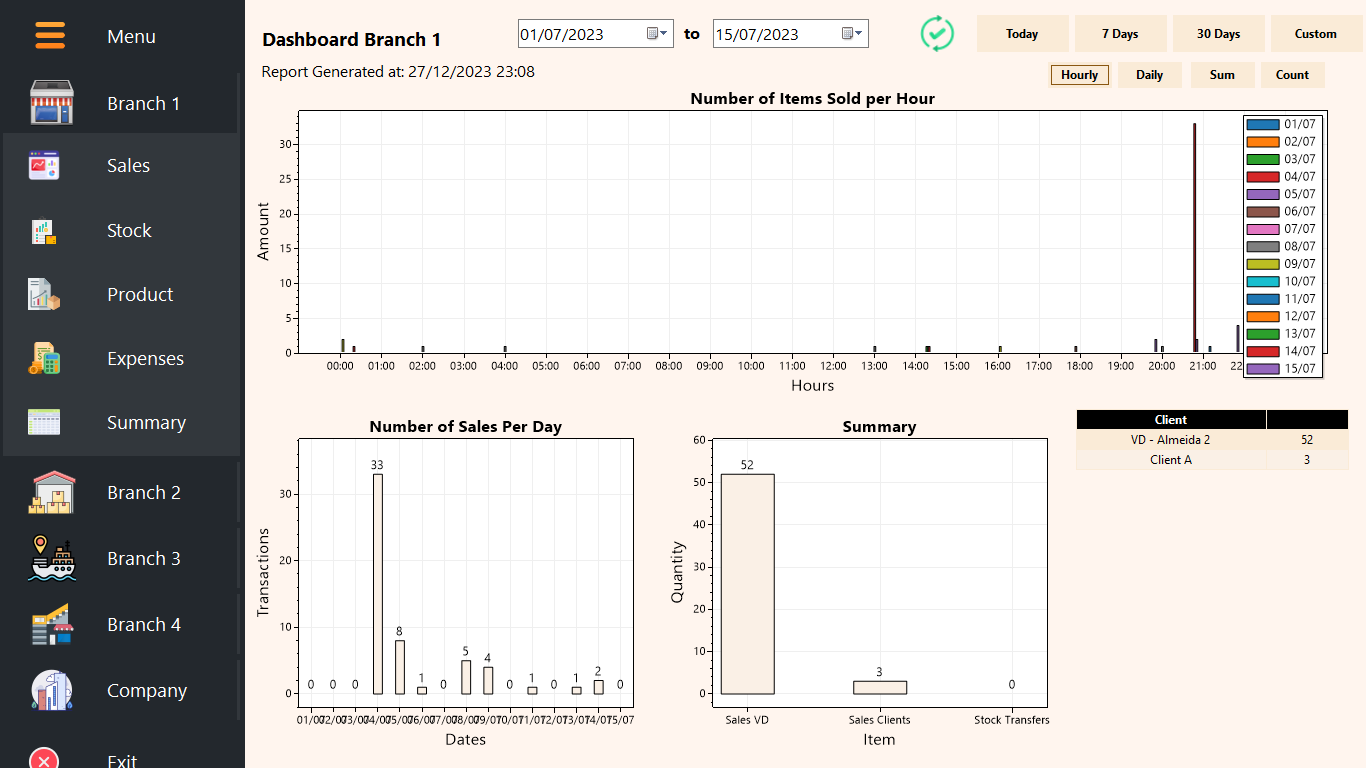
The Dashboard, an ever-evolving feature, continually incorporates new reports based on innovation, customer demand, and system usage. The key differentiator of the Dashboard lies in its analytical prowess, providing an aggregated overview at both the branch and company levels.
Key Features:
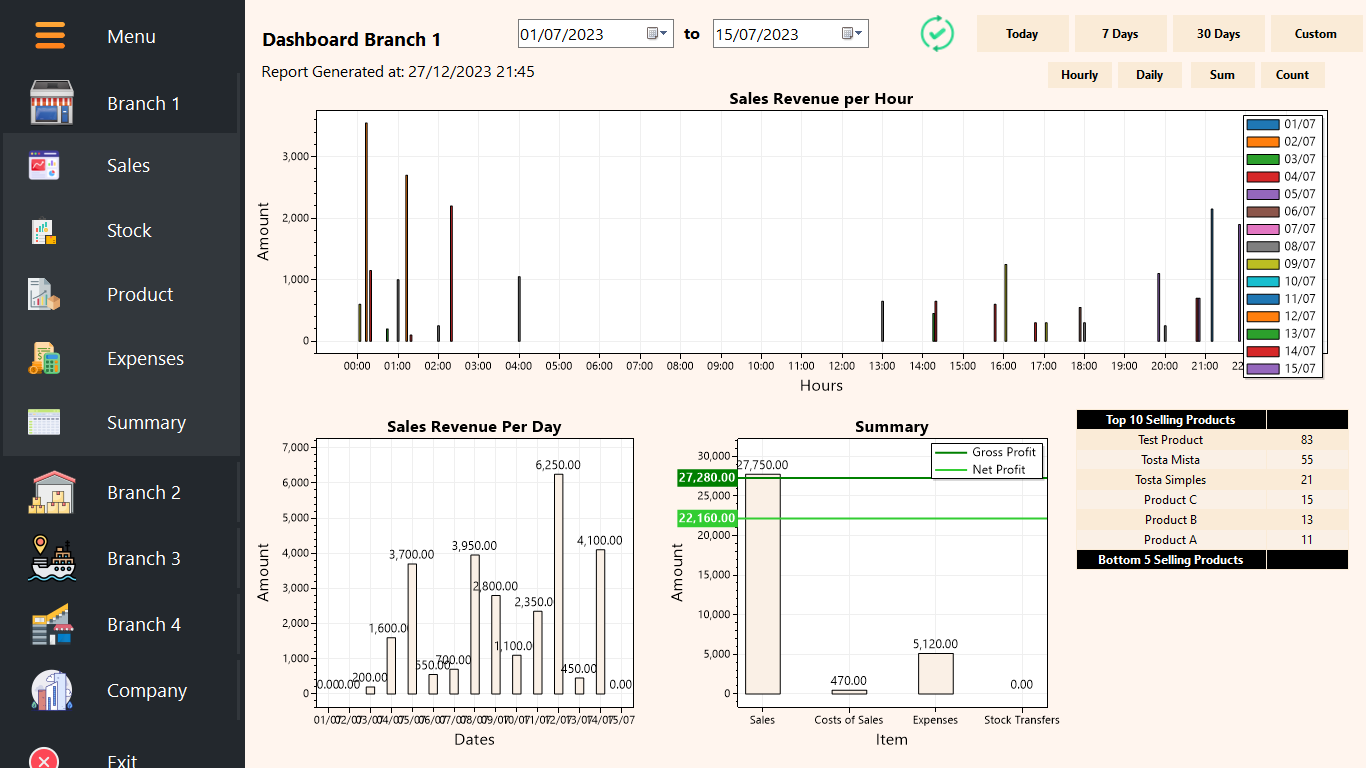
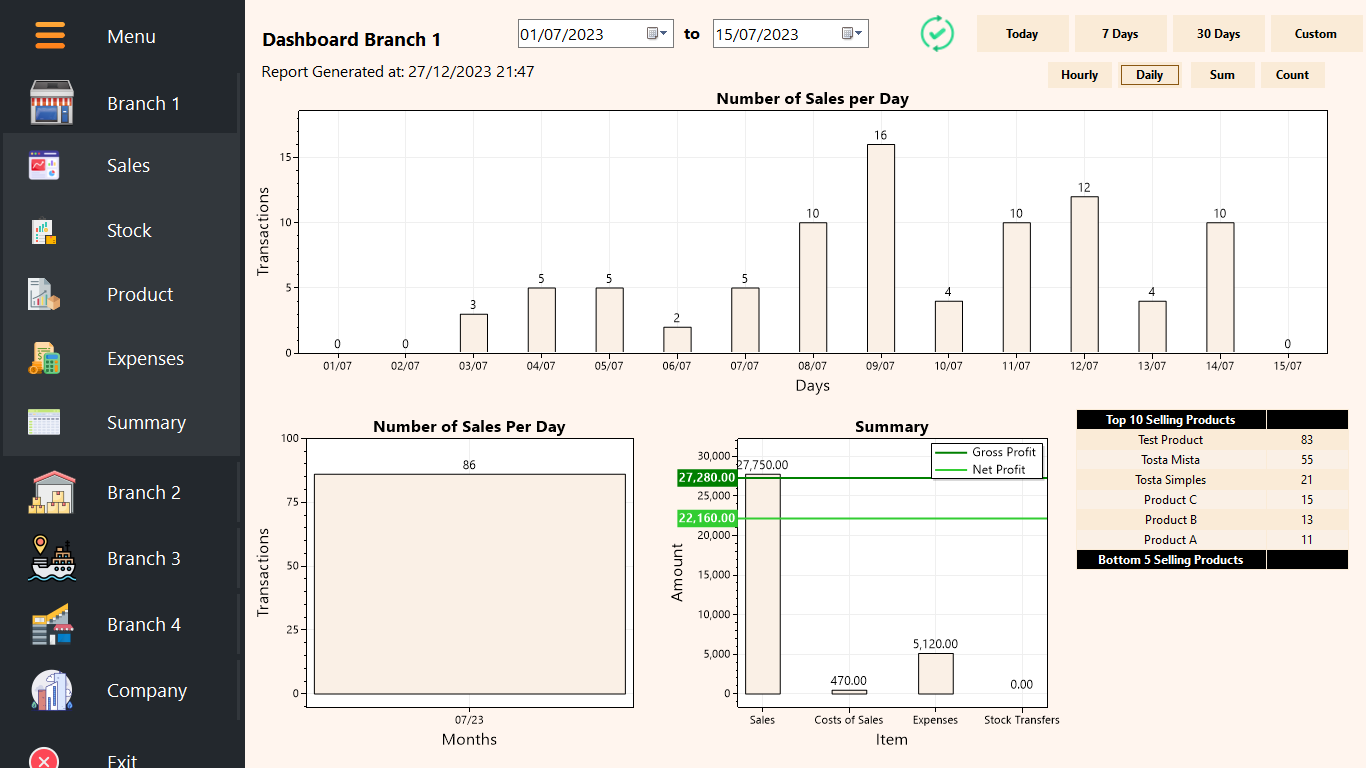
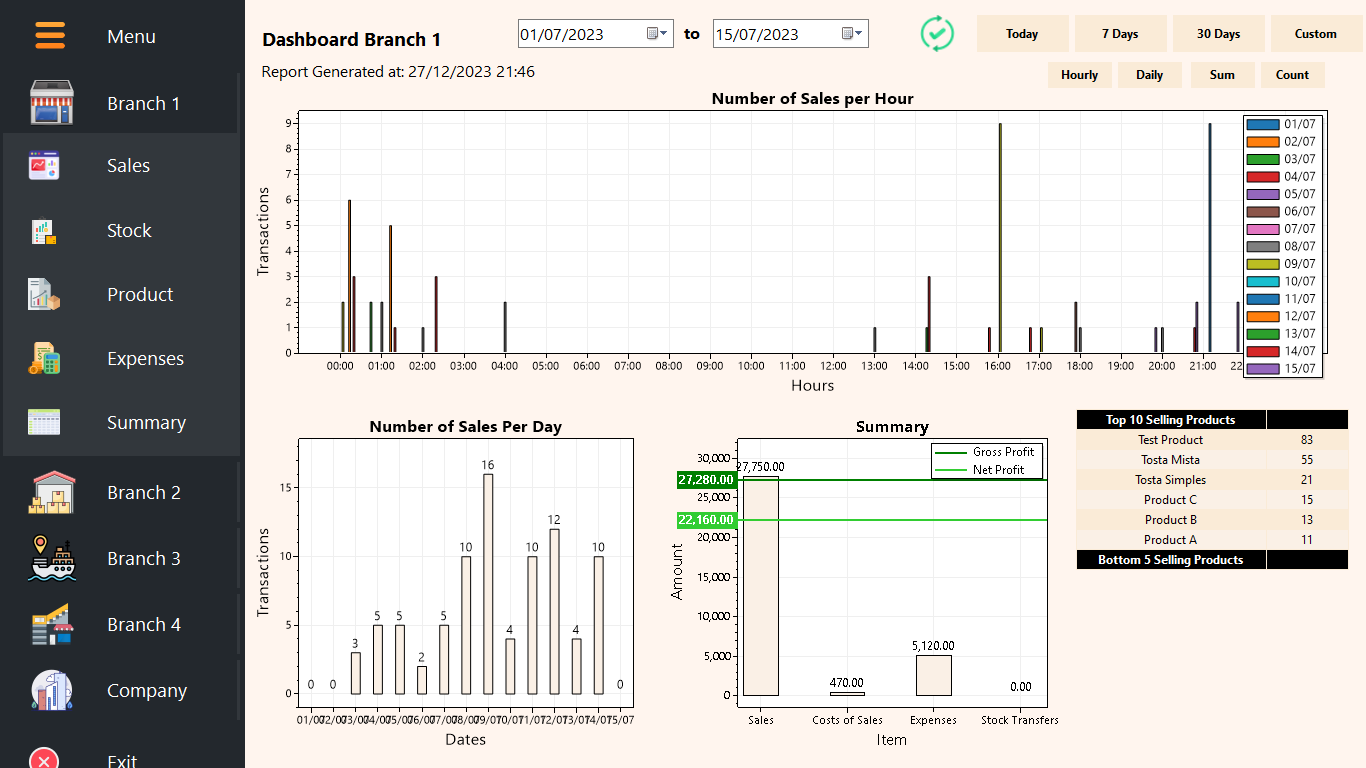
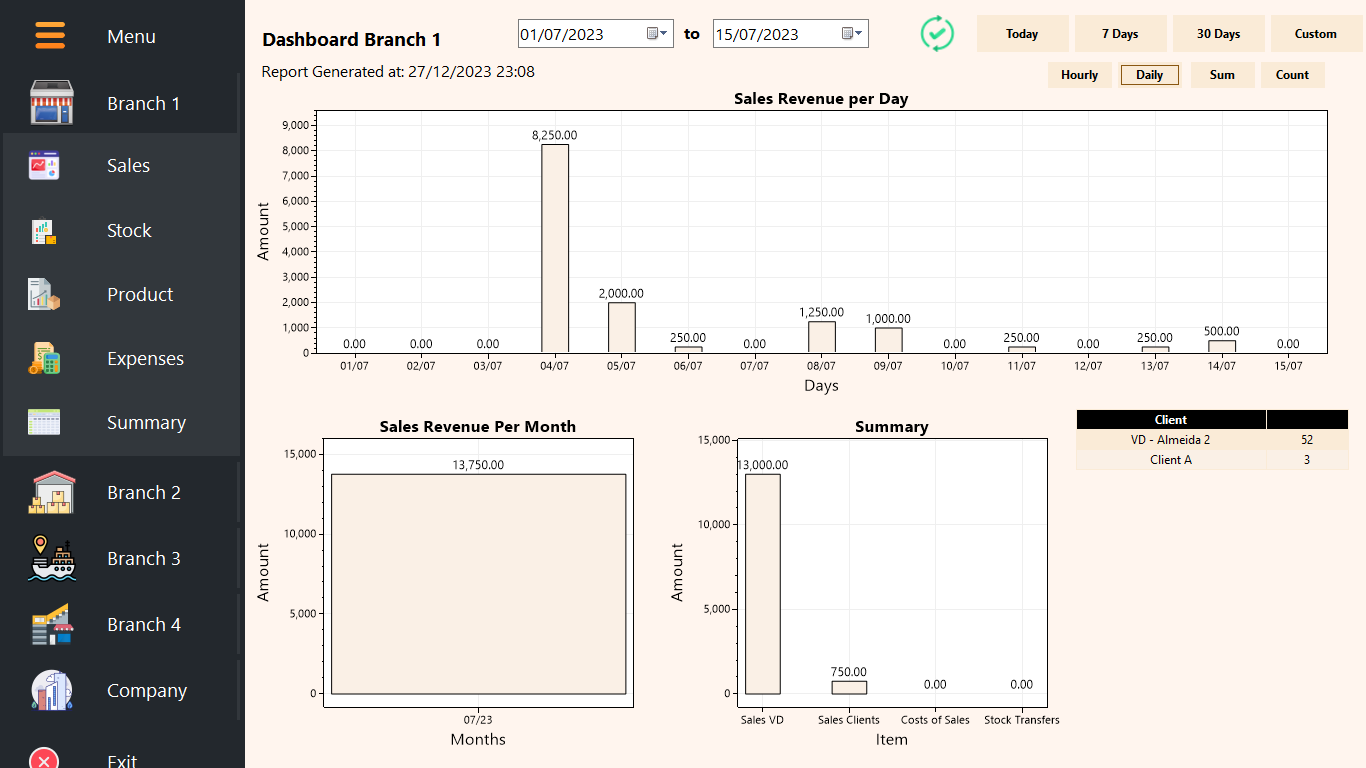
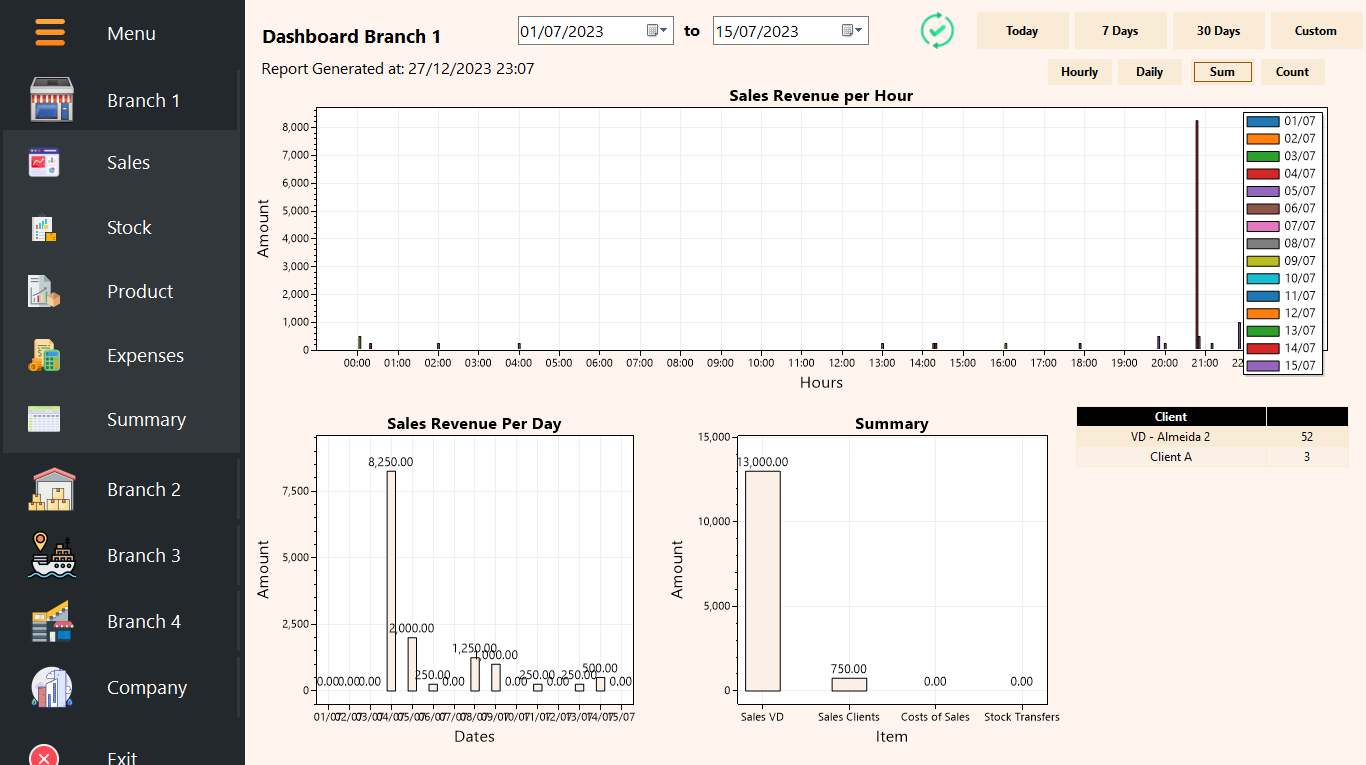
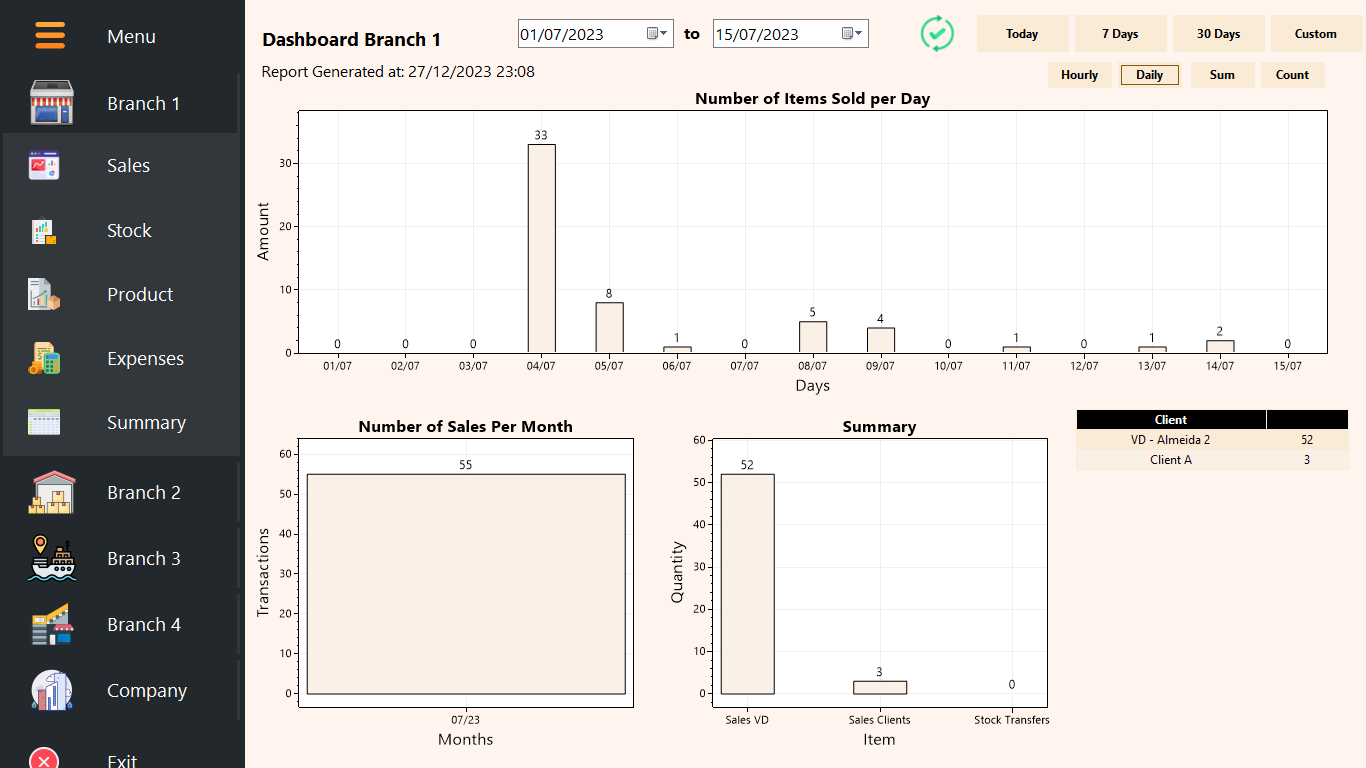
- Aggregated Overview: Unlike the Office and Stock features that provide specific date overviews, the Dashboard offers aggregated views over any number of days, providing hourly and daily insights. Summarizing data in both value and item counts, it allows for customization with today, 7 days, 30 days, and custom date ranges for aggregation.
Analytics Insights:
- Sales Analysis: Gain in-depth insights into sales performance.
- Stock Analysis: Analyze stock trends and levels over time.
- Product Analysis: Understand product performance and popularity.
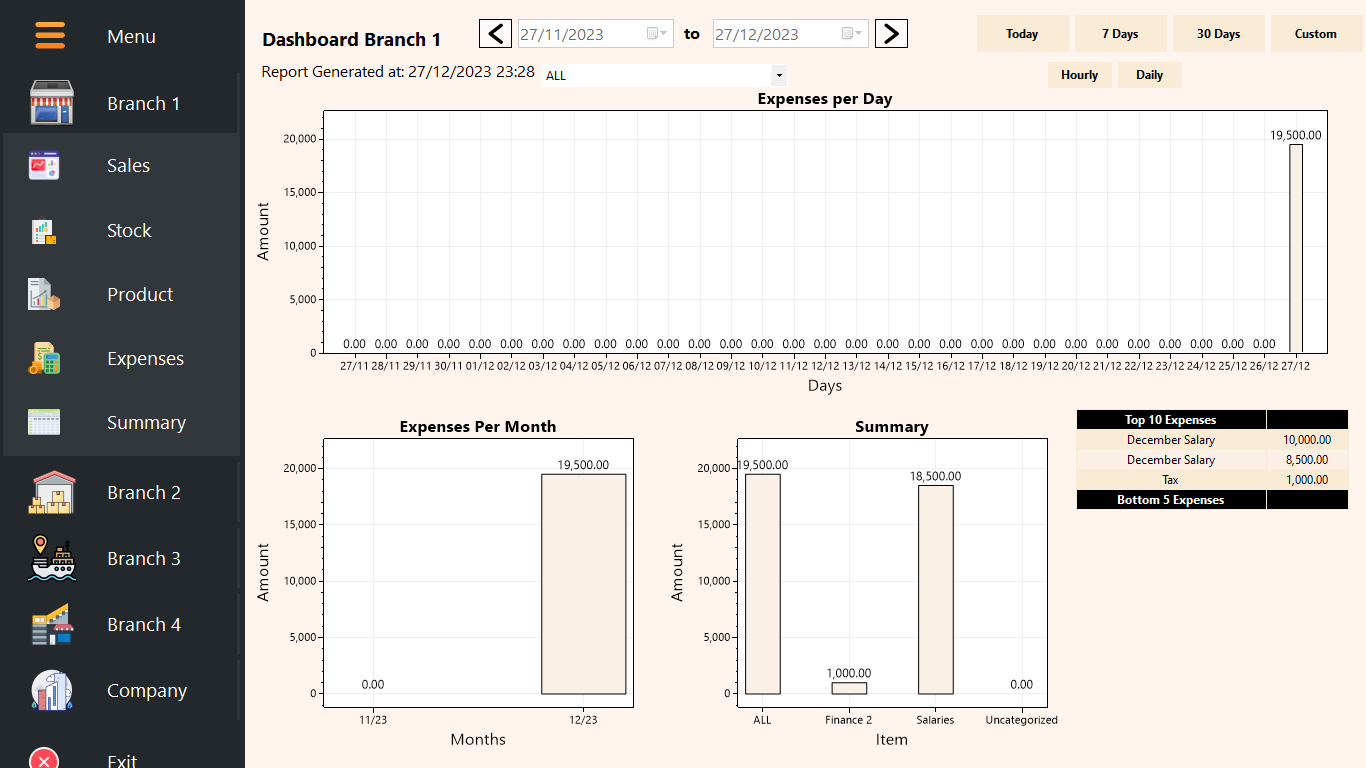
- Expenses Analysis: Track and analyze expenses patterns.
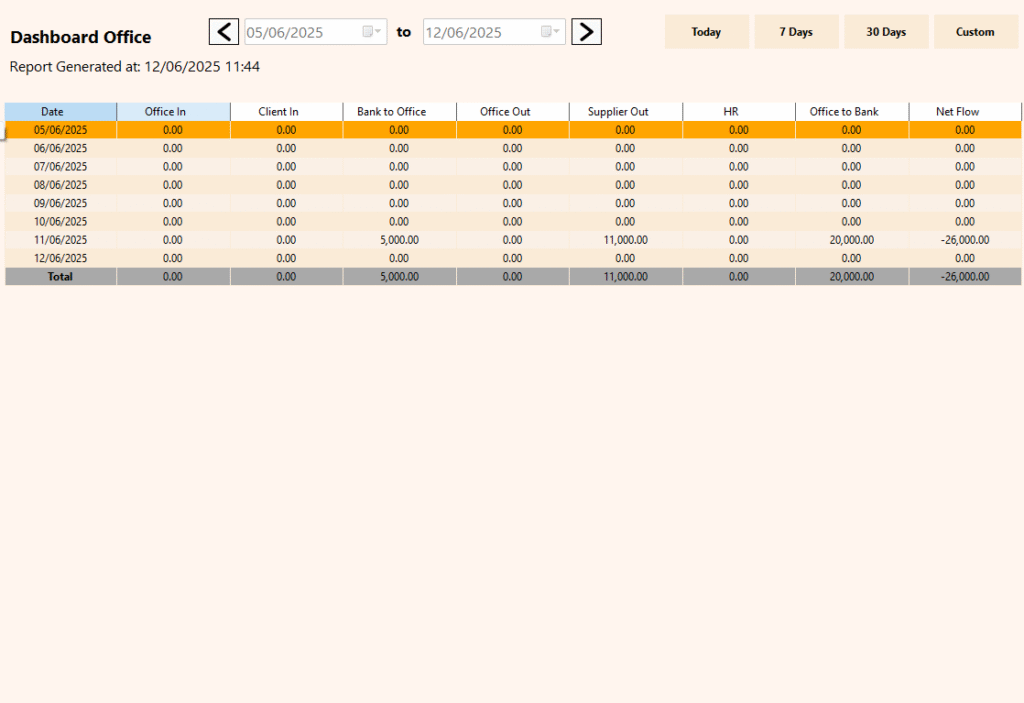
- Tabular Summary: Provides a summarized view of all ins and outs within the specified date range.
-
Office Cash Inflows
Analyze all incoming cash by category and sub-category, helping to understand the sources of income across the business. -
Office Cash Outflows
Review all outgoing cash, categorized and sub-categorized for detailed tracking of how money is being spent. -
Cashflow Summary
Get a clear overview of total inflows and outflows, showing the net cashflow within the selected date range which is critical for assessing liquidity and financial health.
Note: As of the current date (27.12.23), product categorical analysis, client analysis and a comprehensive company overview are in development and will be incorporated into future updates.
Additional Features for Graphs within the Dashboard:
Enhance your analytical experience with these versatile features for each graph within the Dashboard:
-
Copy and Paste as Image: Effortlessly capture and integrate graphs into external documents by copying and pasting them as images.
-
Save as Image: Store and archive graphs by saving them as images, providing a convenient way to track historical data.
-
Zoom to Fit: Optimize your viewing experience by zooming graphs to fit your preferred level of detail and analysis.
-
Open in New Window: Elevate visual clarity by opening each graph in a new window, facilitating better visualization and in-depth analysis.
Sales Report
The Sales Report within the Dashboard offers a comprehensive overview of aggregated sales, presenting insights by hour, day, or month for the selected date range.
Key Features:
Aggregation Options: Explore sales data aggregated over specific periods—hour, day, or month—offering a nuanced understanding of sales patterns.
Key Metrics: Gain valuable insights into key financial metrics, including total sales, total cost of goods sold, total expenses, total stock transfers, gross profit, and net profit values.
Product Performance Insights: Identify trends with a focus on the top 10 and bottom 5 moving products, providing actionable insights into product performance and market dynamics.
This Sales Report serves as a dynamic tool within the Dashboard, empowering users with detailed analytics for informed decision-making.
Note: The upcoming update will include the integration of VAT information into the Dashboard, further enhancing the depth of financial analysis.
Stock Report
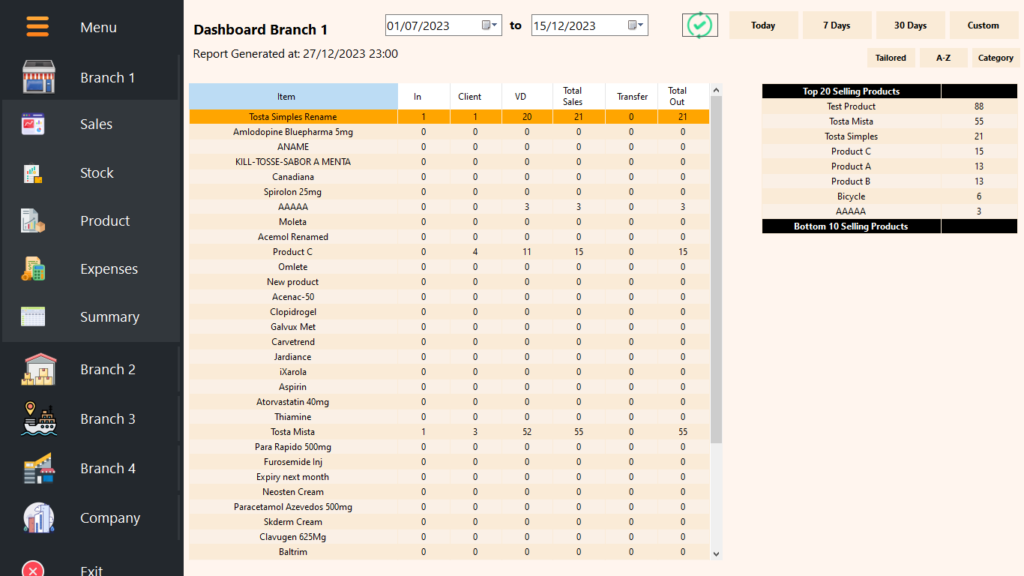
Mirroring the comprehensive Stock Report under Reporting, the Dashboard’s Stock Report offers an aggregated perspective over today, 7 days, 30 days, or custom date ranges. It provides a detailed overview of stock movements, encompassing opening balances, stock entries, stock outflows, total values, and current stock levels.
Key Features:
Aggregation Options: View stock data aggregated over specific periods—today, 7 days, 30 days, or custom date ranges—for a holistic understanding of stock dynamics.
Top 20 and Bottom 10 Sellers: Gain valuable insights into product performance with a focus on the top 20 and bottom 10 selling items, offering a snapshot of stock trends.
Additional Features for Stock Report within the Dashboard:
Enhance your analytical capabilities and tailor your view with these additional features:
Sortable Columns: Effortlessly organize and analyze data by making every column in the stock table sortable. This flexibility ensures a customizable and user-friendly experience.
Tailored Sorting Options: Customize your product sorting preferences with options for alphabetical, categorical, or a tailored view. This feature, configured in the system settings, allows you to adapt the presentation of products to match your specific business needs.
Product Report
The Product Report in the Dashboard facilitates in-depth analysis of individual products, mirroring the structure and aggregation options of the Sales Report.
Key Features:
Aggregation Options: Utilize the same aggregation options as the Sales Report—hour, day, or month—providing flexibility for detailed product performance analysis.
Comprehensive View: Obtain a detailed view of an individual product’s performance, serving as a focused counterpart to the broader Sales Report.
Sales Differentiation: Highlight how the product was sold, distinguishing between public sales and client transactions. Additionally, track the quantity sent to another branch for comprehensive insights.
Client-Specific Purchases: Gain visibility into client-specific purchasing behavior, showcasing how much of the product was bought by each specific client.
This Product Report is a powerful tool for dissecting the performance of individual products within the broader sales landscape, offering nuanced insights into sales strategies and client preferences.
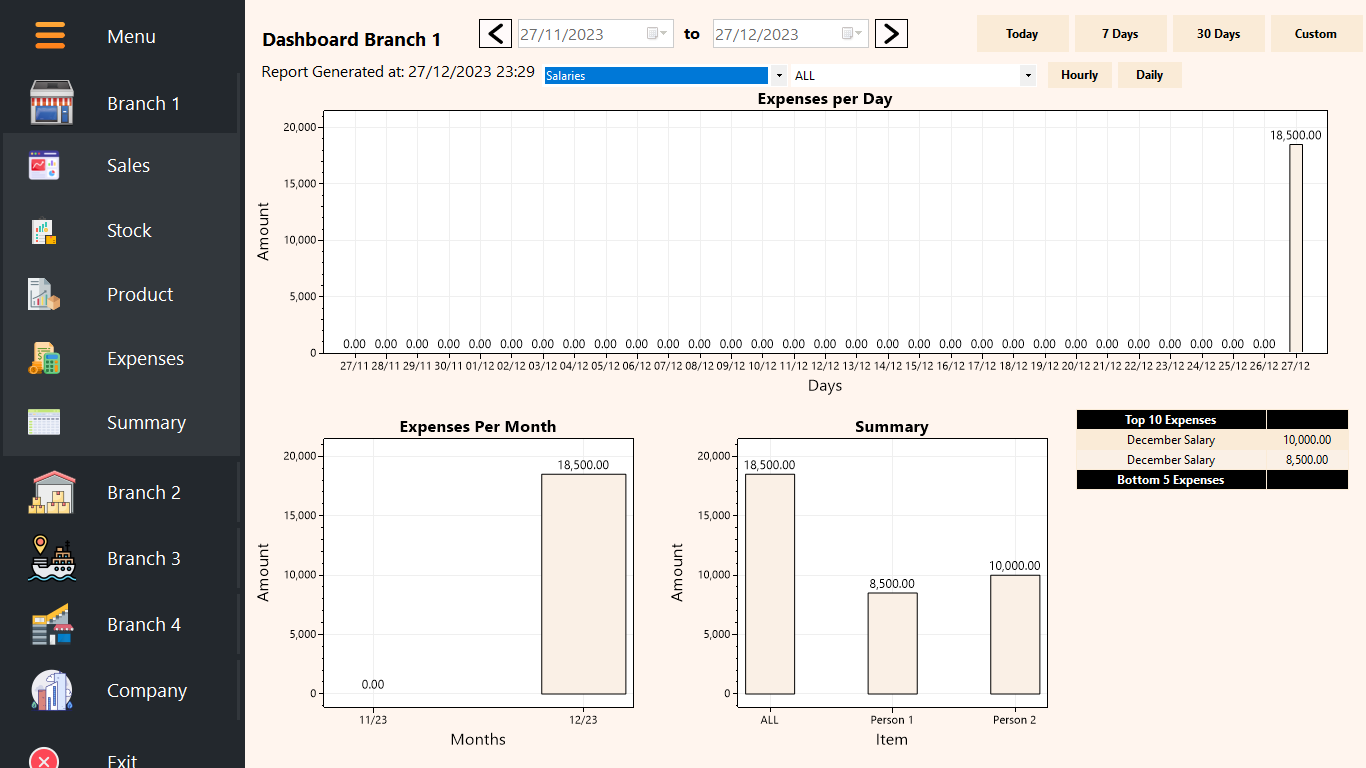
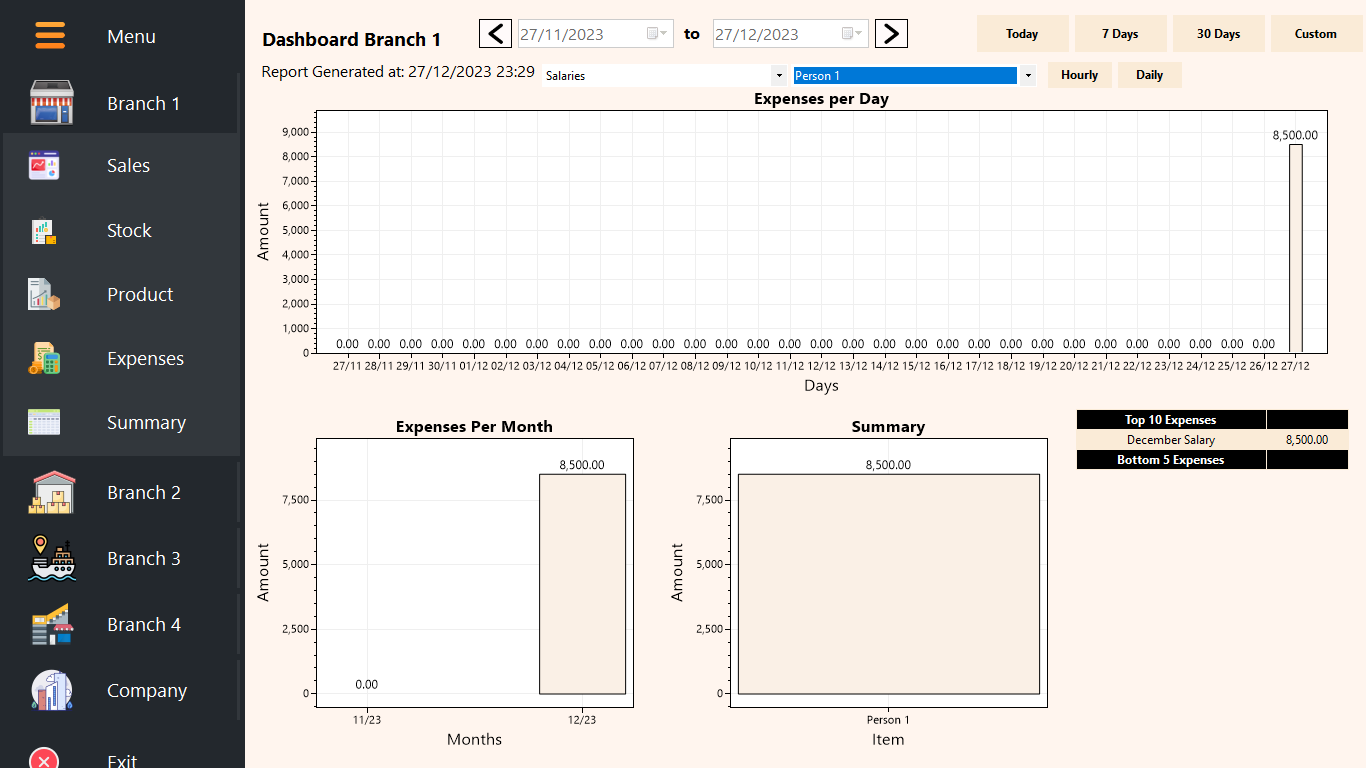
Expense Report
The Expense Report in the Dashboard offers a comprehensive view of all expenses, with options for both categorical and sub-categorical analysis.
Key Features:
Aggregation Options: Leverage the same aggregation options—hour, day, or month—providing a versatile approach to expense analysis.
Holistic Expense Overview: Gain insights into all expenses, providing a complete and detailed picture of financial outflows.
Categorical and Sub-Categorical Views: Analyze expenses categorically and explore sub-categorical breakdowns, offering a granular understanding of where resources are allocated.
Top 10 and Bottom 5 Expenses: Identify trends and areas of focus with a summary of the top 10 and bottom 5 expenses, facilitating strategic financial decision-making.
This Expense Report serves as a valuable tool within the Dashboard, empowering users with a comprehensive understanding of financial allocations and highlighting areas for optimization.
Summary Report
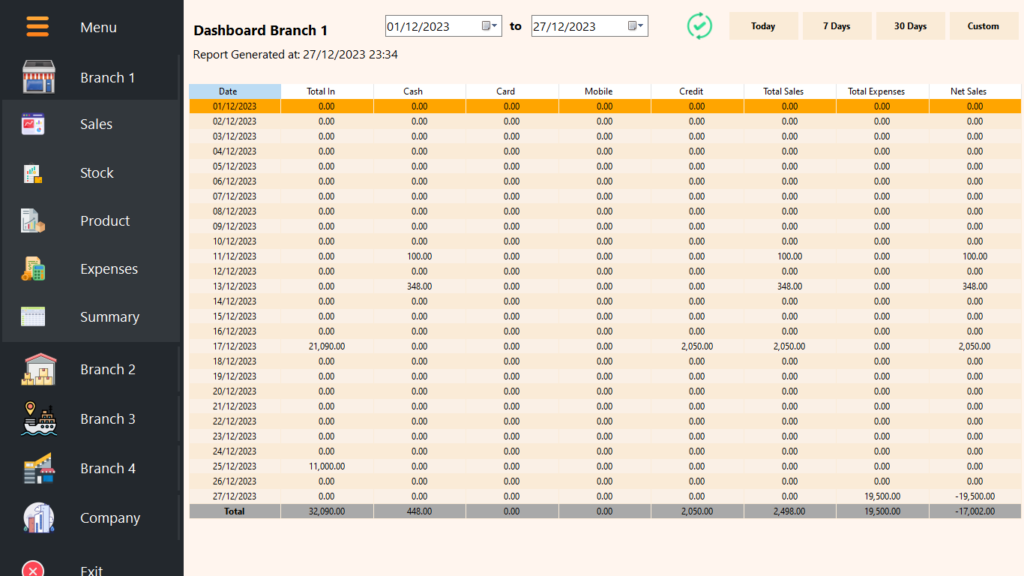
The Summary Report in the Dashboard provides a concise tabular overview, capturing key financial metrics with aggregation options for today, 7 days, 30 days, or custom date ranges. Key features include:
Total Stock Entry: Track the total stock entry for each day, offering insights into inventory management and stock movement.
Total Sales Breakdown: Explore total sales categorized by method of payment, providing a detailed breakdown of revenue sources.
Total Expenses: Understand the total expenses incurred each day, providing visibility into financial outflows.
Net Sales Calculation: Automatically calculate net sales per day by subtracting total expenses from the sum of total stock entry and total sales.
Total of Totals: Summarize the grand totals for each column per day, providing an aggregate view of daily financial activities.
This Summary Report serves as a versatile tool for quickly assessing daily financial activities within the Dashboard, allowing for dynamic analysis based on different timeframes.
Company Report
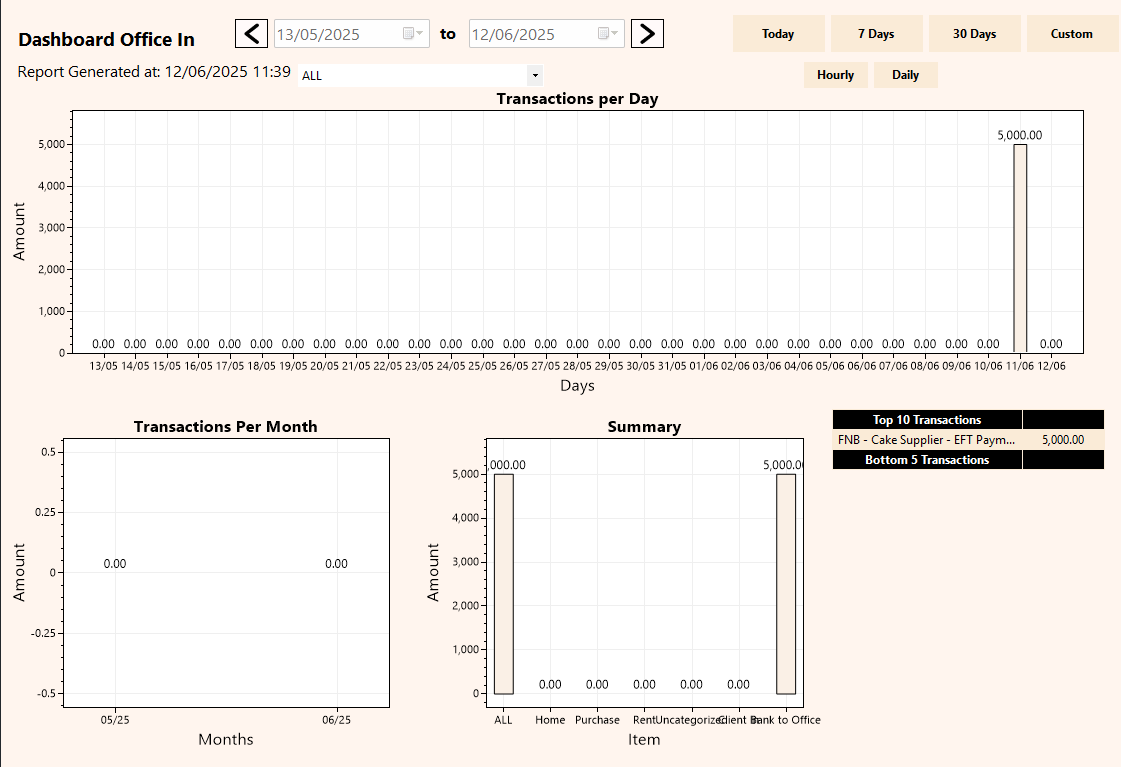
In addition to transaction and performance metrics, the dashboard provides a focused view of cash movement within the business. Understanding where money comes from and how it is spent is essential for maintaining financial control. This section is divided into three parts: Office Cash Inflows, Office Cash Outflows, and a Cashflow Summary. These tools allow users to track cash by category and sub-category, identify spending patterns, and get a clear picture of overall cash movement during a selected period. This helps ensure better planning, budgeting, and financial decision-making.
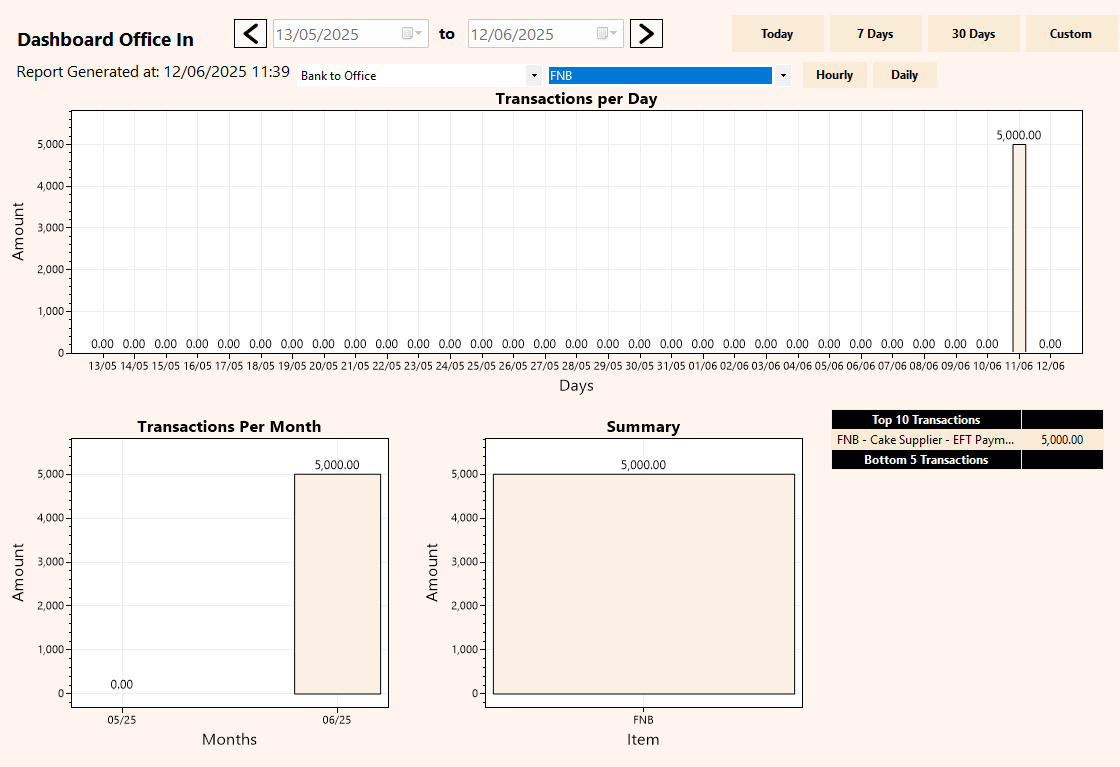
Office In
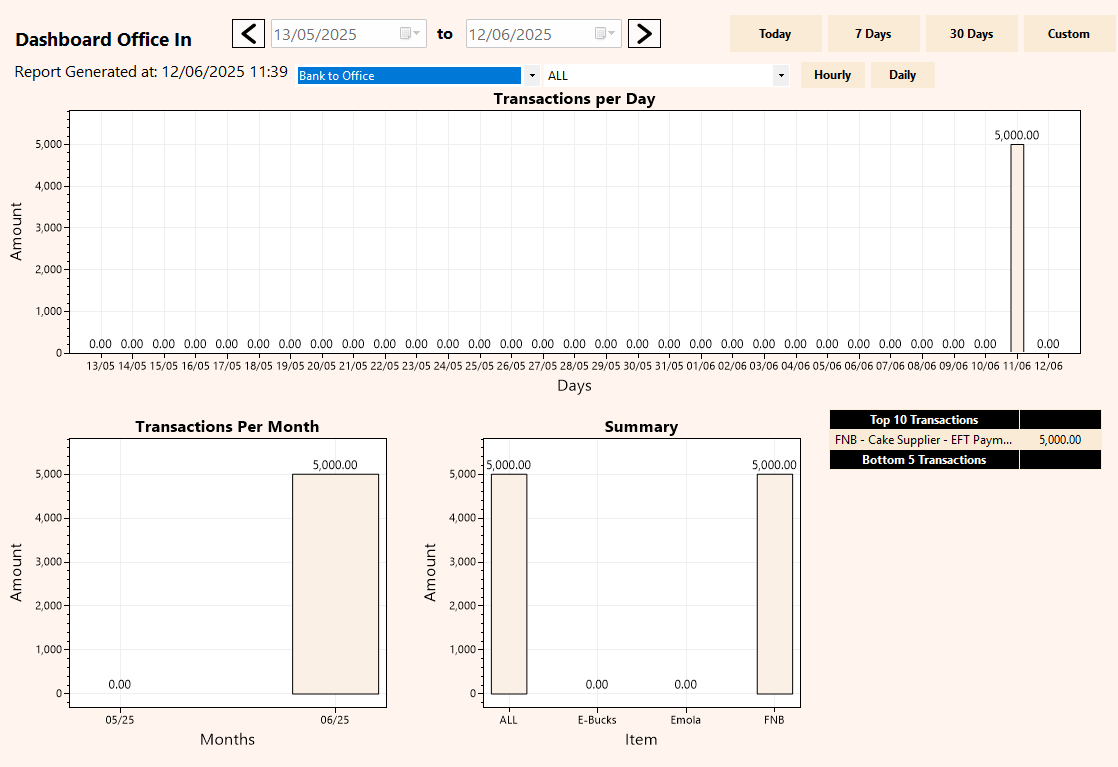
The Office Cash Inflows section provides a detailed analysis of all incoming cash recorded under office-related categories and sub-categories. Users can explore inflows at three levels: the overall total, by specific category, or by sub-category. The analysis can be filtered by any time range, offering a clear view of how funds enter the business over time. Totals and trends are displayed consistently with previous dashboard views, helping identify which areas contribute most to cash inflow.
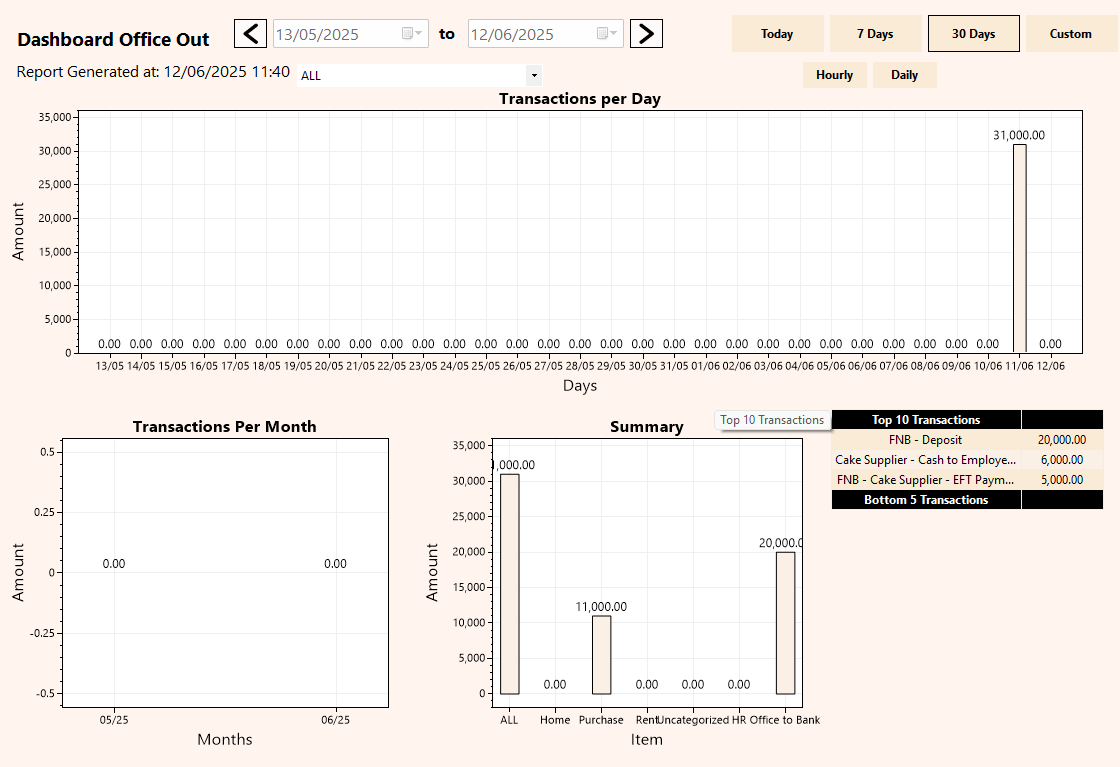
Office Out
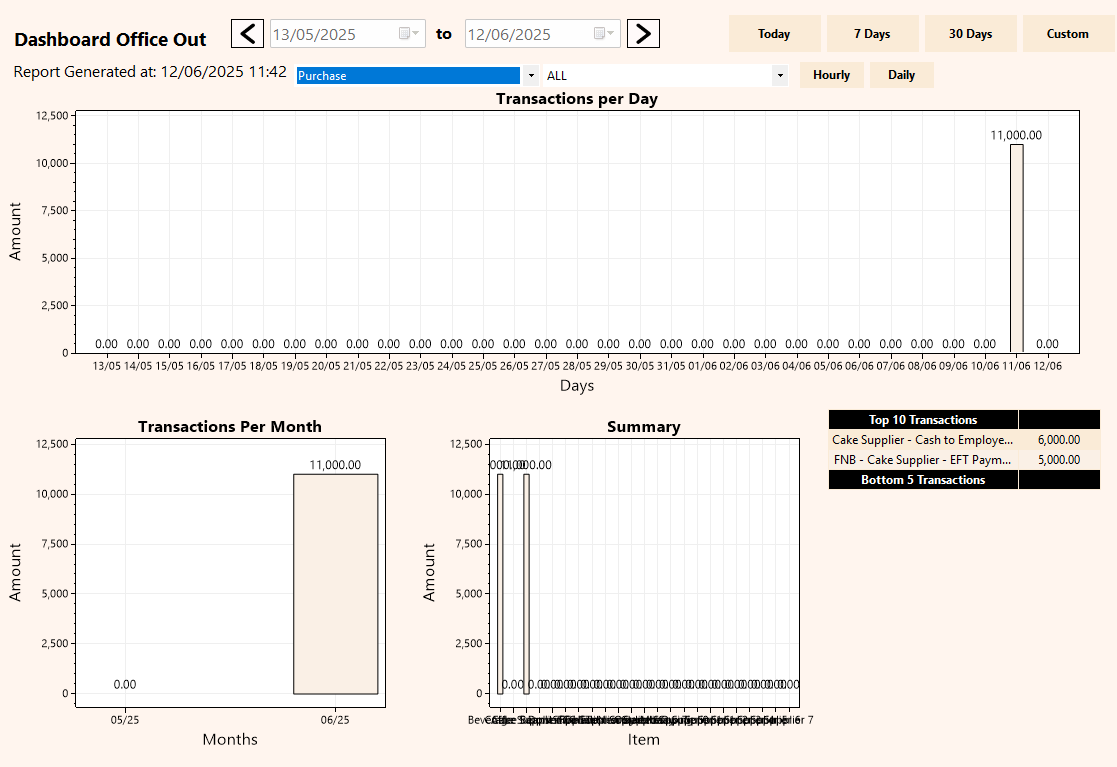
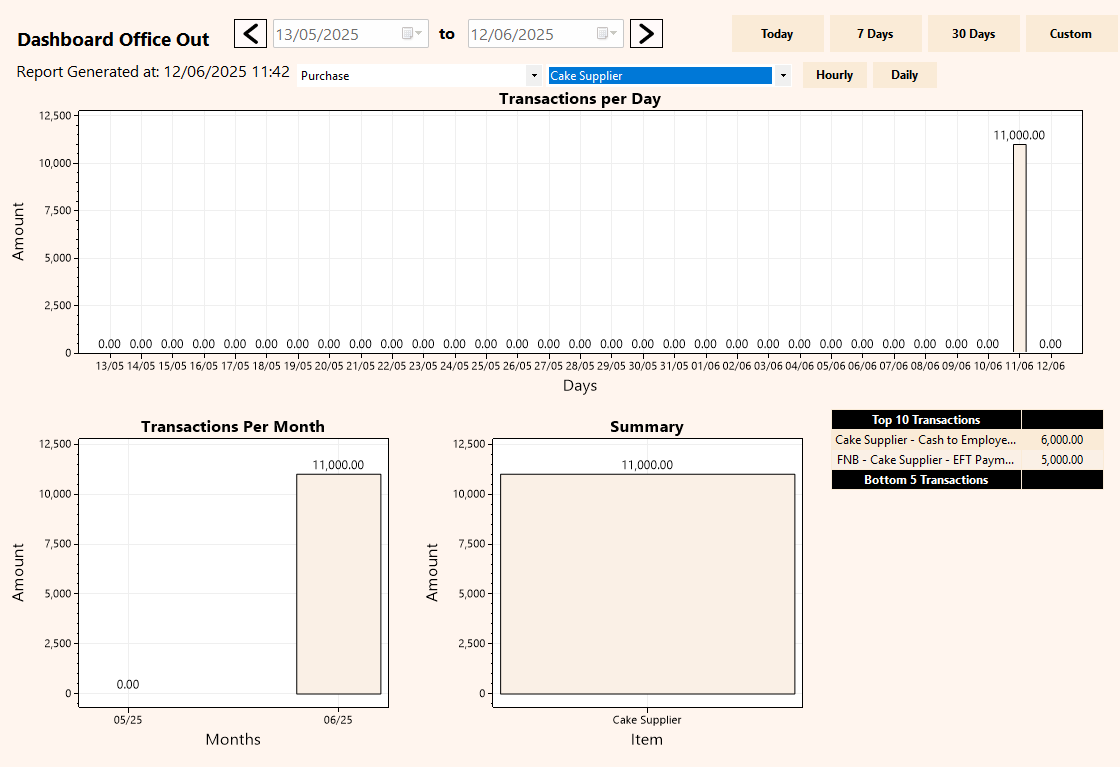
The Office Cash Outflows section mirrors the inflow analysis, but focuses on all outgoing cash related to office expenses. It breaks down spending by category and sub-category, allowing for a full overview or a more detailed look at specific areas. Users can filter by custom time ranges to see exactly where and when cash is being spent. This helps in tracking cost centers, identifying unusual expenses, and optimizing resource allocation.
Summary
The Cashflow Summary section presents a day-by-day breakdown of all inflows and outflows within the selected date range. For each date, the system shows the total cash received, total cash spent, and the resulting net cashflow. This summary gives a concise yet powerful overview of the business’s liquidity and financial movement over time, supporting accurate budgeting and financial forecasting.
Additional Feature for Summary Report within the Dashboard:
- Data Analysis Compatibility: Effortlessly transfer your financial data into external analysis tools, such as Excel, by copying and pasting the summary table. This feature enhances flexibility and facilitates further in-depth analysis using your preferred data analysis software.
Office
The Office Module serves as the central hub for orchestrating the company’s financial transactions. While it doesn’t display data directly, it acts as the primary source where crucial feeding occurs, capturing and managing cash inflows (cash incomes, client debt payments, bank withdrawals) and outflows (cash expenses, bank deposits). This foundational role ensures accurate financial reporting and analysis throughout the One Click POS system.
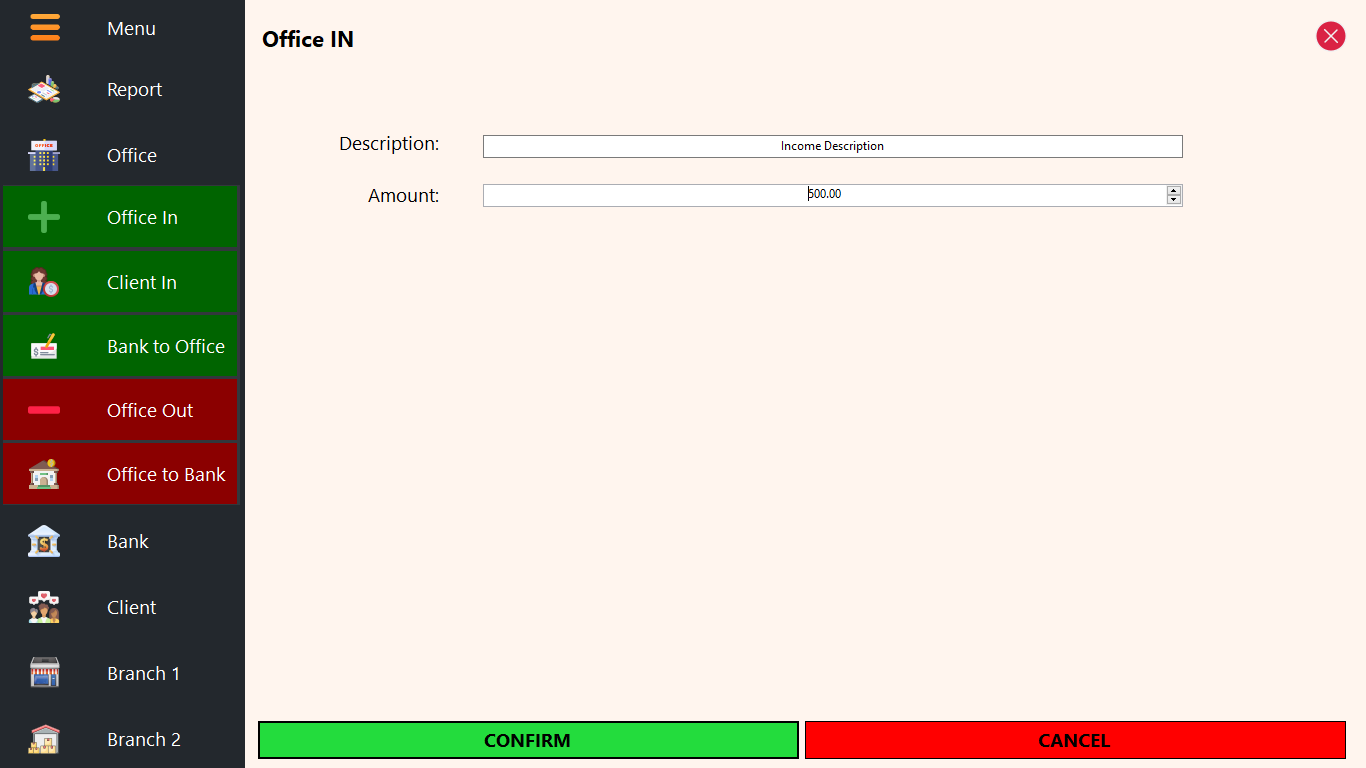
Office In
Office In serves as the entry point for any cash inflows into the company, distinct from branch-level transactions. This feature accommodates various types of incomes, returns on investment, or any cash influxes to the company. Users can enhance record-keeping by adding descriptions, providing clarity on the purpose and nature of each entry. Office In within the Office Module ensures meticulous tracking and documentation of all incoming financial resources at the company level.
Client In
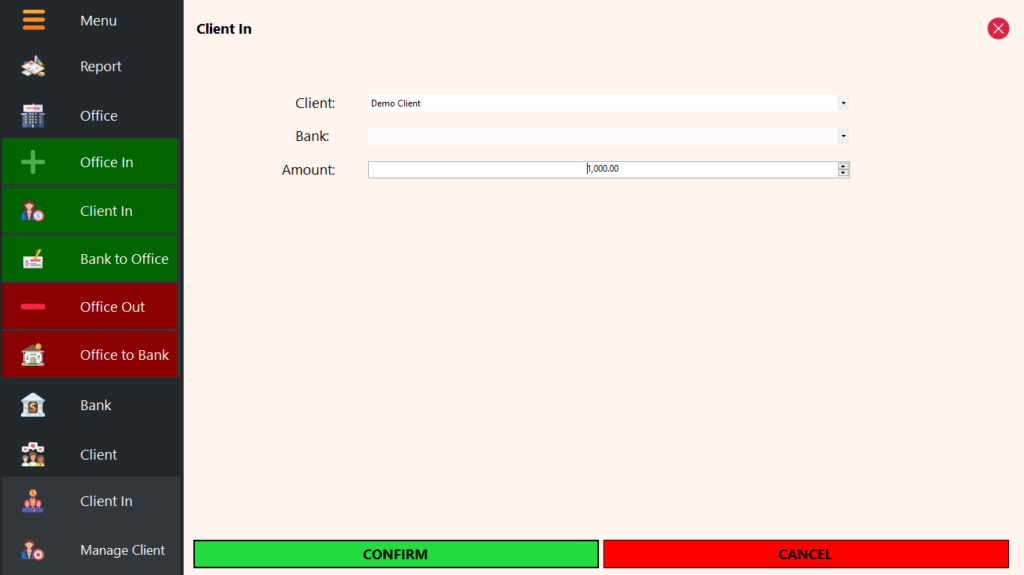
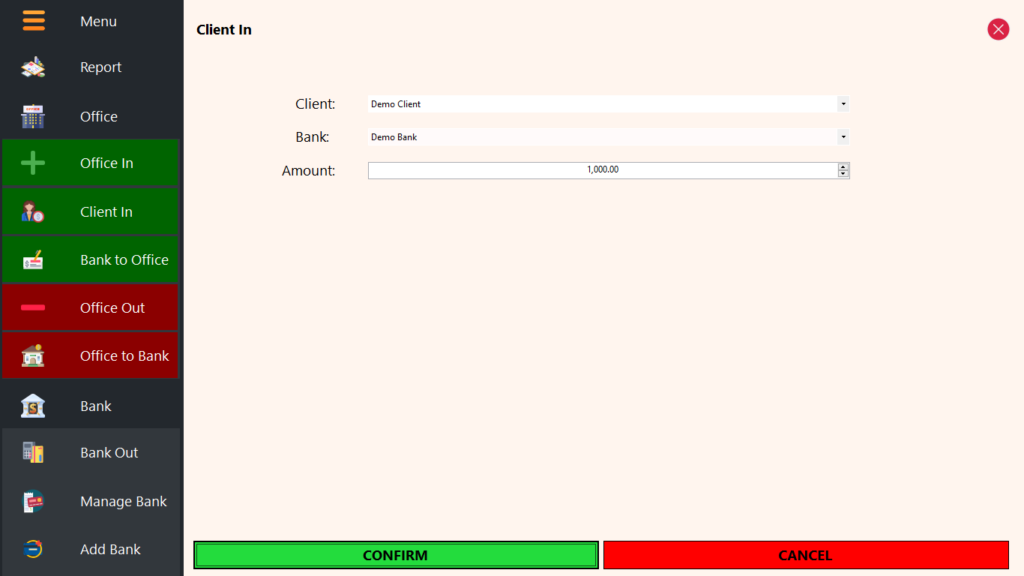
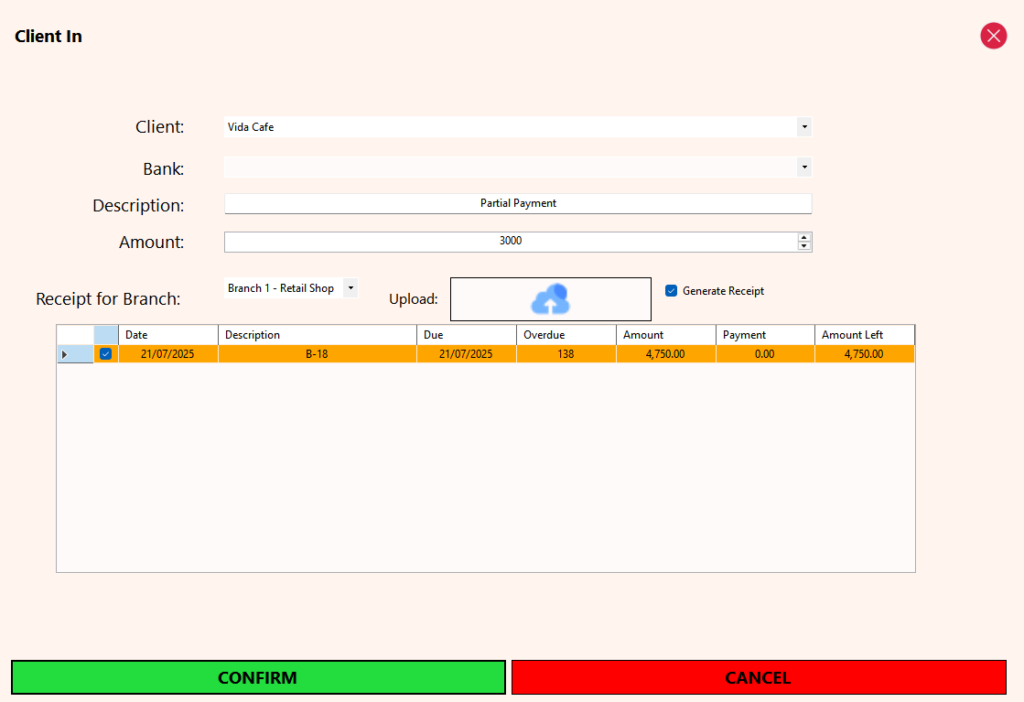
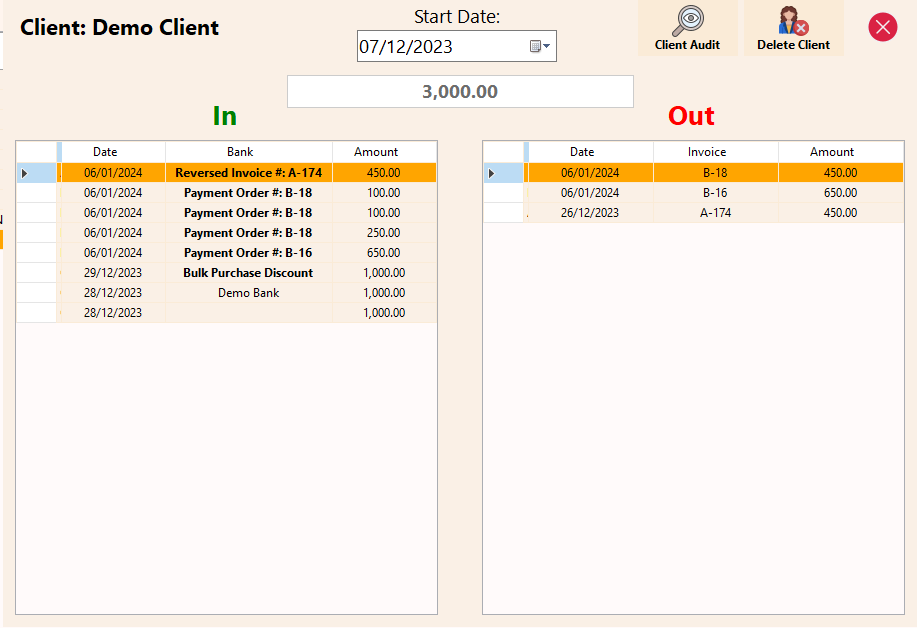
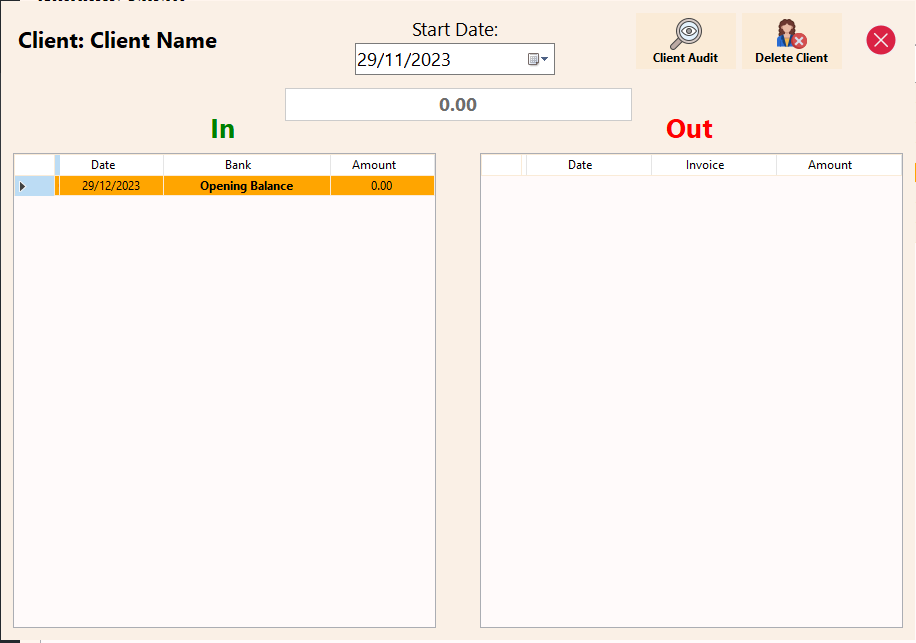
Client In captures transactions when a client, having made a purchase on credit from a branch, proceeds to make a payment. This feature is essential as client accounts are managed at the company level. When a client settles their account, the Office Module is updated, reflecting the payment in both the company’s cash account and the client’s individual account. If the client pays in cash, it is seamlessly added to the company’s cash account as an inflow. For transactions involving card, EFT, or bank deposit, transparency is ensured by categorizing them as cash inflows to the company account, subsequently recording them as outflows to the associated bank account for accurate and transparent financial tracking. Additionally, clients have the flexibility to leave deposits in their account for future purchases, adding a layer of convenience beyond straightforward invoice payments.
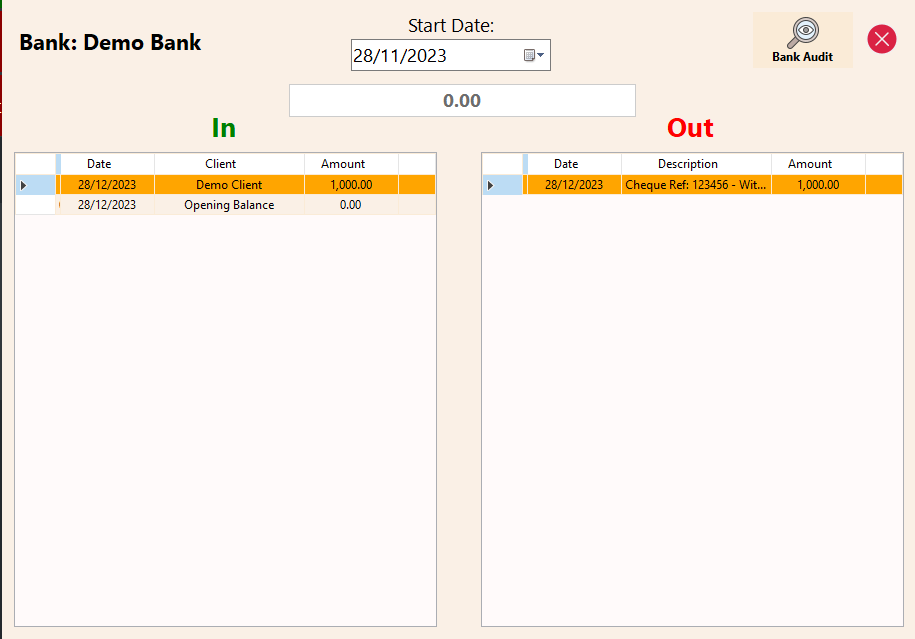
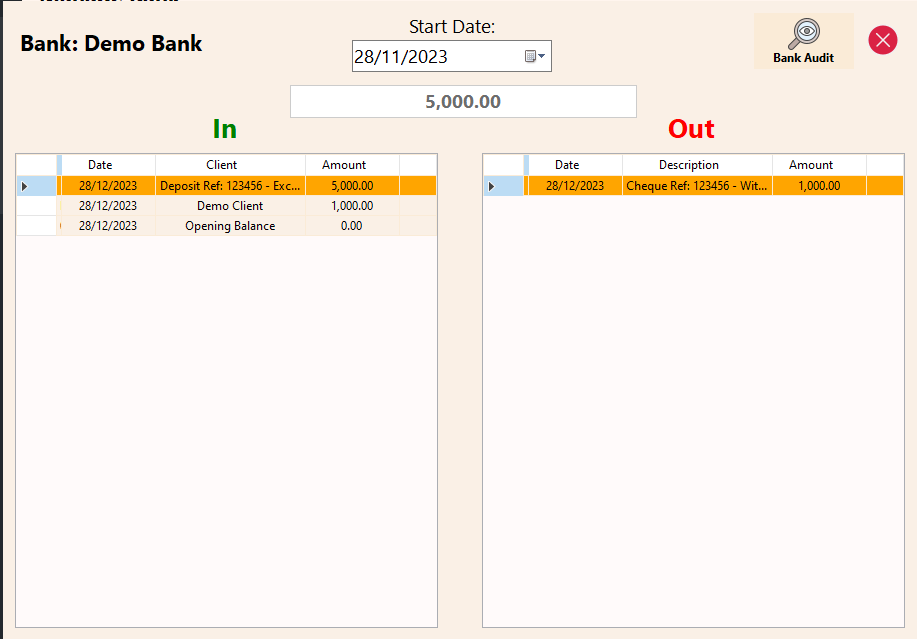
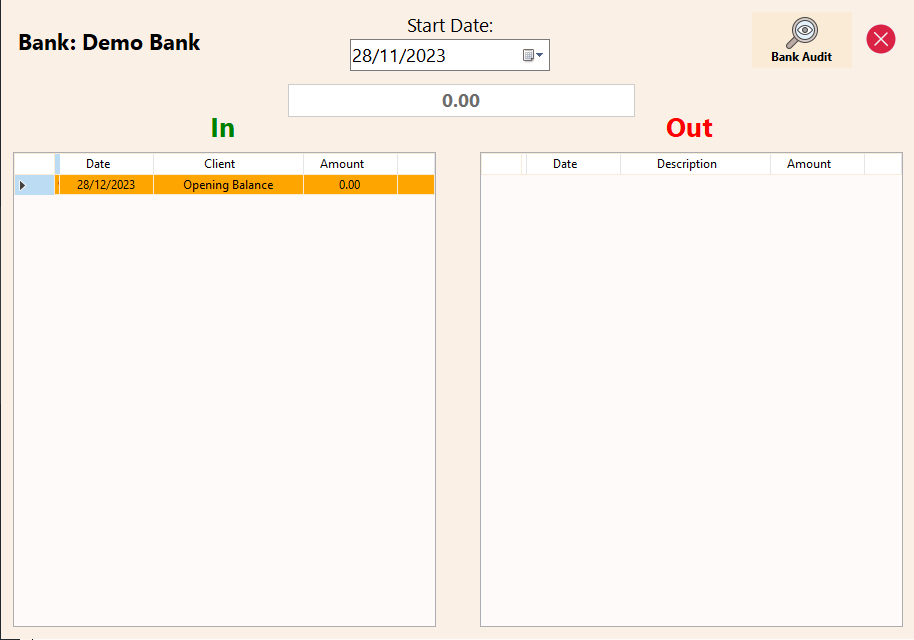
Note: Demo Client & Bank were with opening balance of 0.
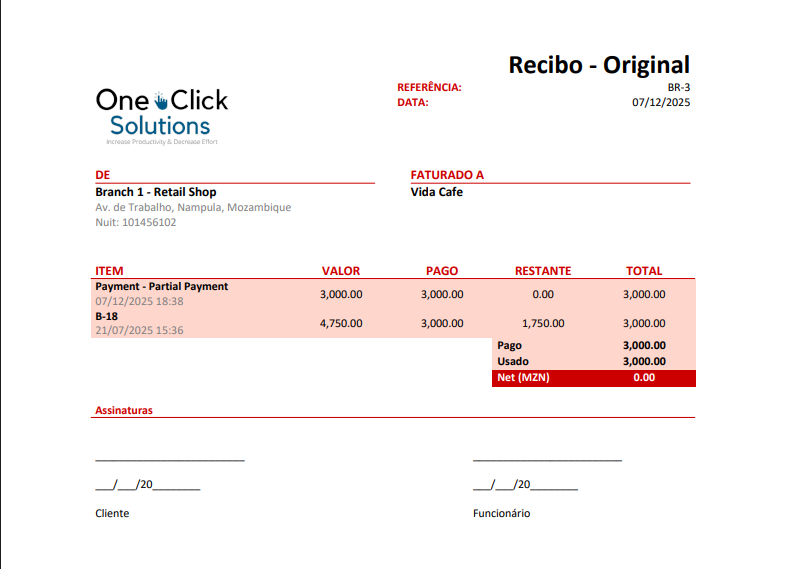
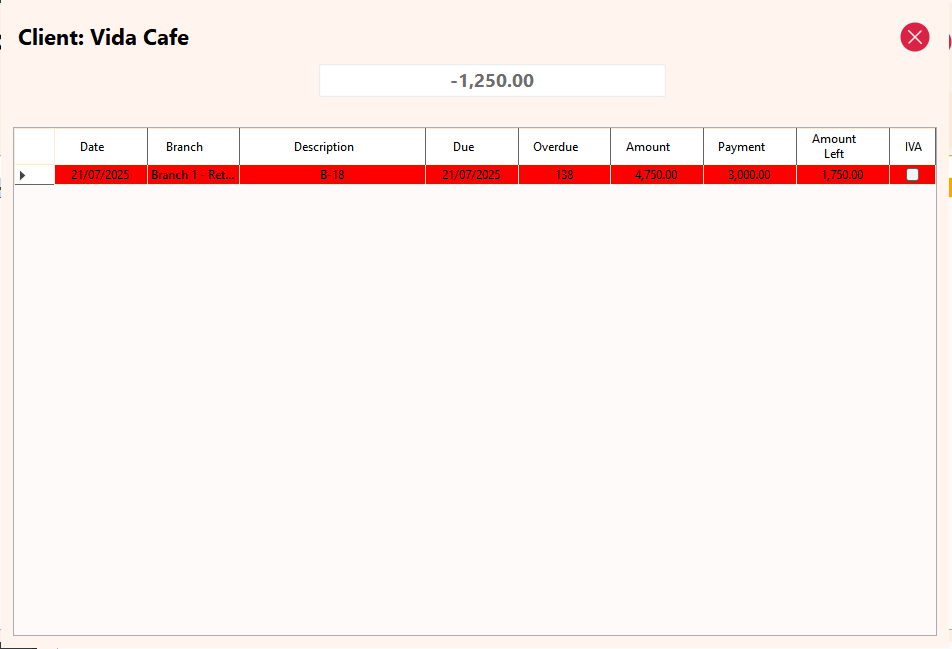
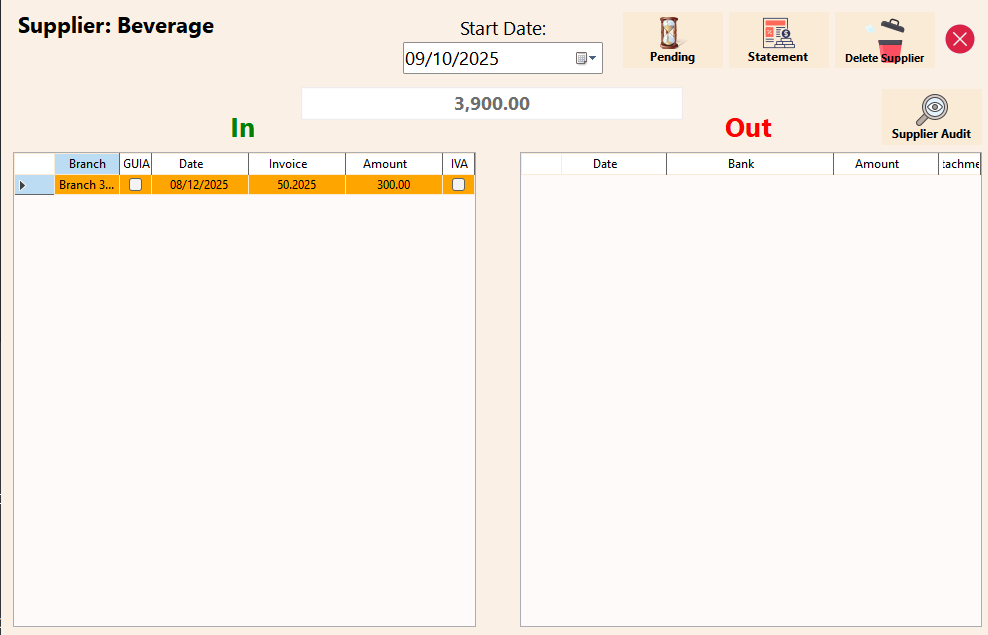
The Invoice-level feature (28.02.25) allows recording of payments by clients per at the invoice level to align payments according to their invoices. Upon recording payments, receipts (28.02.25) are generated for client payments linking the invoices paid with the payment.
Bank to Office
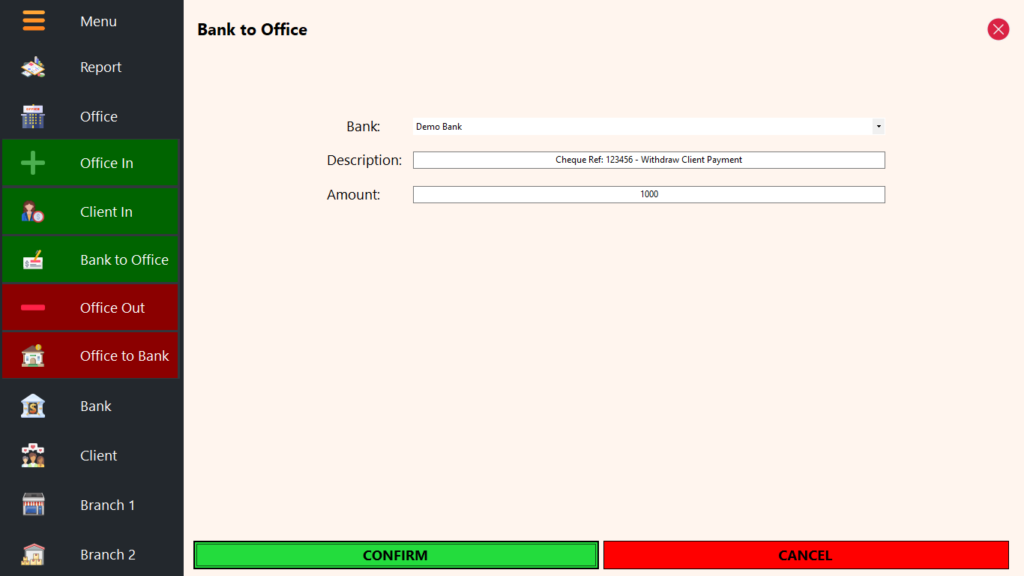
Bank to Office is the module that manages any withdrawal of funds from the bank, ensuring transparency in financial movements. All transactions pass through the company’s account before being allocated or utilized. Typically, this feature is utilized when issuing a cheque, reflecting as a cash inflow in the company’s cash account. Users have the ability to add a description, facilitating detailed record-keeping and providing insights into the purpose of each withdrawal. Bank to Office within the Office Module ensures meticulous tracking of fund movements for accurate financial management.
Office Out
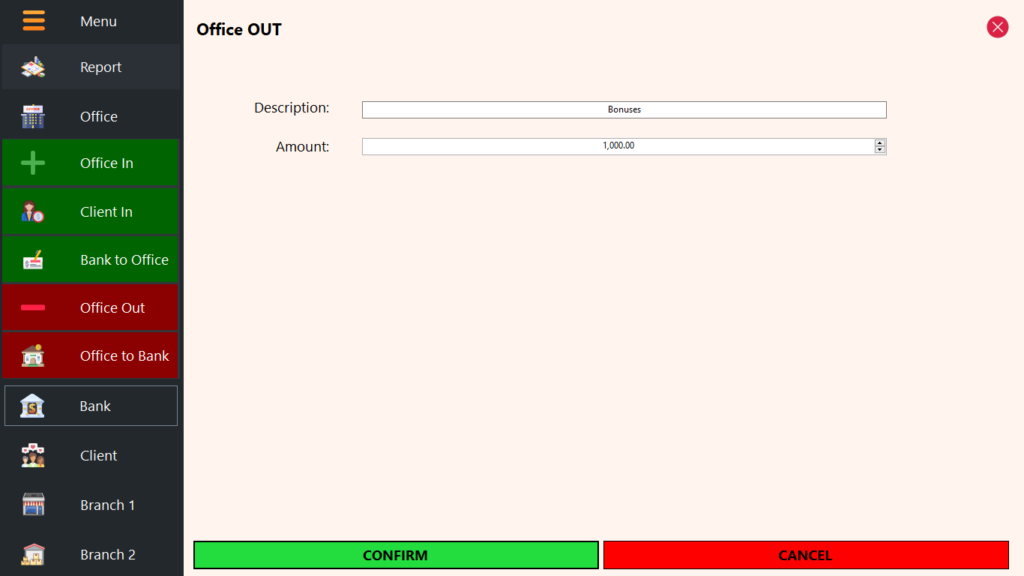
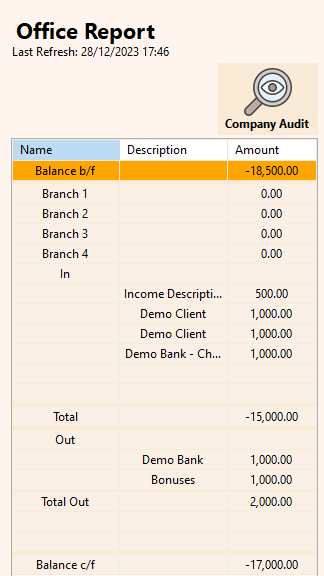
Office Out mirrors the functionality of Office In but is dedicated to outflows from the company. This encompasses company-level expenses, cash investments, and any other form of cash outflow. Transactions recorded in Office Out are seamlessly reflected in the Office Report within the Report Module, ensuring a comprehensive overview of company-level financial activities. This feature serves as a vital component for accurate tracking and reporting of cash outflows at the company level.
Supplier Out (17.11.24)
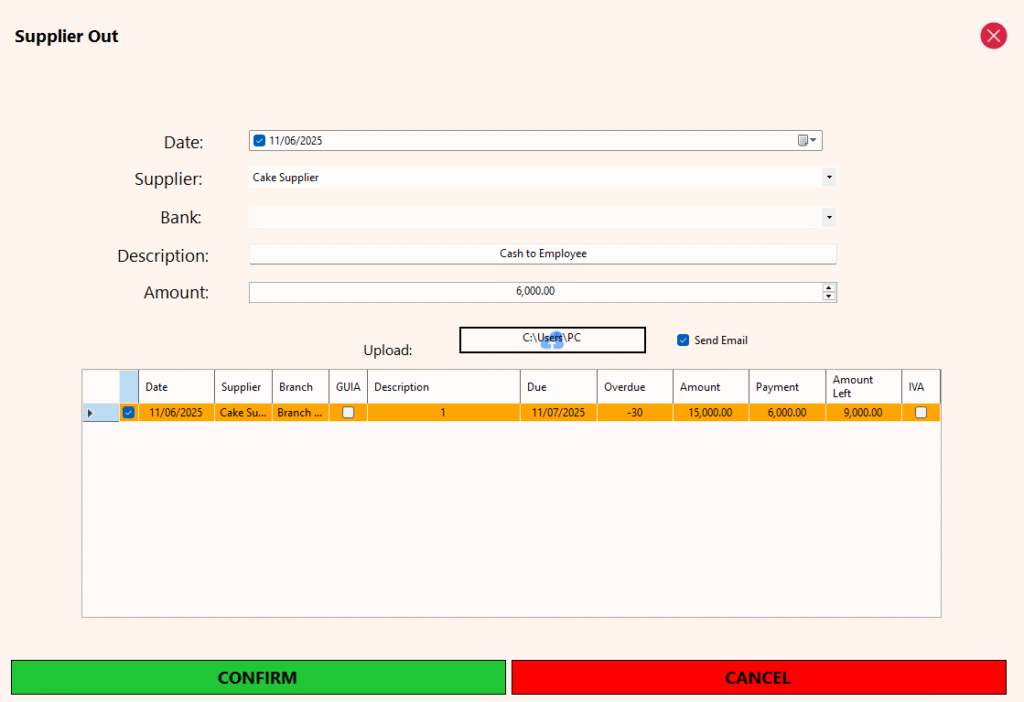
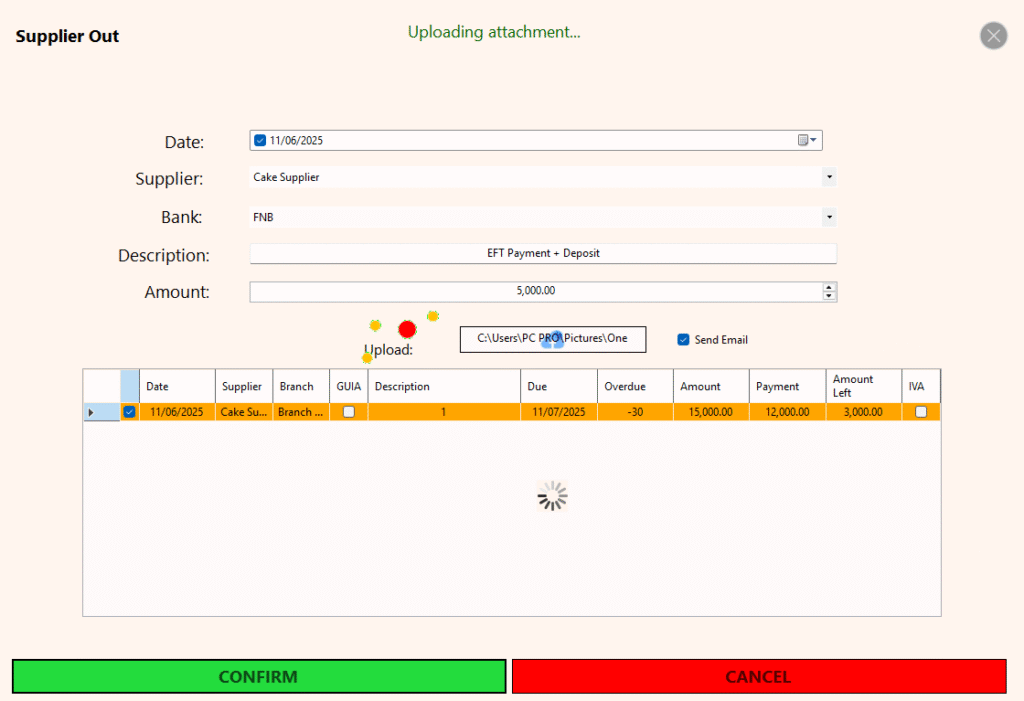
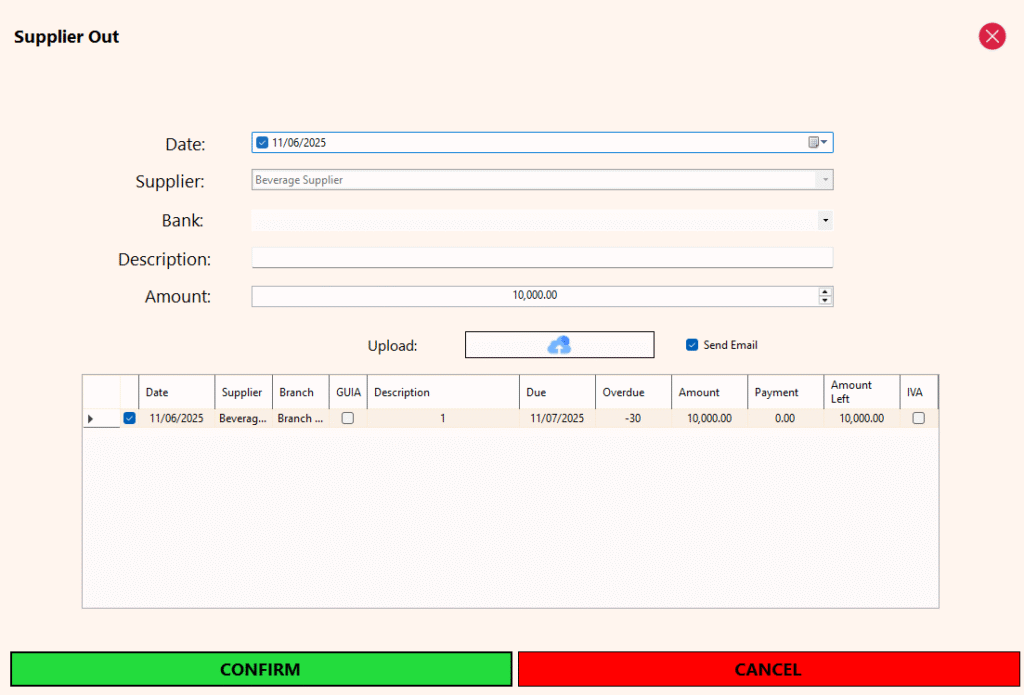
The Supplier Out feature allows recording payments made to suppliers, with multiple flexible options for managing how those payments are applied to outstanding invoices.
Payments can be made in the following ways:
-
By selecting specific invoices – useful when certain invoices should be excluded from the payment.
-
By selecting multiple invoices – the system pays the selected invoices in full and applies any remaining amount as a partial payment to the next applicable invoice.
-
Without selecting any invoices – the system automatically allocates the payment to the oldest pending invoices first.
If the payment amount exceeds the total of selected invoices, the extra amount is automatically added to the supplier’s balance and treated as a deposit. This balance is then used to automatically settle future invoices as they are created.
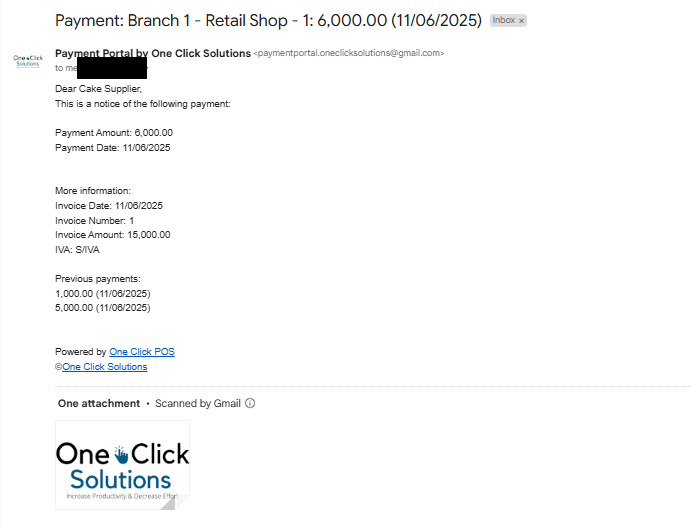
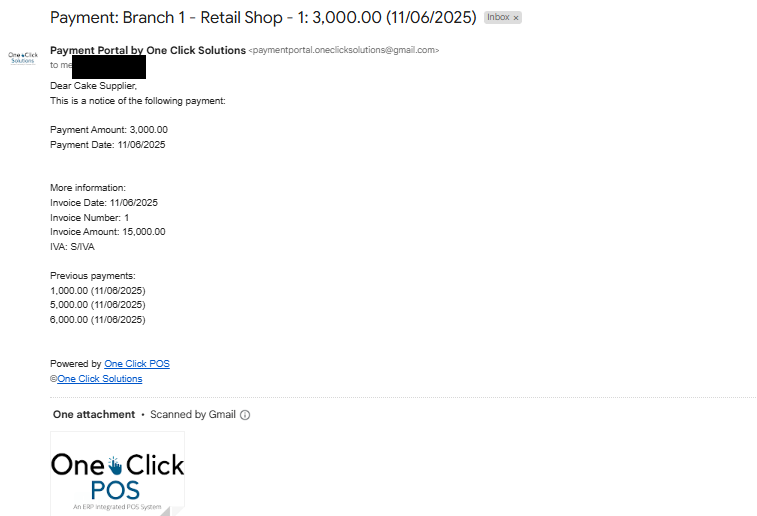
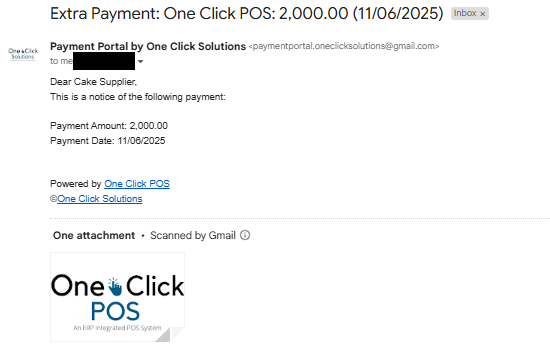
Payments can be made via cash or bank transfer, and the system updates both the Office cash account and relevant bank account balances in real time. Additional options include setting the payment date, adding a description, and uploading an optional attachment (such as proof of payment). If a supplier email is on file, the system can send an automated email confirming the payment and attaching any uploaded documents.
All payments recorded through Supplier Out are categorized under Purchases in the dashboard, ensuring accurate financial reporting and real-time visibility into supplier-related expenses.
Office to Bank
Office to Bank represents the counterpart to Bank to Office, focusing on the process of making a cash deposit to a bank. This action results in a decrease in the company’s cash account and a corresponding increase in the bank account. Notably, when clients make payments through the bank, the system automatically registers an Office to Bank entry, ensuring accurate and seamless financial tracking. This feature is instrumental in maintaining balance and transparency between the company’s cash and bank accounts within the One Click POS system.
Bank to Bank
Bank to Bank is a feature currently under development, requiring a manual two-step process for fund transfer (As of: 28.12.23). Initially, a withdrawal (Bank to Office) is executed, followed by a deposit to the target bank (Office to Bank). While not automated, this approach ensures a systematic and accurate movement of funds between banks within the Office Module. Future enhancements aim to streamline this process, providing users with a more efficient and direct Bank to Bank functionality.
Summary
Inflows:
- Office In: Increases company cash.
- Client In: If cash payment, increases company cash and decreases client balance. If bank payment, adds a debit and credit to company cash (to reflect transaction), decreases client balances and increases bank balances.
- Bank to Office: Increases company cash and decreases bank balance.
Outflows:
- Office Out: Decreases company cash.
- Supplier Out: If cash payment, decreases company cash decreases supplier balance.
If bank payment, it adds a debit and credit for the company cash (to reflect transaction), decrease bank and supplier balances.
If the payment amount exceeds the outstanding invoices, the excess is recorded as a deposit and added to the supplier’s balance for future use. - Office to Bank: Decreases company cash and increases bank balance.
Neutral:
- Bank to Bank: Manual process involving a withdrawal (Increases Company & Decreases Bank) and a deposit (Decreases Company & Increases Bank).
Bank
The Bank Module empowers companies to monitor their bank accounts seamlessly, eliminating the need for constant reference to bank statements. Notably, the system doesn’t establish direct links with banks but instead enables companies to reconcile with bank statements at regular intervals, in accordance with company policies. It’s essential to acknowledge that minor variations between the bank’s statement and the system’s balance may occur, attributed to monthly bank fees and interest charges. The Bank Module serves as a robust tool for maintaining accurate financial oversight and reconciliation within the One Click POS system.
Bank Out
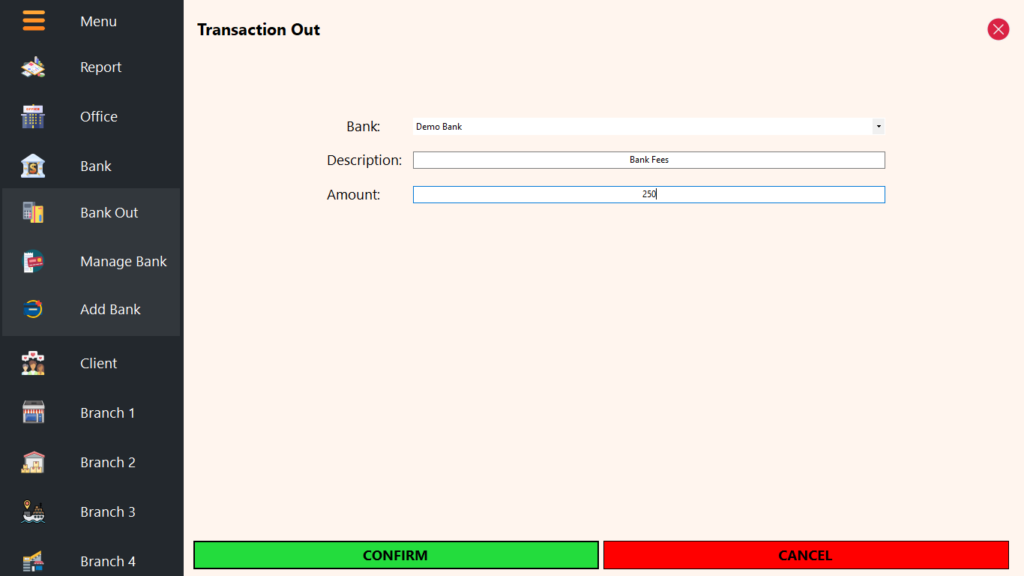
Bank Out, within the banking module, facilitates outflows from a bank without impacting the company’s cash account. Primarily designed for reconciliation purposes, it allows the removal of bank fees and charges incurred, ensuring alignment with bank statements. Additionally, if the company’s bank account serves as petty cash, card payments can be deducted directly without the necessity for the office account to reflect the transaction, streamlining financial operations within the One Click POS system.
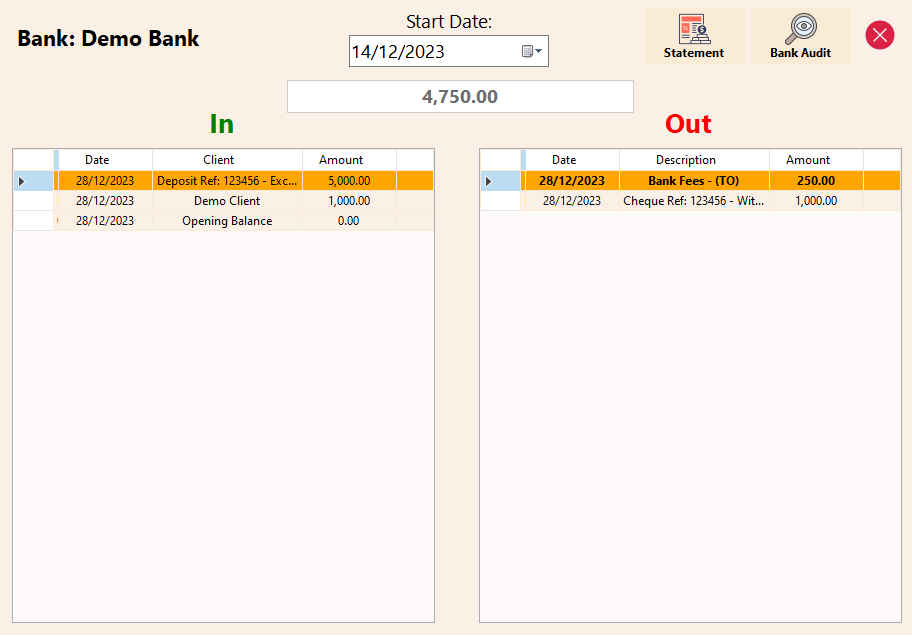
Note: Bank Out transactions are shown in the bank history as (TO) – transaction out in bold for transparency.
Manage Bank
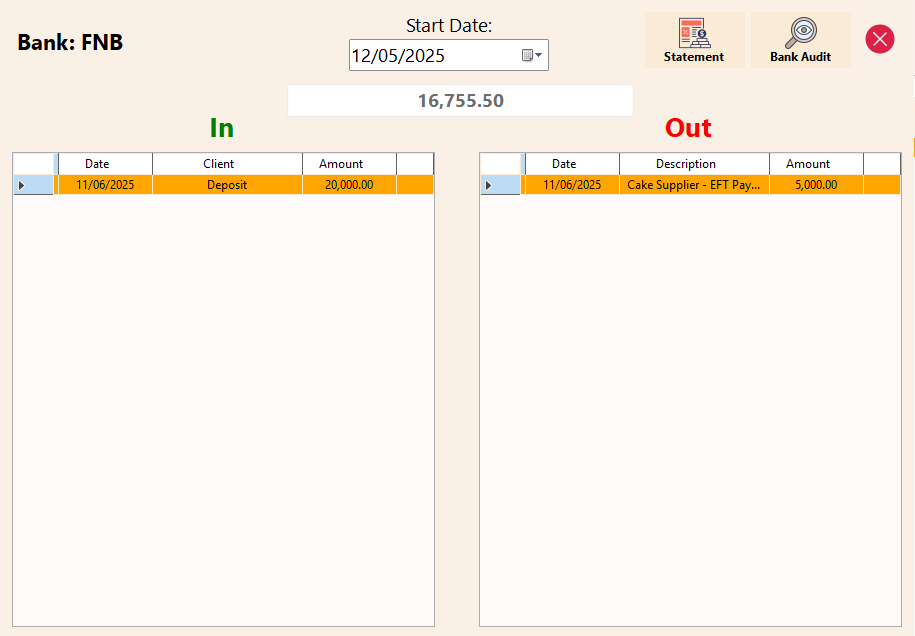
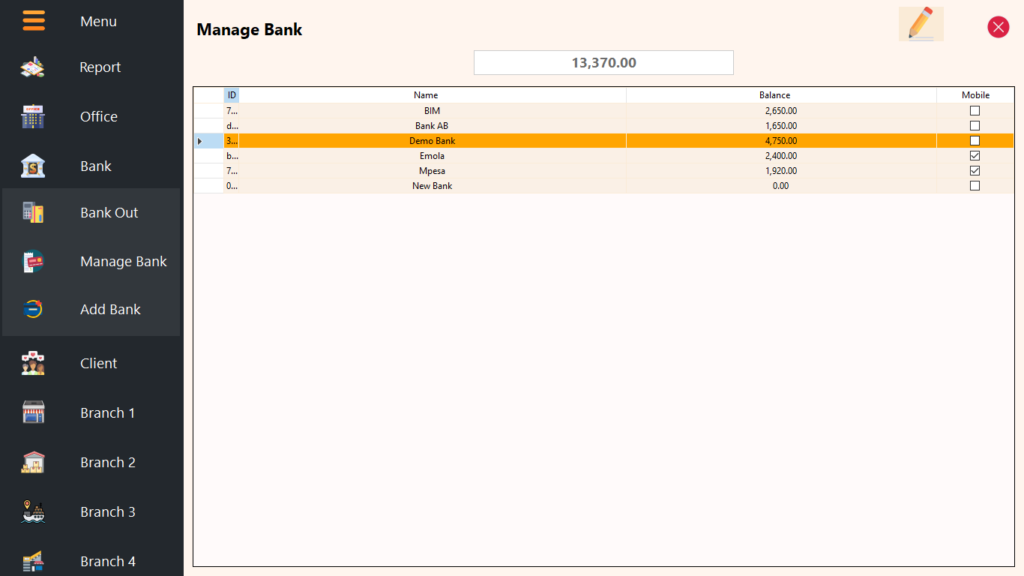
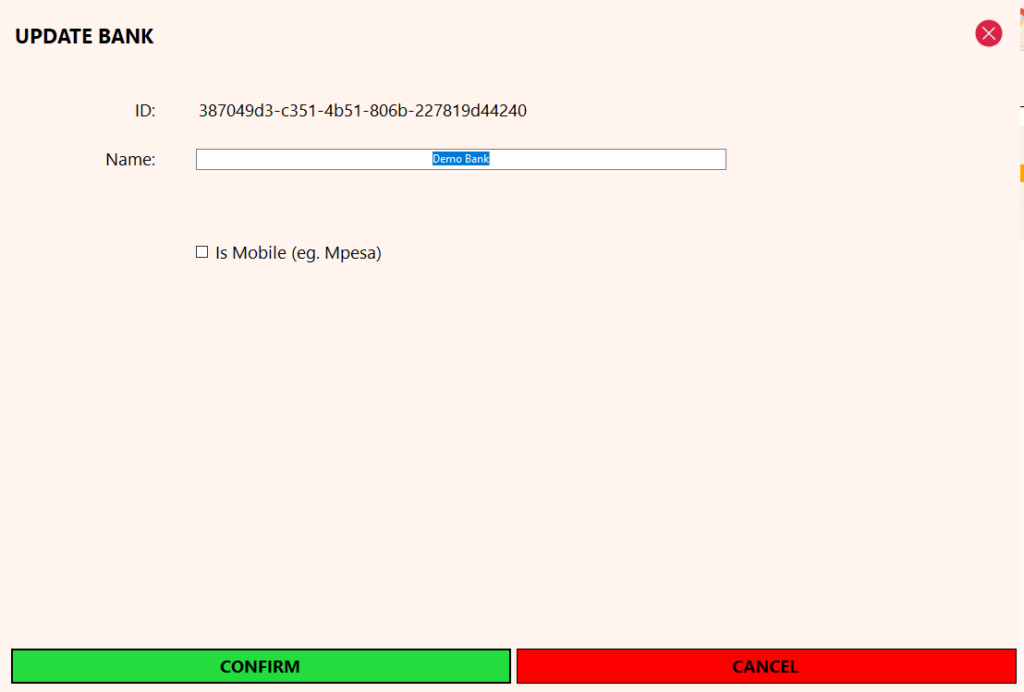
Manage Bank provides a comprehensive overview of all banks in the system, showcasing their current balances. Users have the flexibility to designate a bank as a mobile wallet, specifically utilized in the POS system. At the top, the total company balance is displayed, consolidating all bank balances. The module supports the editing of bank names and the mobile wallet status.
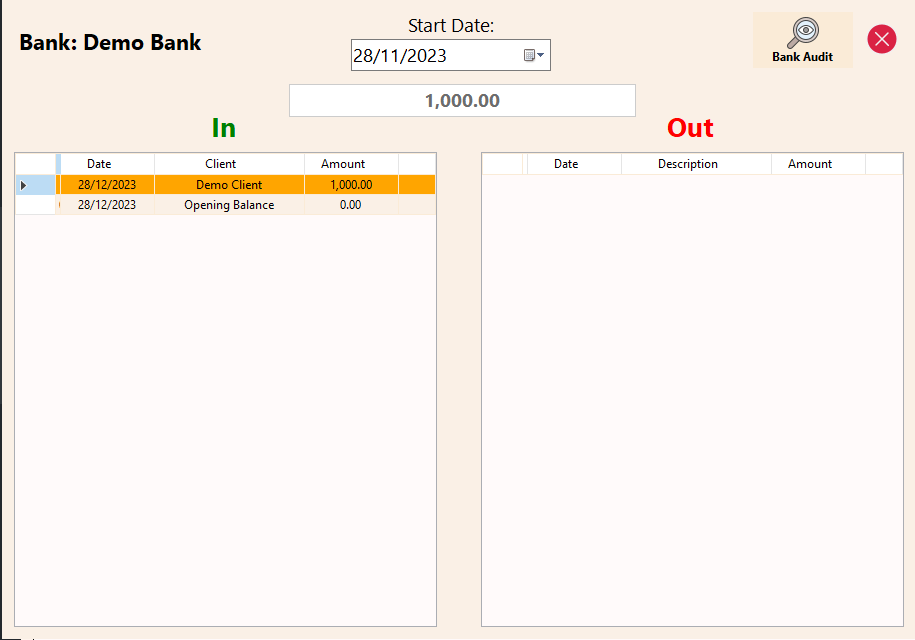
Additionally, Manage Bank facilitates the viewing of a bank’s transaction history. By default, the system displays the last 30 days of history but allows users to adjust the Start Date for a more extended historical record. This feature enhances transparency and accessibility to vital banking information within the One Click POS system.
Additional Feature for Bank Account within Bank Module:
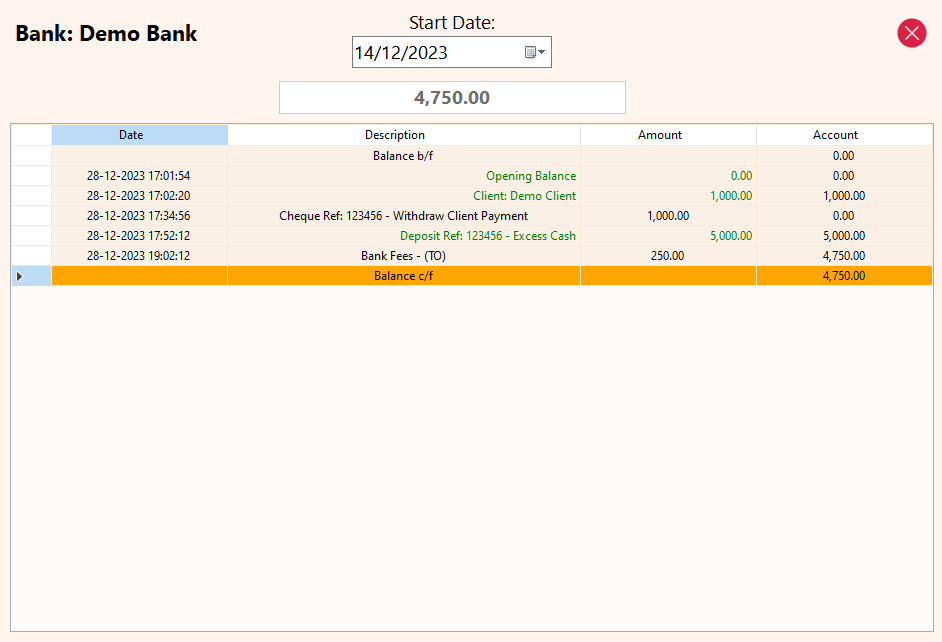
1. Audit Bank Account Feature: An additional feature in Manage Bank enables users to perform a comprehensive audit of a bank account, providing insights into the balance from the inception of the account. This functionality enhances financial transparency and allows for a meticulous examination of the bank’s historical balance data within the One Click POS system.
2. Bank Statement Feature (since 13.01.2024): Gain clarity into your financial transactions with detailed bank statements, tracking every deposit and withdrawal seamlessly.
Add Bank
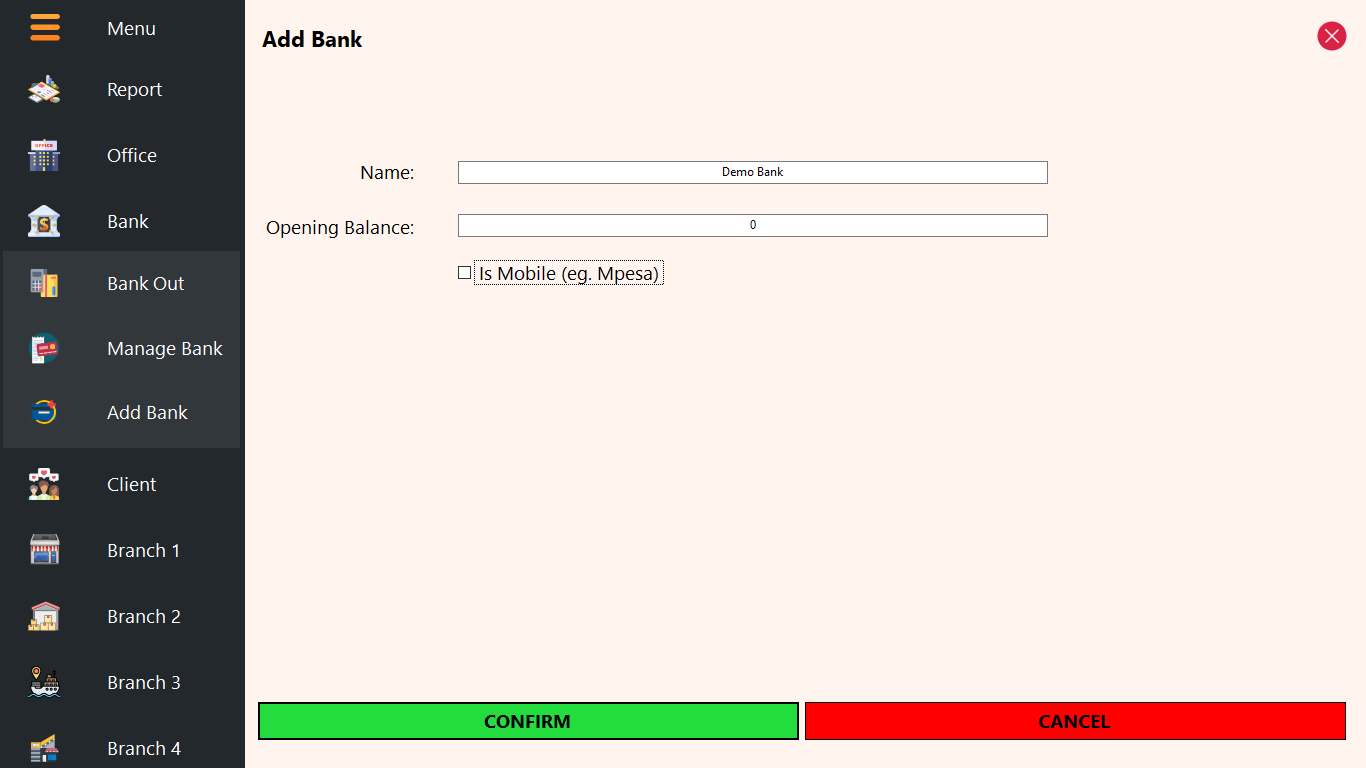
The Add Bank feature enables users to effortlessly set up a bank account within the system. The account name corresponds to the bank’s name for easy tracking. Additionally, this feature supports the incorporation of Bank POS Terminals in branches, facilitating efficient monitoring of transactions within store locations. It’s important to note that this feature does not imply direct acceptance of bank payments but rather enhances the system’s capacity for comprehensive financial management and record-keeping within the One Click POS system.
Note: The opening balance is added as a transaction for auditing purposes.
Client
The Client Module focuses on managing the clients associated with the business, providing enhanced capabilities for tracking their purchases and payments. Additionally, this module facilitates credit sales to clients, contributing to a more streamlined and efficient client management process within the One Click POS system.
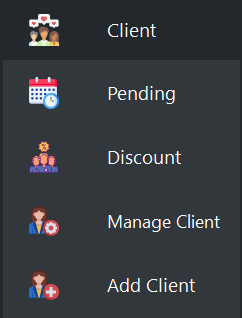
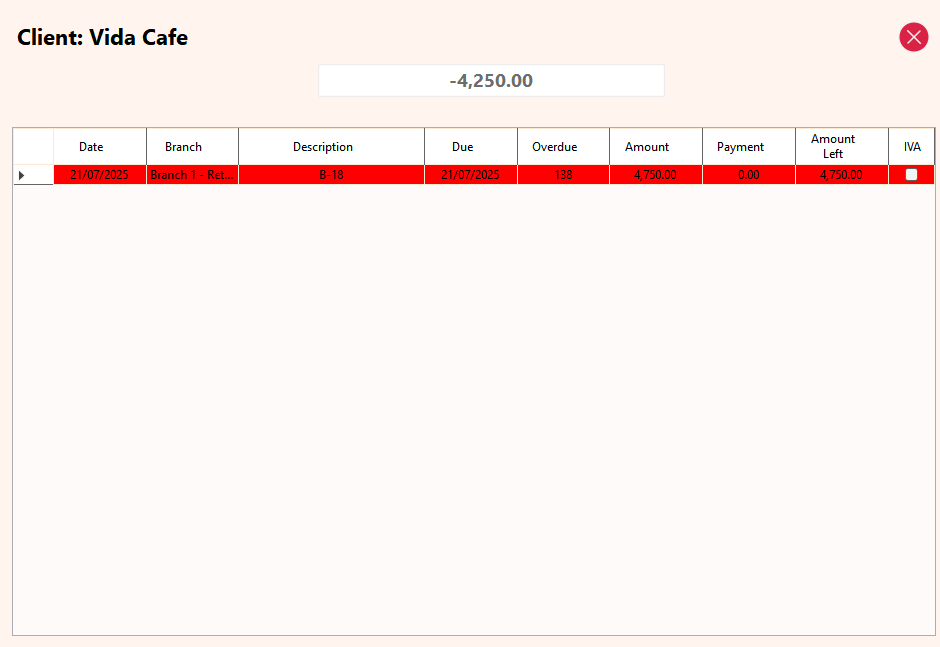
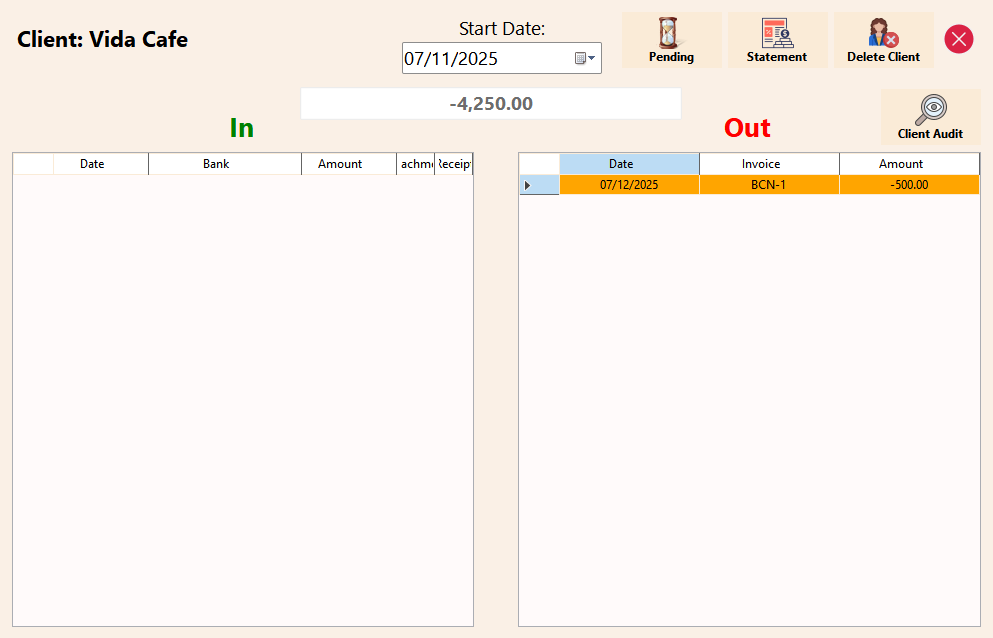
Pending (28.02.25)
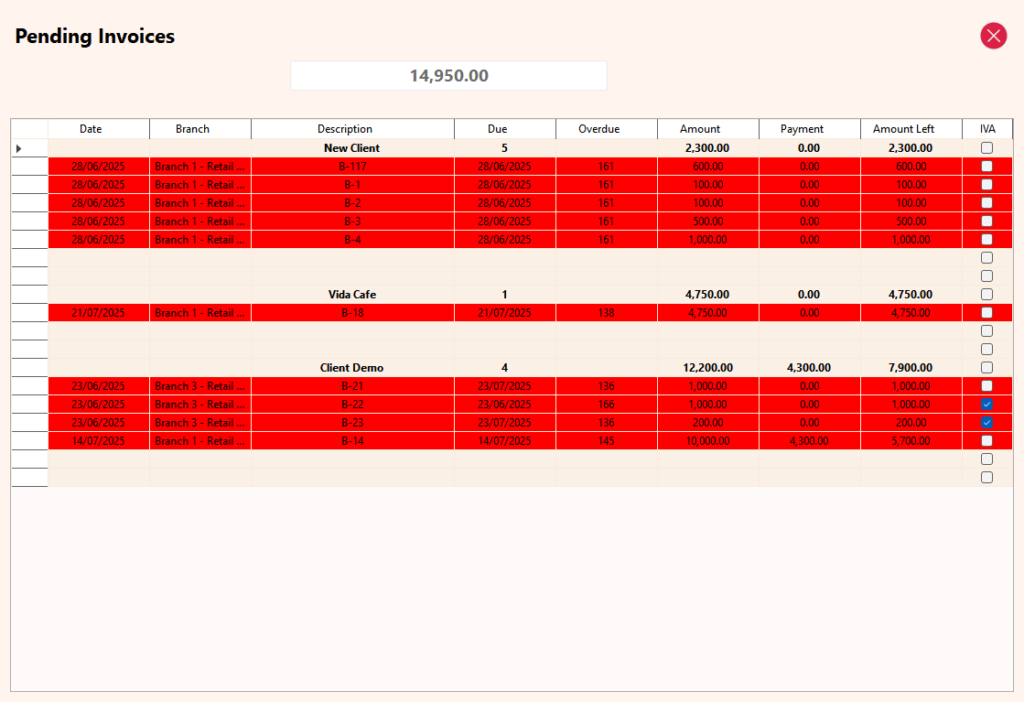
The Pending Invoice feature provides a comprehensive overview of all unpaid client invoices, helping businesses manage receivables efficiently.
The color coding provides an indication of how long invoices have been due. This view provides an overall picture of unpaid client invoices.
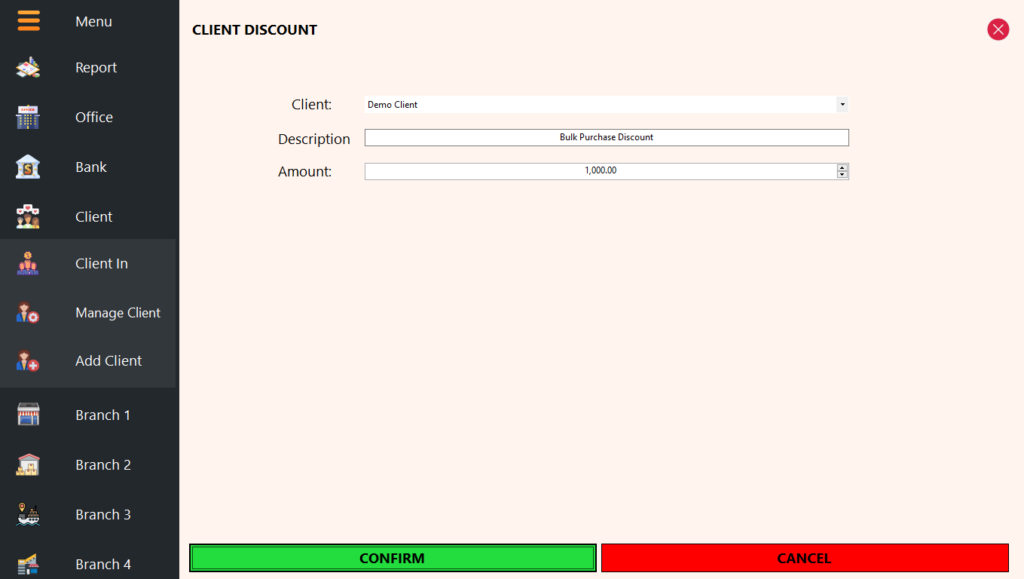
Discount
Similar to Bank Out, Client In in the Client Module enables the manipulation of client accounts without impacting the office account. This functionality serves various purposes, including providing discounts to clients in monetary value, adjusting accounts as needed, and implementing debt forgiveness. Client In enhances flexibility in client management within the One Click POS system.
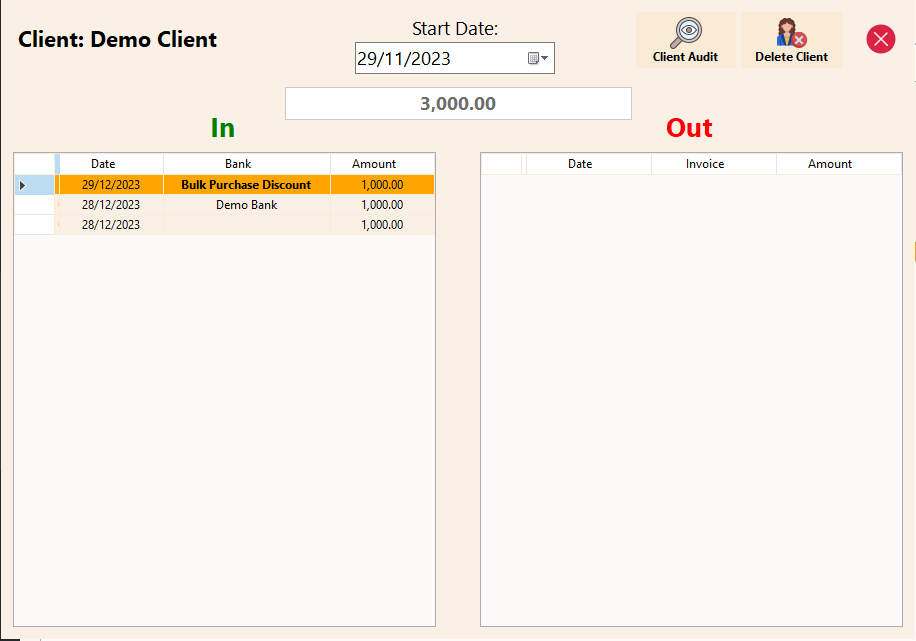
Note: Client Discount transactions are shown in bold.
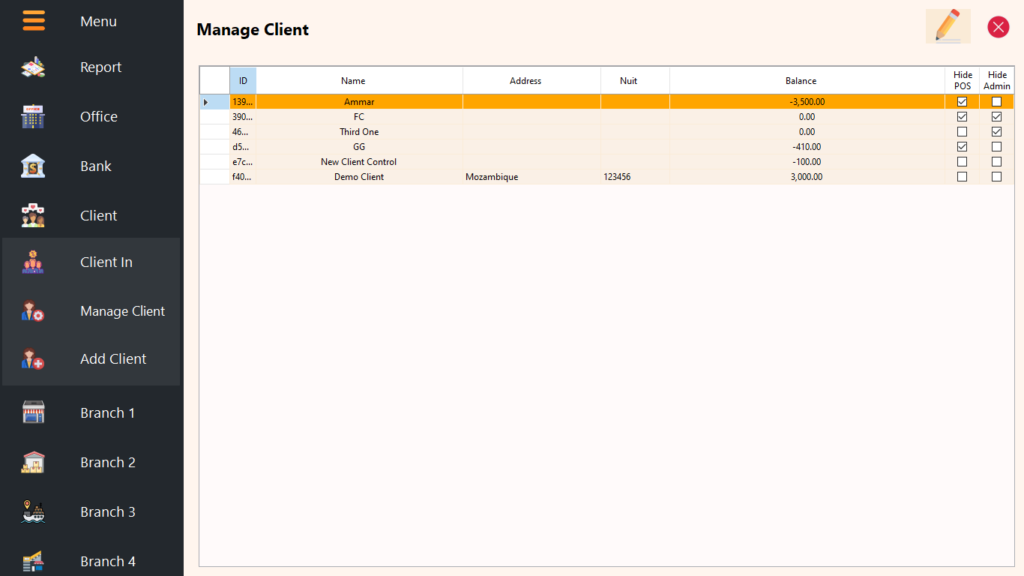
Manage Client
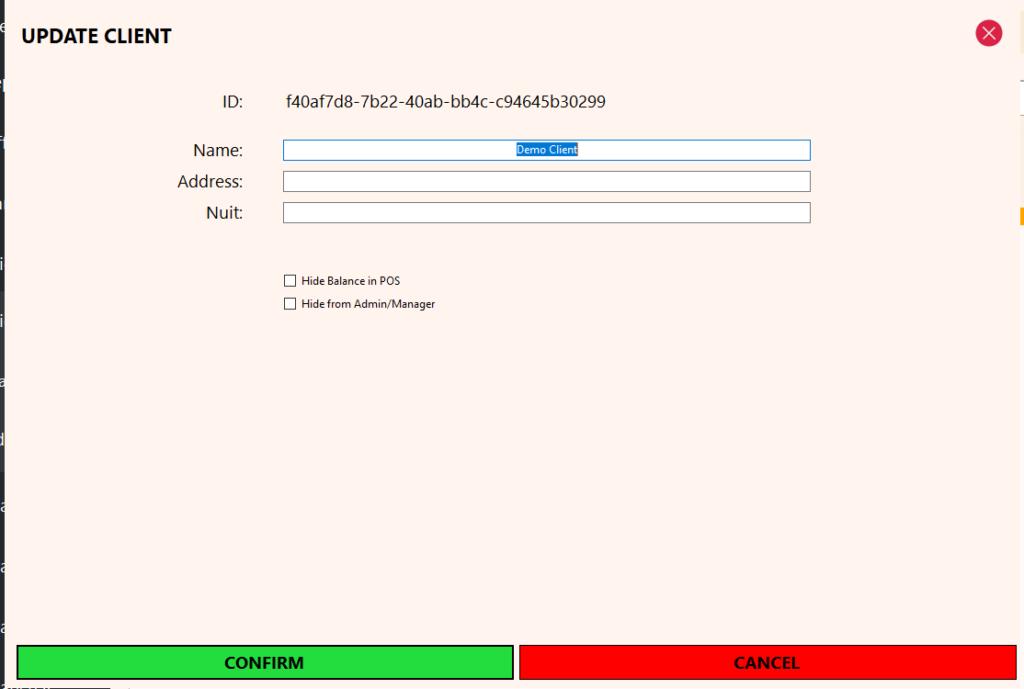
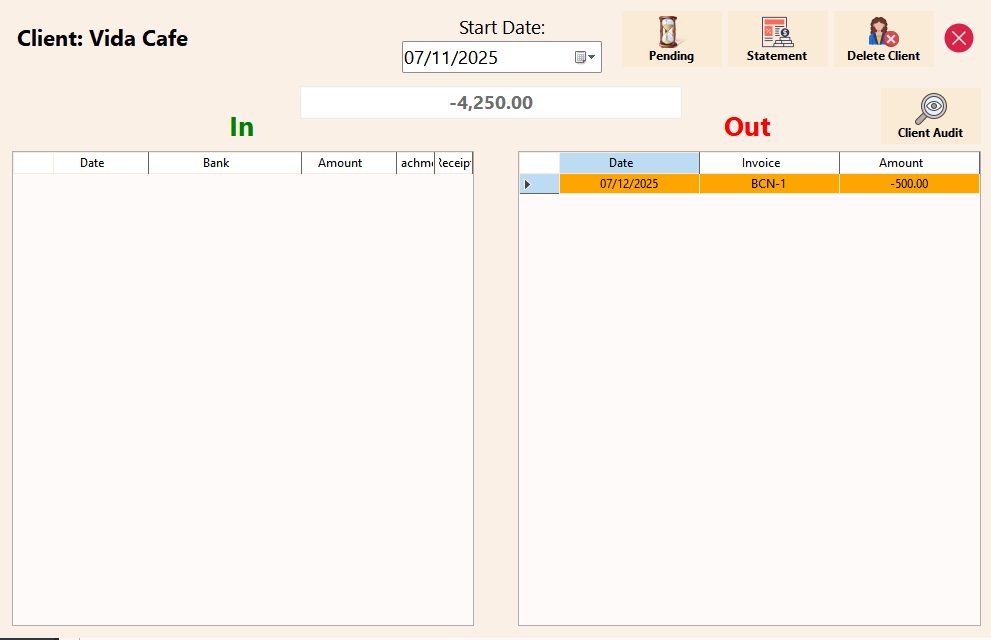
Much like Manage Bank, the Manage Client feature presents the current client list with the flexibility to view client history. It provides essential details such as the client’s address, VAT number, and balance. The module allows for administrative controls, including the option to hide a client from the administrator/manager and conceal the balance from the POS module.
Moreover, Manage Client facilitates the editing of client details such as name, VAT number, address, visibility settings (Hide from Admin & Hide from POS). Additionally, the option to soft-delete a client is available, ensuring that deleted clients are hidden from the list while preserving data integrity within the One Click POS system.
The Invoice level feature (28.02.25) allows to track client’s invoices individually, showing due dates, amounts, payments, methods, attachments, for clear insight and outstanding balances and payment status. The pending view shows all outstanding amounts from clients, allowing you to easily track and manage unpaid invoices.
Additional Feature for Client Account within Client Module:
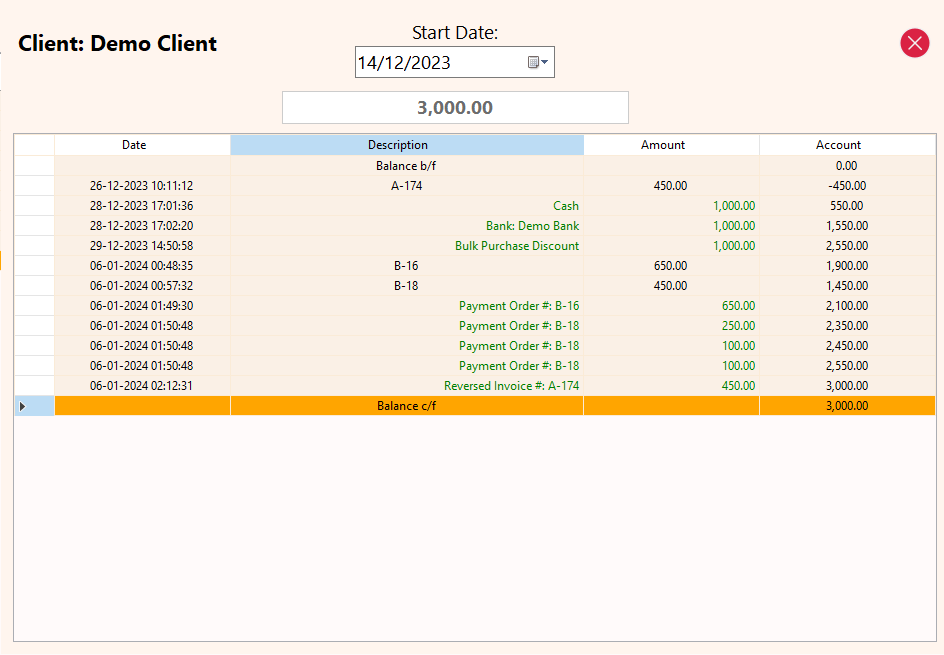
1. Audit Client Account Feature: An additional feature akin to the banking module, Client Module introduces the Audit functionality. This feature empowers users to conduct a comprehensive audit of client accounts, gaining insights into the historical balances and transactions since the inception of the client account. The Audit feature enhances transparency and offers valuable tools for meticulous client account examination within the One Click POS system.
2. Reverse Credit Sale Feature: a feature providing a seamless way to undo credit transactions. When a sale is made on credit, this functionality allows for the effortless reversal of the transaction. The system automatically initiates a stock transfer, returning the products back to the originating branch. Simultaneously, the client’s account is appropriately adjusted, ensuring accurate and efficient handling of credit sales. This feature streamlines the process of rectifying credit transactions, contributing to the overall flexibility and control offered by One Click POS system.
3. Client Statement Feature (since 13.01.2024): Elevate client management with comprehensive statements, providing a transparent overview of their transactions and account activities.
Add Client
The Add Client feature facilitates the seamless creation of new clients for businesses. This feature includes optional fields for the client’s address and VAT number, which can be utilized in invoice printing. Notably, the system provides the flexibility to hide the client from the administrator/manager (viewable only to the Owner) and conceal the client balance from the POS Module—particularly useful for client credit sales within the One Click POS system.
Note: The opening balance is added as a transaction for auditing purposes.
Supplier
The Supplier Module provides a complete framework for managing supplier relationships and transactions within an ERP environment. Designed to streamline operations, it centralizes supplier data, supports invoice and payment processing, and ensures transparency across all financial activities. With built-in real-time synchronization, it keeps the back office informed and up to date with every supplier interaction.
-
Centralized Supplier Management
All supplier details, including contact information, assigned products, and account data, are maintained in a single, organized view for efficient administration. -
Invoice Handling
Invoices can be created, linked to specific suppliers, tracked for due dates, and monitored for payment status, simplifying procurement workflows. -
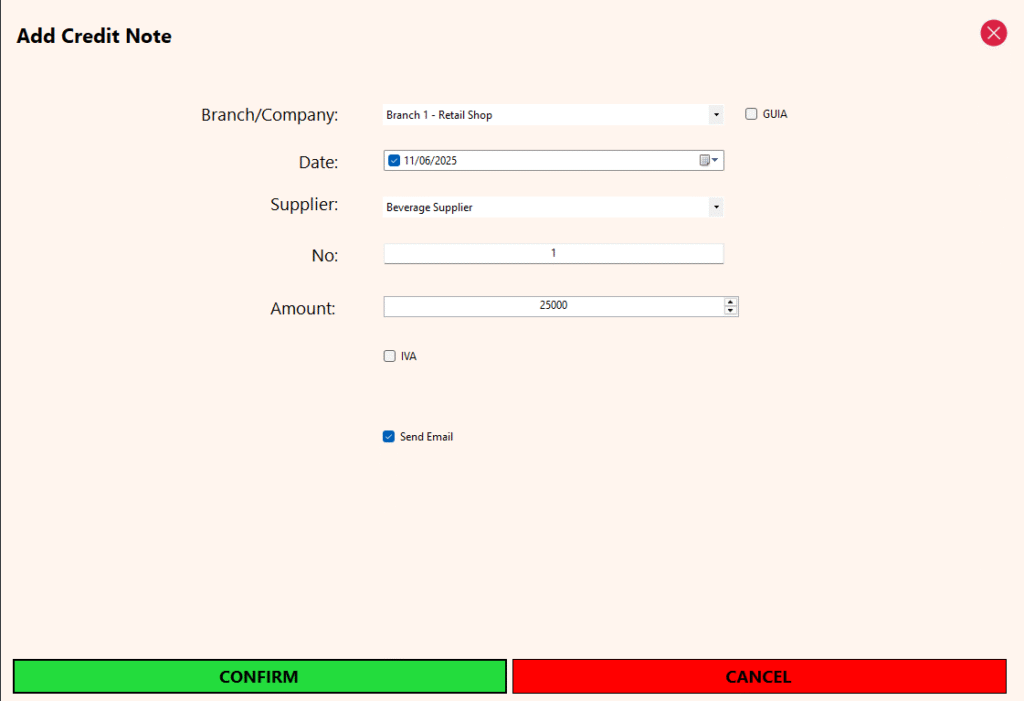
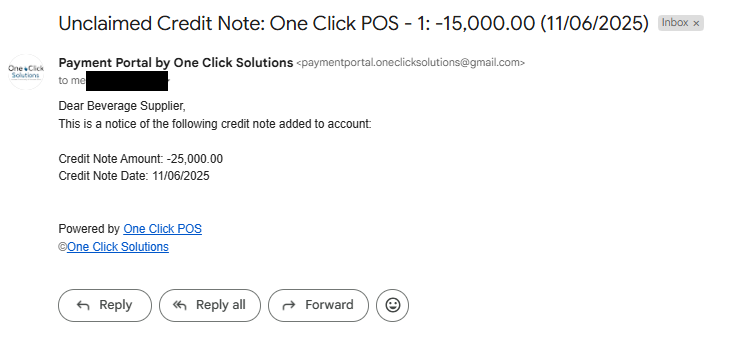
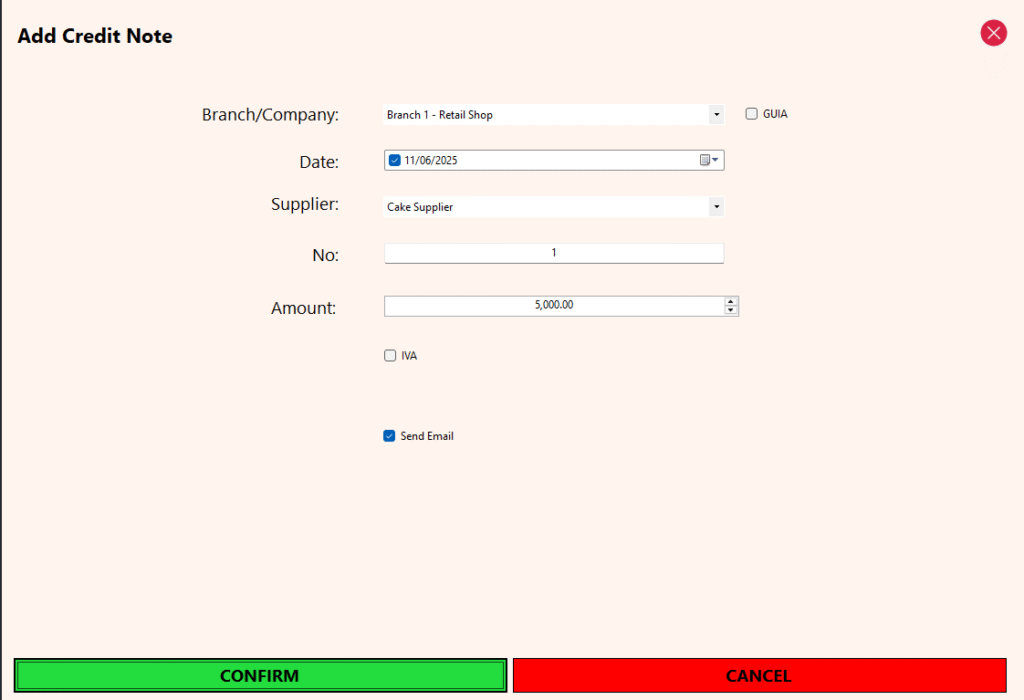
Credit Notes
Credit notes can be issued for returns or billing adjustments, helping maintain clear and accurate financial records. -
Pending Payments Overview
Outstanding balances are displayed clearly, allowing for better planning and prioritization of payments to suppliers. -
Bank Integration
Suppliers can be linked to specific bank accounts. Statements can be generated either by pending invoices or by bank transactions for transparent reconciliation. -
Flexible Payment Options
Payments can be recorded instantly, whether made in cash or through bank transfers, allowing for flexibility in how suppliers are paid. -
Real-Time Office Integration
Every update related to supplier activity is reflected immediately in the dashboard, ensuring decision-makers have access to current and accurate information.
How It Works
The Supplier Module is designed to handle two key account scenarios:
-
Negative Balance – when there is an outstanding amount owed to the supplier.
-
Zero or Positive Balance – when there is no outstanding debt, or the business holds a deposit or pre-paid balance with the supplier.
In cases where the balance is negative, adding new invoices increases the total liability. The system tracks payments at the invoice level, providing clear visibility of which invoices remain unsettled. When a payment is recorded without selecting specific invoices, the system automatically applies the amount to the oldest outstanding invoices first. However, if specific invoices are selected during payment, they are settled accordingly.
When a supplier’s balance is zero or positive, any newly added invoice is automatically settled using the available balance or deposit. This reduces manual effort and ensures that credits are appropriately utilized.
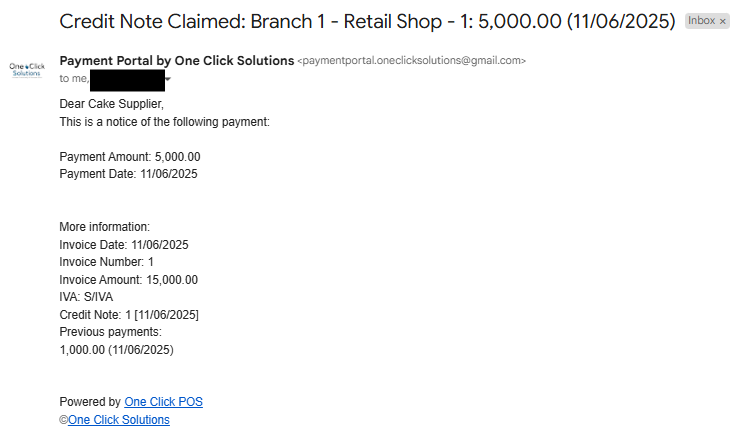
Credit notes function as equivalent to a payment, reducing the outstanding balance and updating the supplier account in real time. This allows for accurate financial tracking and a consistent view of supplier obligations across the system.
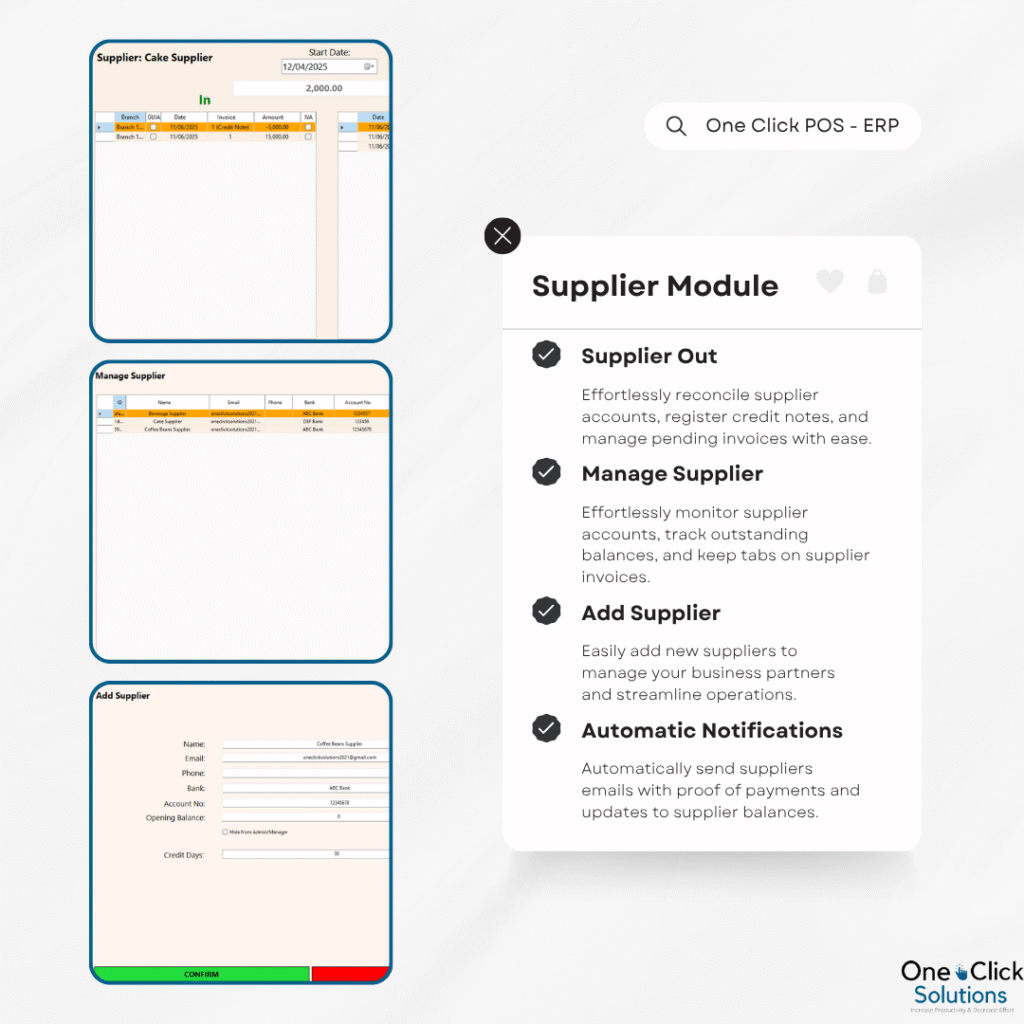
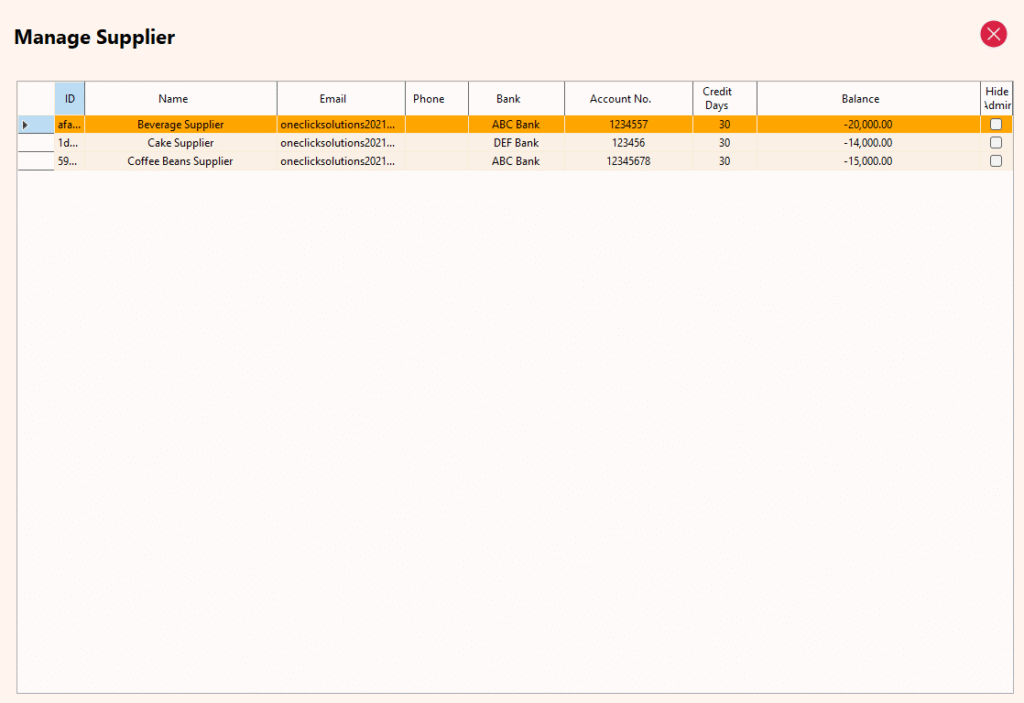
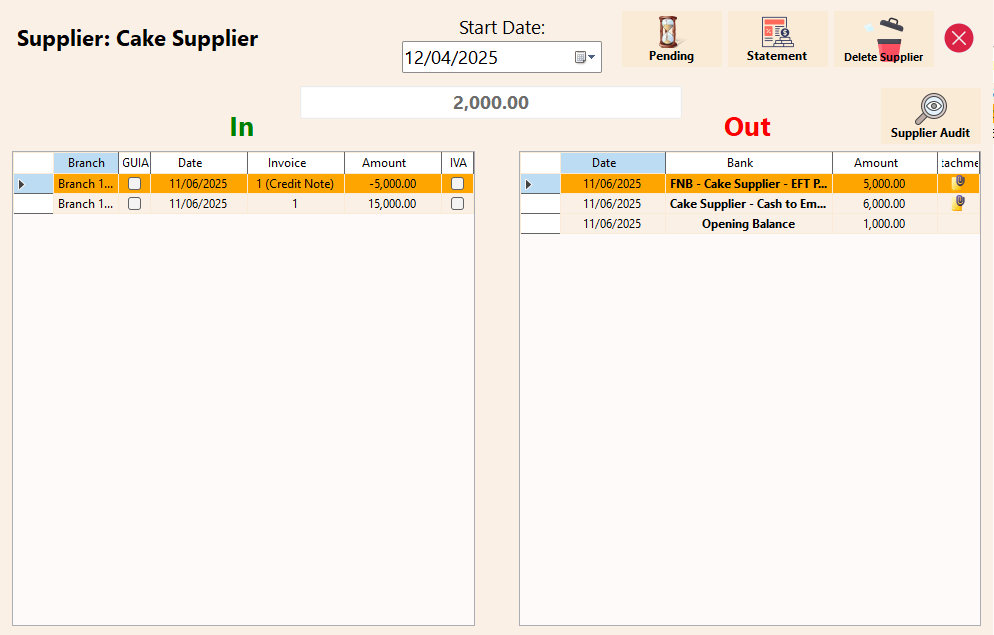
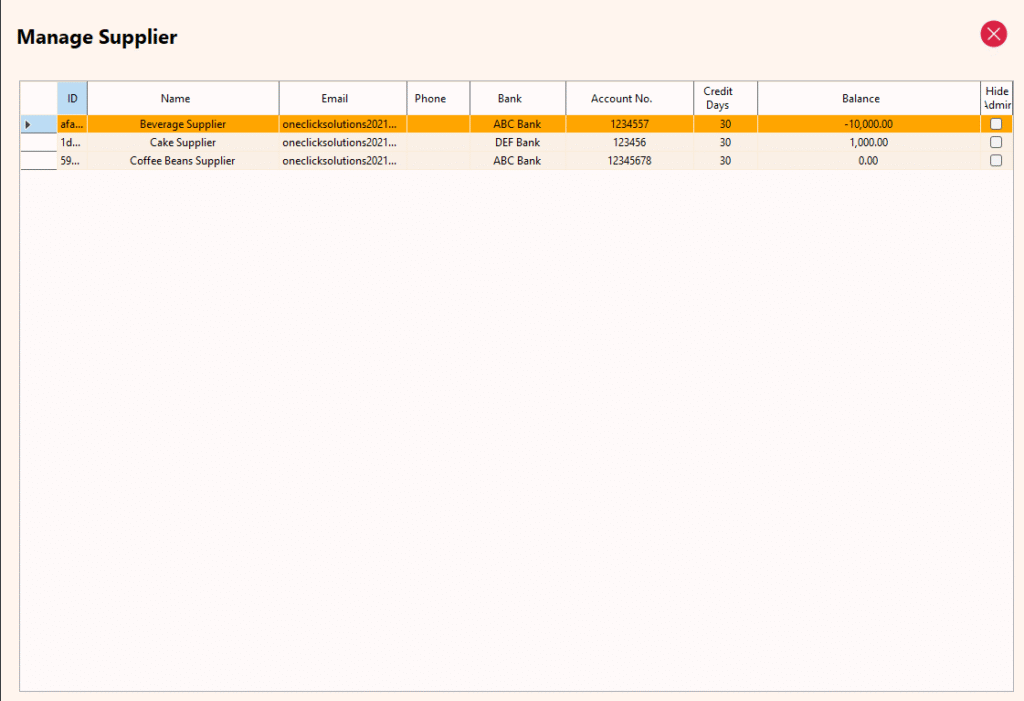
For this post, there are 3 suppliers added, one with an outstanding balance, one with no balance and one with a deposit.
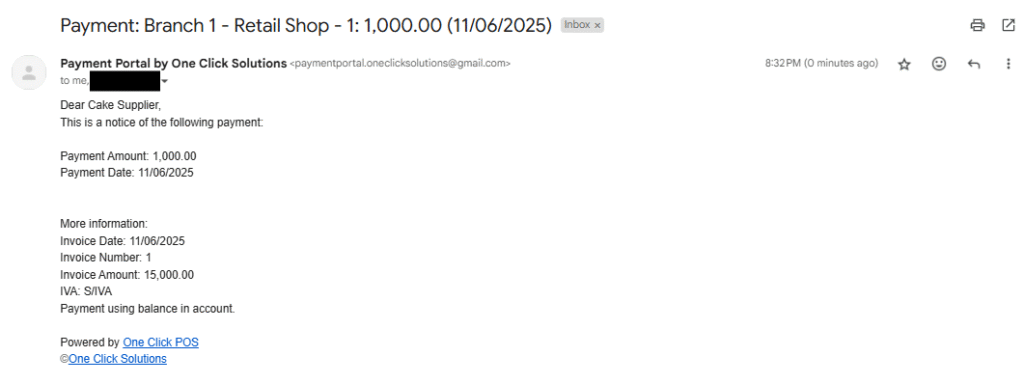
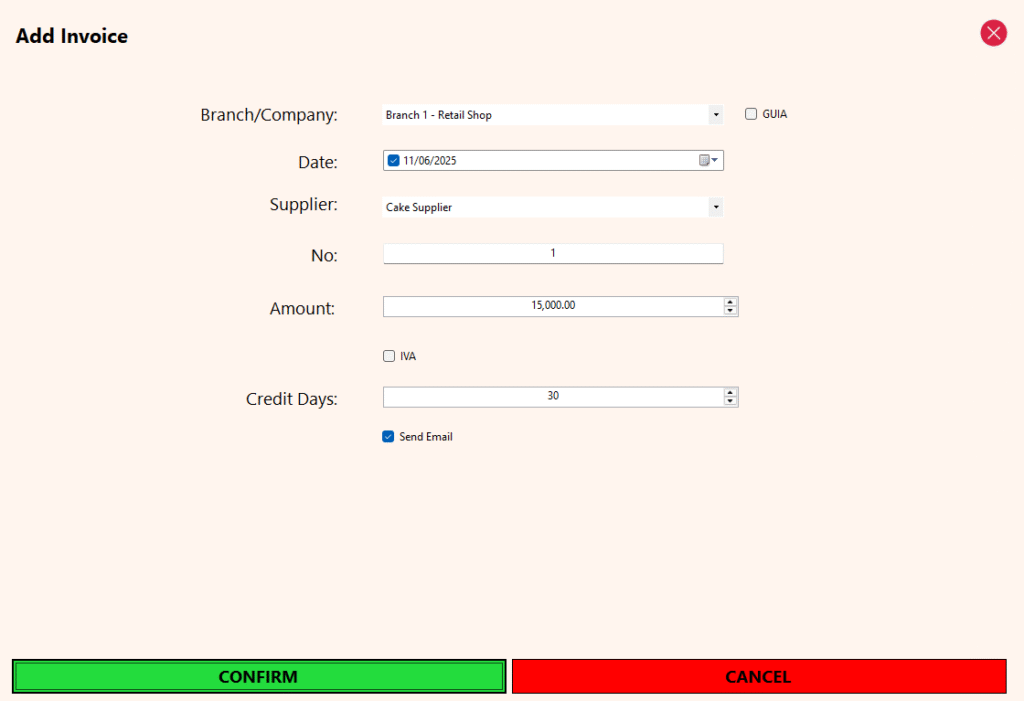
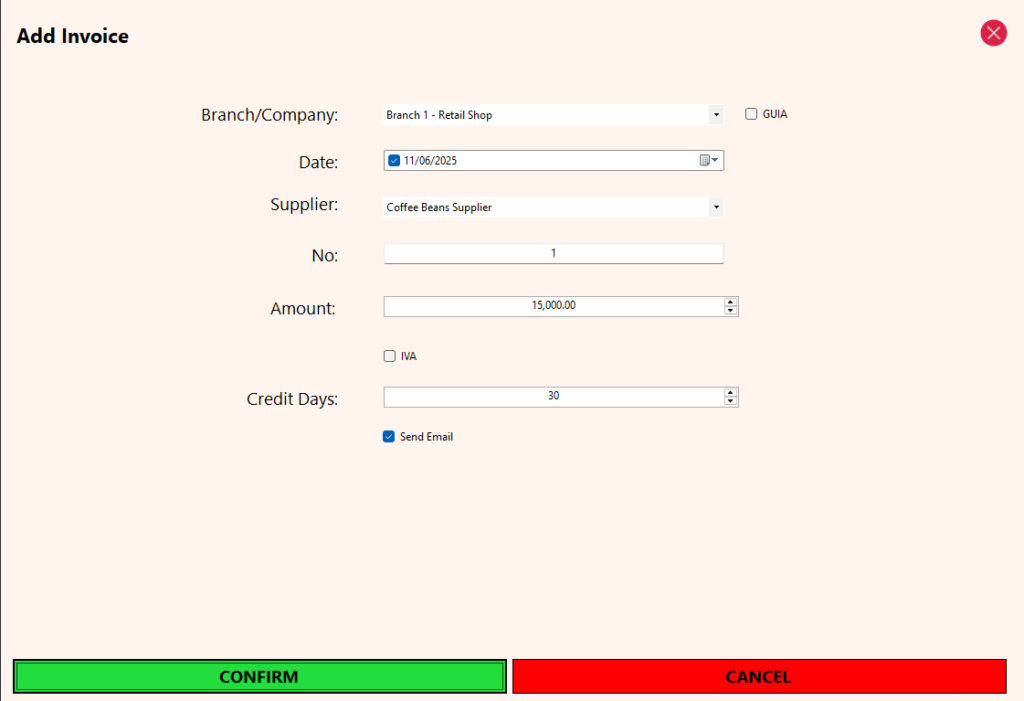
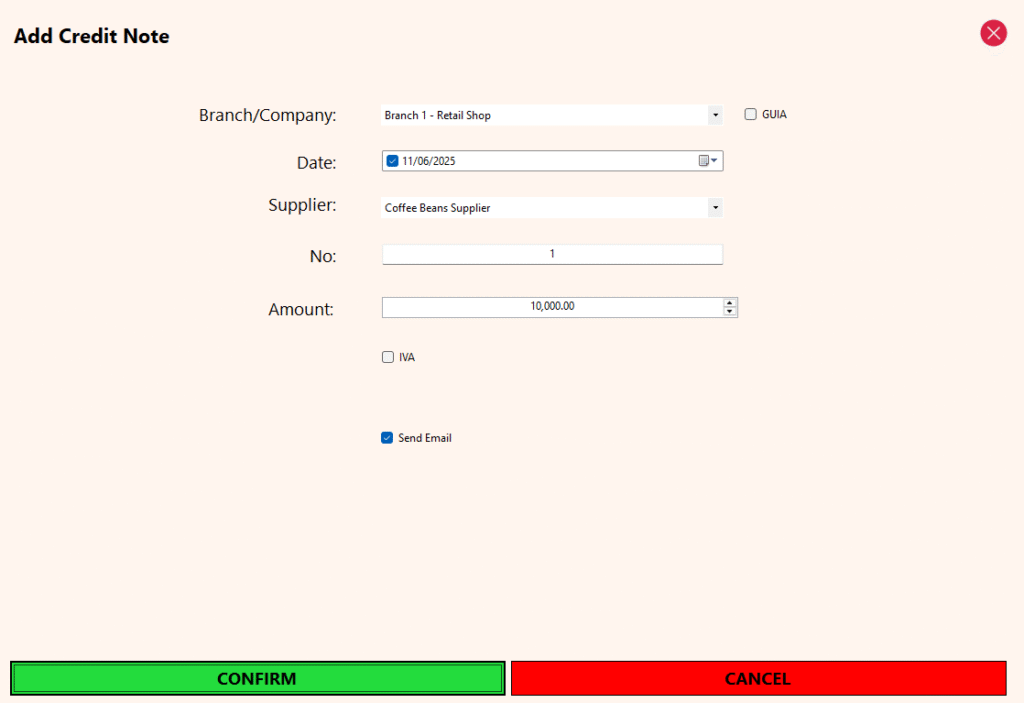
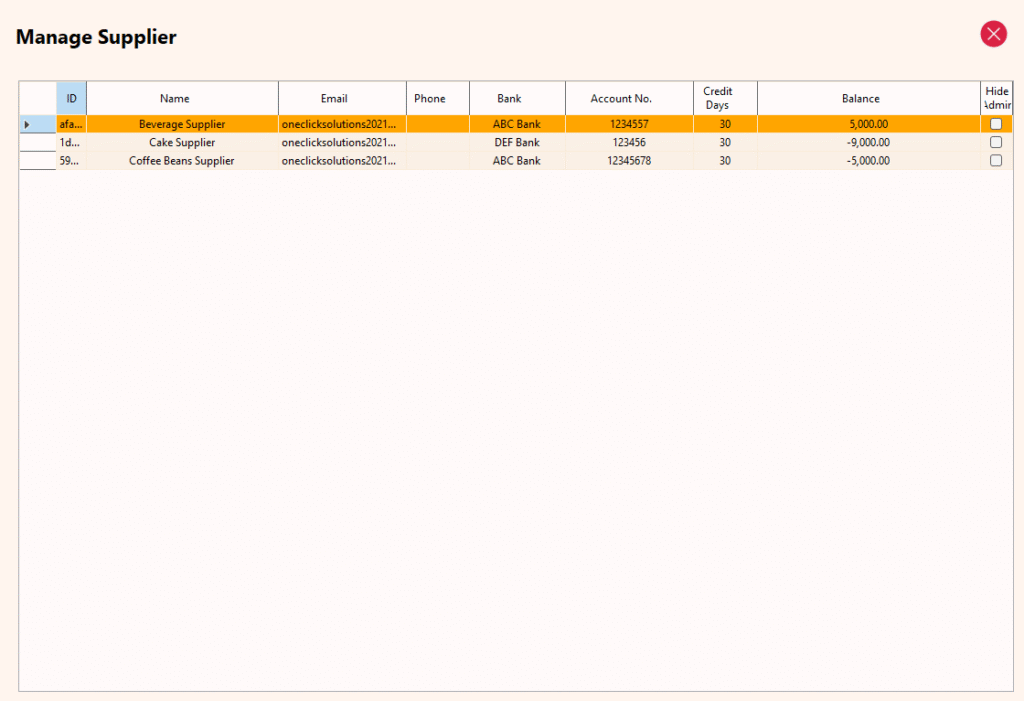
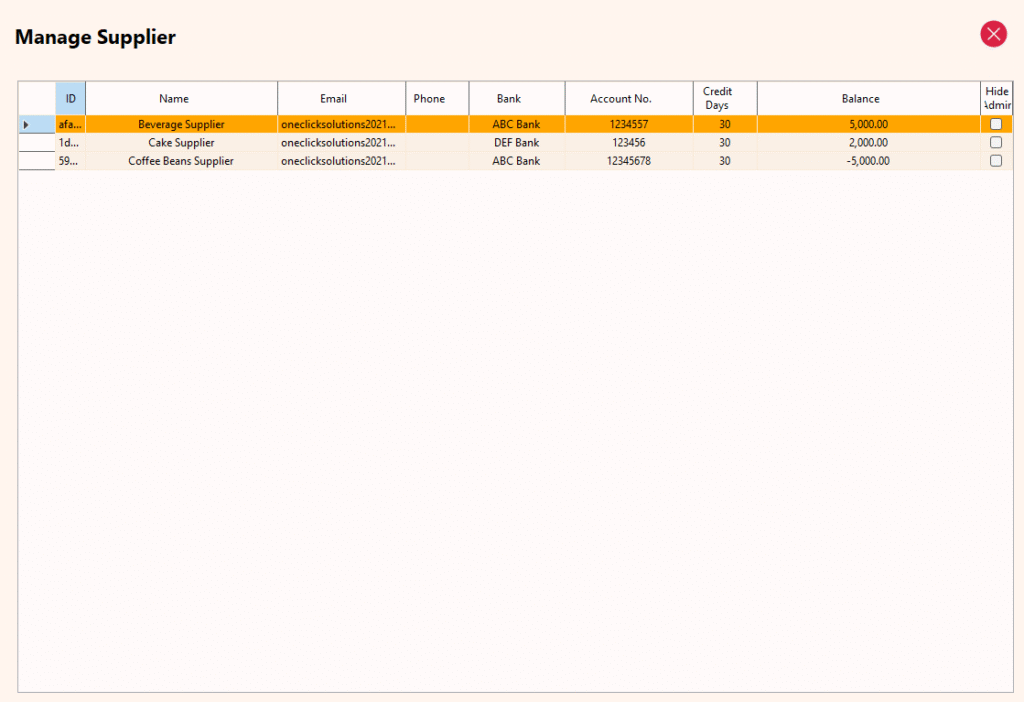
Note: The screenshots below follow a step-by-step flow to demonstrate how the Supplier Module works in practice:
-
Three suppliers were added.
-
One invoice was created for each supplier.
-
The pending invoices screen was viewed.
-
One credit note was added for each supplier.
-
A payment was made using the Supplier Out feature.
-
Finally, the Manage Supplier section was accessed to view detailed information for each supplier.
This sequence provides a complete walkthrough of supplier management, from creation to transaction tracking.
Pending
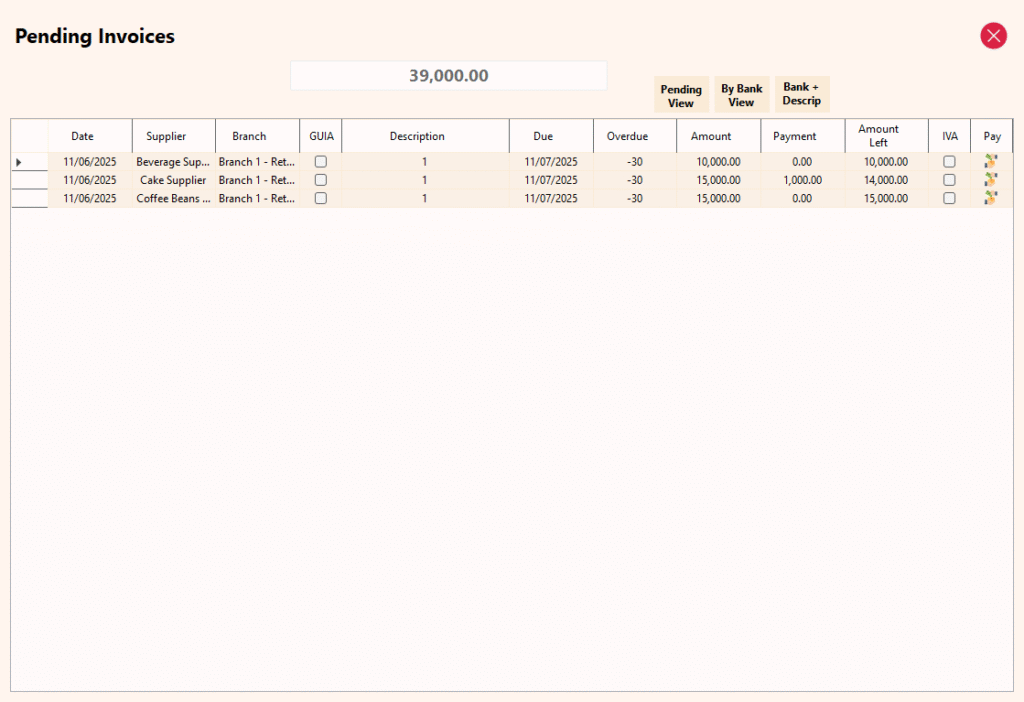
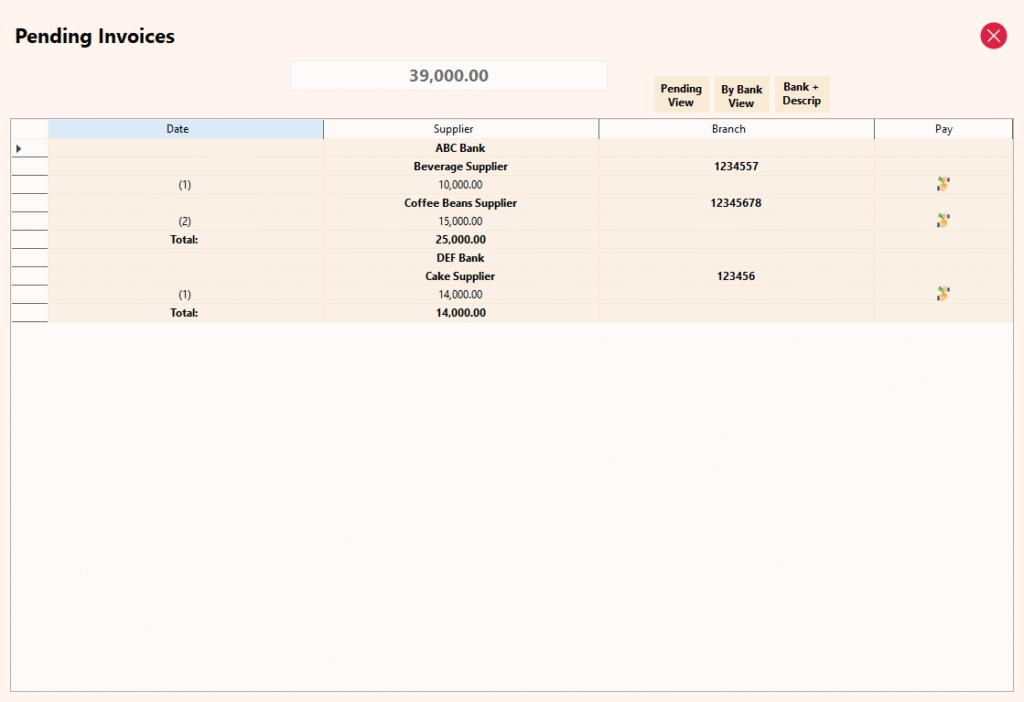
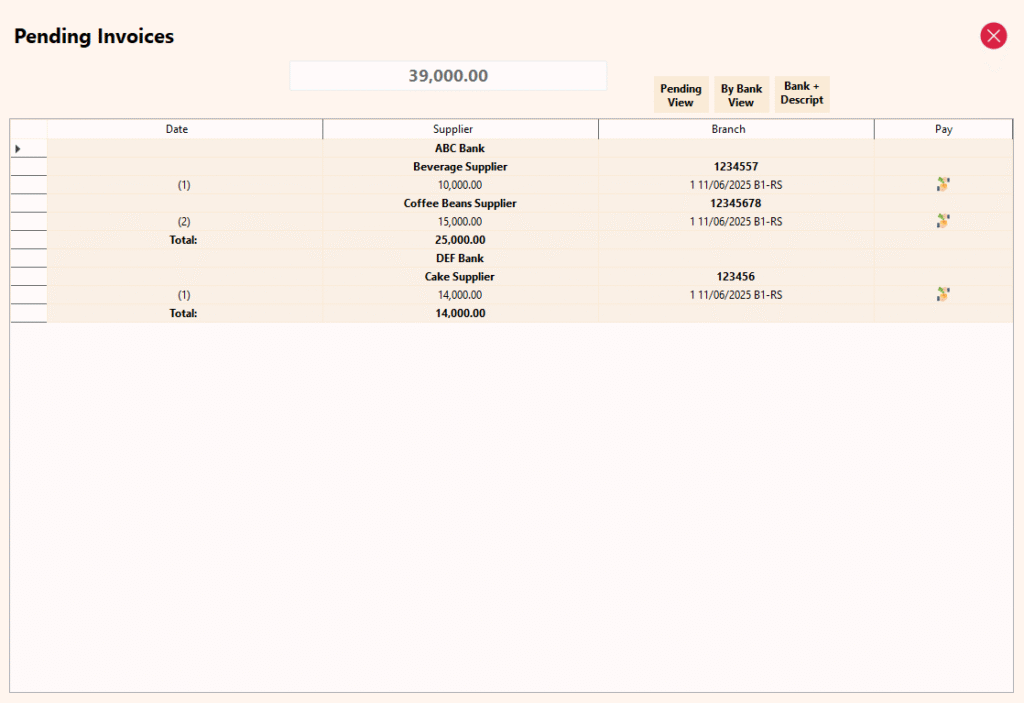
The Pending Invoice feature provides a comprehensive overview of all unpaid supplier invoices, helping businesses manage liabilities efficiently. It offers three distinct views for flexible reporting and streamlined payment processing:
Pending View
Displays all outstanding invoices in a clean list format, showing essential details such as supplier name, amount due, and due dates—ideal for quickly identifying what requires payment.By Bank View
Groups pending invoices by the supplier’s assigned bank account, making it easier to generate payment statements organized by bank.By Bank + Description View
Expands on the bank view by adding detailed invoice descriptions, formatted as invoice number, invoice date, and branch initials. This view provides clear context for each payable and is especially useful when sending statements to suppliers.
Additionally, each invoice row includes a quick payment option. Clicking the pay icon next to an invoice takes the user directly to the Supplier Out page, pre-filled with that specific invoice selected for payment. This allows for fast, targeted settlement of individual invoices without manual selection. The final screenshot in this section demonstrates this functionality in action, showing the Supplier Out page after initiating quick payment for the first invoice in the list.
Add Invoice
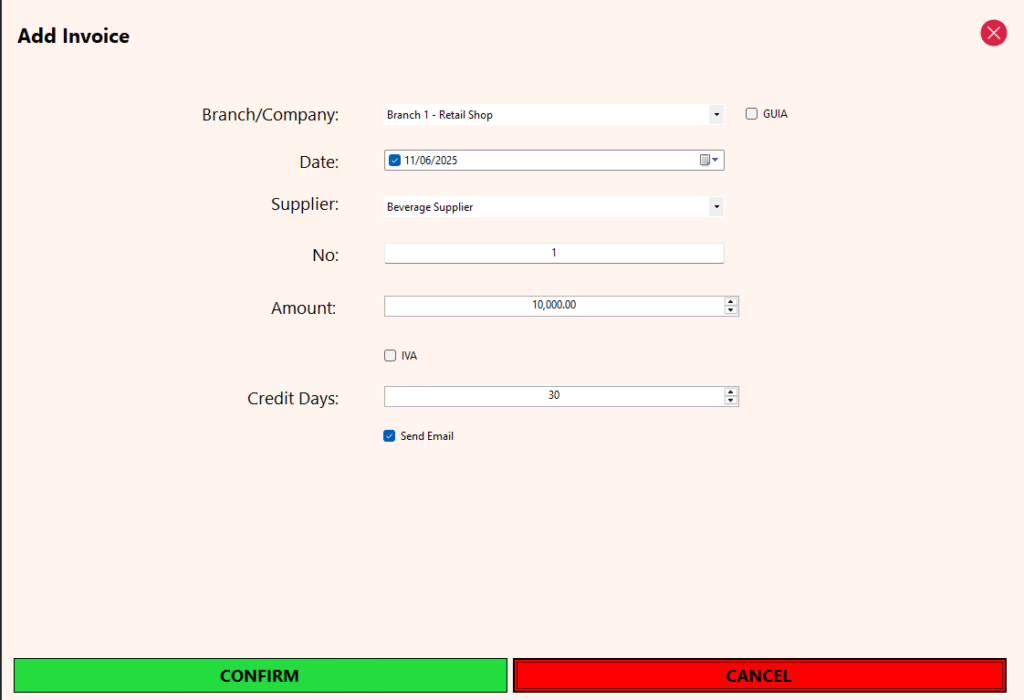
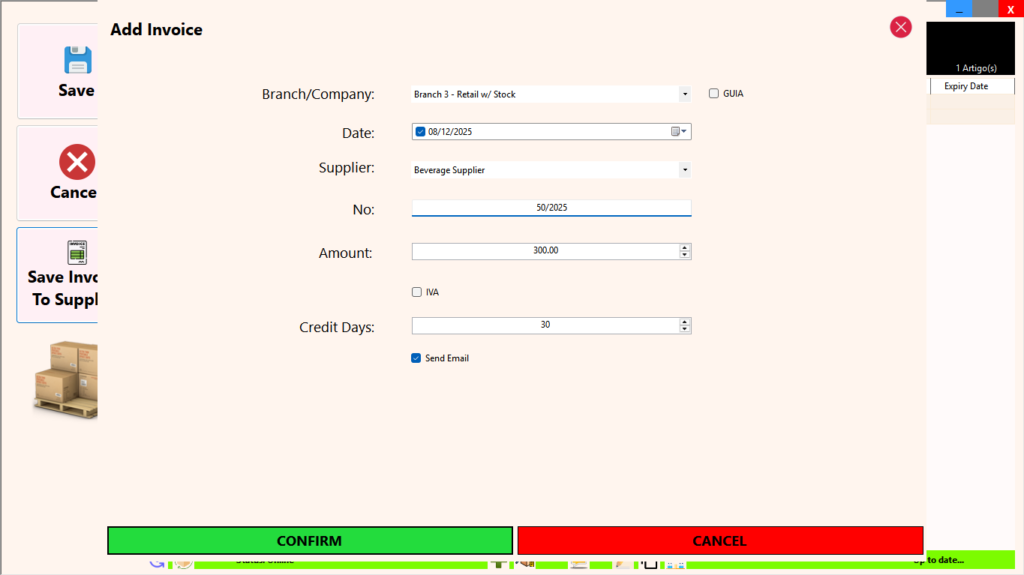
The Add Invoice feature allows businesses to record supplier invoices with detailed tracking and flexibility. Invoices are logged per branch, enabling accurate expense allocation across multiple locations. For those not needing branch-level tracking, the first branch can be used as the default to represent the company as a whole.
Each invoice entry includes essential details such as the invoice date, supplier name, invoice number, total amount, VAT, and credit days. The system automatically applies the default credit days set for the supplier, ensuring consistency and reducing manual input.
An additional option is available to automatically email the supplier when an invoice is settled using an existing balance. If a supplier has an email address saved, this option is enabled by default, streamlining communication and maintaining clear records of automated settlements.
Note: Purchasing Module is still to come. At the moment, stock entry should be done using the stock in functionality as the invoices do not have any link with inventory.
Credit Note
The Credit Note feature enables the recording of credit notes issued by suppliers. When a credit note is added, it functions as a payment toward the supplier account, automatically reducing the outstanding balance. This ensures that account totals remain accurate and reflect any adjustments or returns.
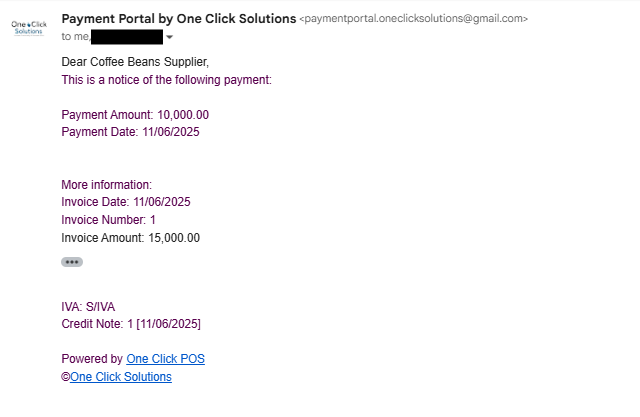
Upon saving a credit note, the system can optionally send an email notification to the supplier, informing them that their account balance has been updated due to the credit note. This promotes transparency and keeps both parties aligned on account status.
Manage Supplier
The Manage Supplier feature provides a centralized view of all suppliers, displaying key information along with the current balance for each. It serves as the main control panel for monitoring and managing supplier accounts.
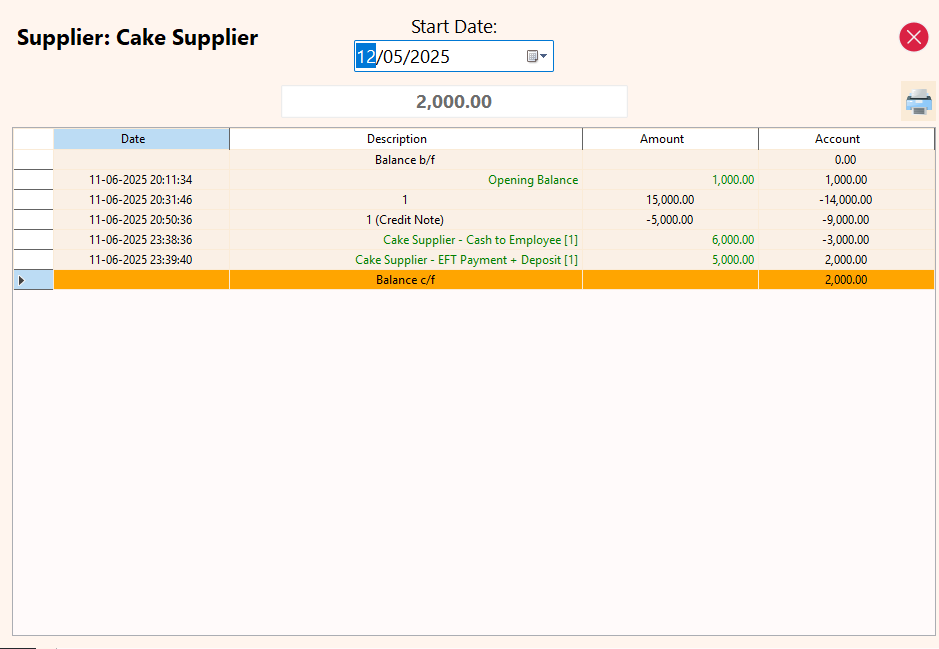
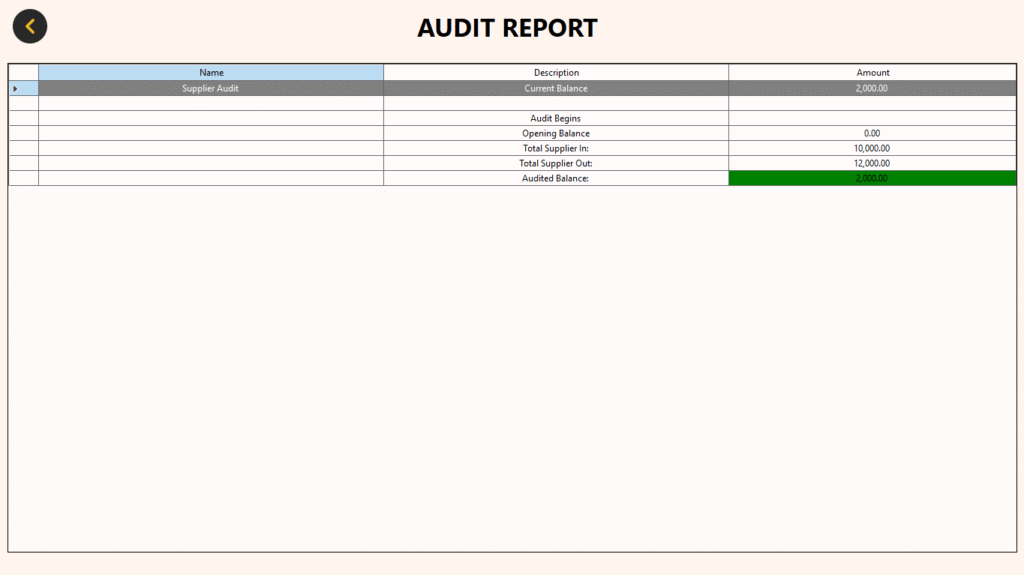
Selecting a specific supplier opens a detailed view, which includes:
-
A summary of all activity, showing incoming transactions (invoices and credit notes) and outgoing payments.
-
Attachment access via an icon, allowing users to quickly view proof of payment or related documents.
-
A pending transactions view tailored to the selected supplier, similar to the general Pending Invoice feature, but filtered for that specific account.
-
A statement view, formatted like a traditional bank statement, listing the chronological history of all financial interactions with the supplier.
-
An audit tool to verify the accuracy of the supplier’s balance by cross-checking all recorded transactions, useful for identifying and resolving any discrepancies.
This feature ensures transparency, easy traceability, and confidence in supplier account management.
Add Supplier
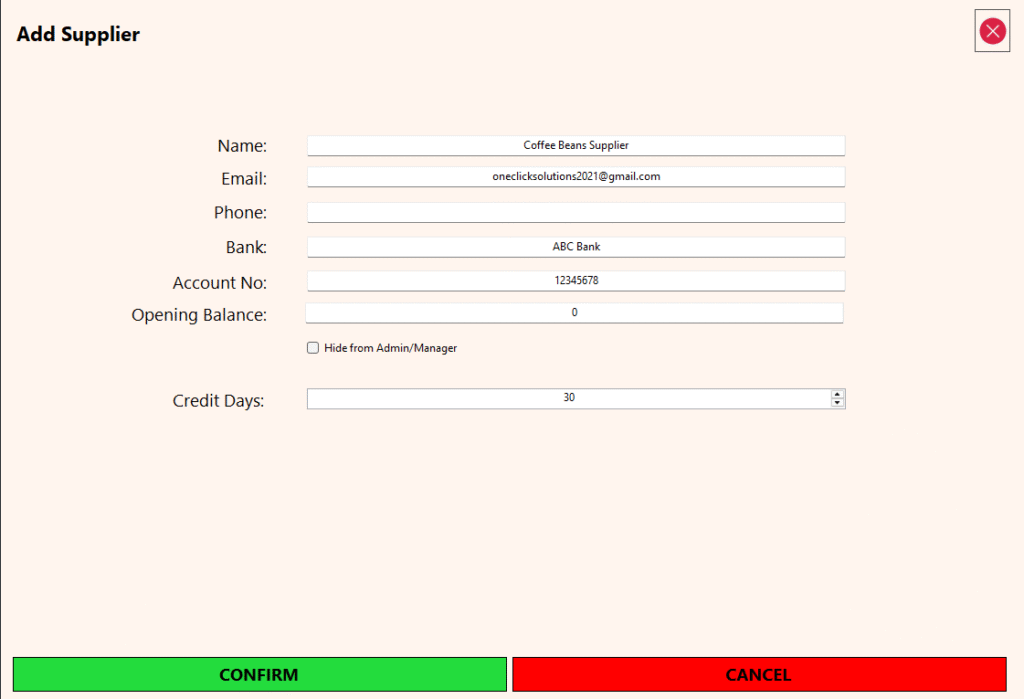
The Add Supplier feature enables the registration of new suppliers with all essential details required for smooth transaction management. It captures the supplier’s name and contact email—useful for automatically sending payment proofs or documents. Bank account information can also be recorded to facilitate future bank deposits. An opening balance field is included to reflect any pre-existing amounts owed or advanced. Additionally, businesses can specify the number of credit days typically granted by the supplier, helping to track due dates and manage cash flow more effectively.
Branch/Division
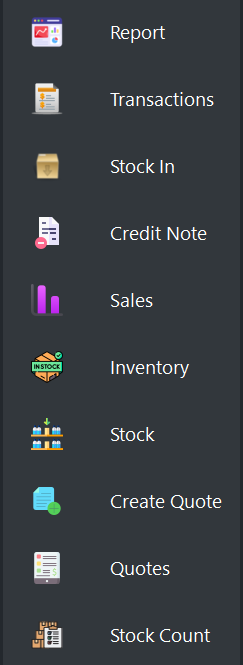
The Branch/Division Module introduces six essential features to monitor the real-time progress of each branch. Distinguishing itself from the Reporting Module, this module provides combined sales and stock reports tailored to individual branches.
-
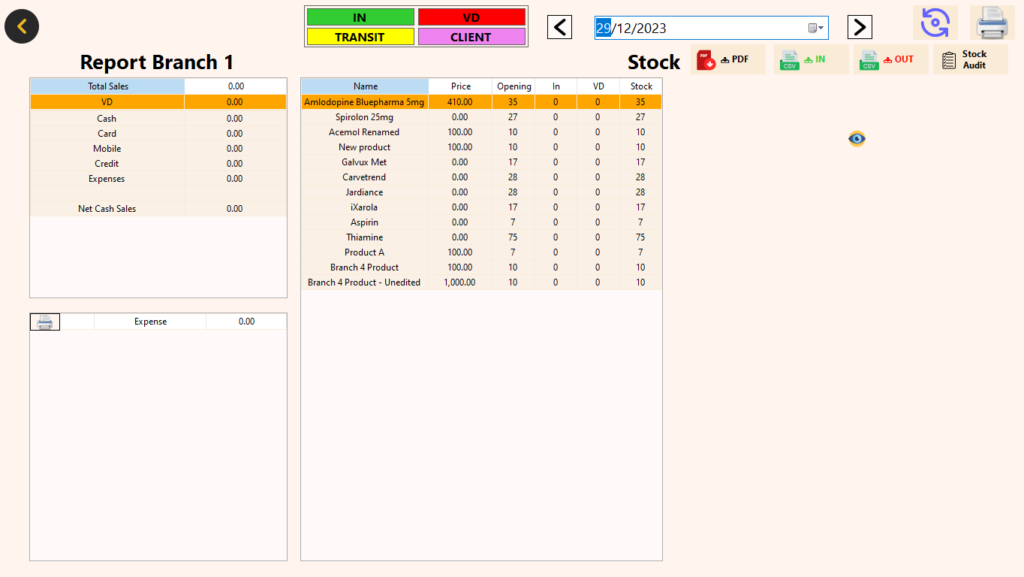
Sales & Stock Report: Offers a comprehensive view akin to the office report but tailored for the branch. Displays sales, expenses, products in stock, and out-of-stock items. Users can print incoming, outgoing, current stock, and expense reports, with the flexibility to view reports for any date.
-
Transactions: Lists all sales transactions (in & out) at the branch, enabling the reprinting of duplicate invoices (A4 & Thermal printing). Provides a breakdown of each line item within a specific invoice and allows viewing sales for any chosen day.
-
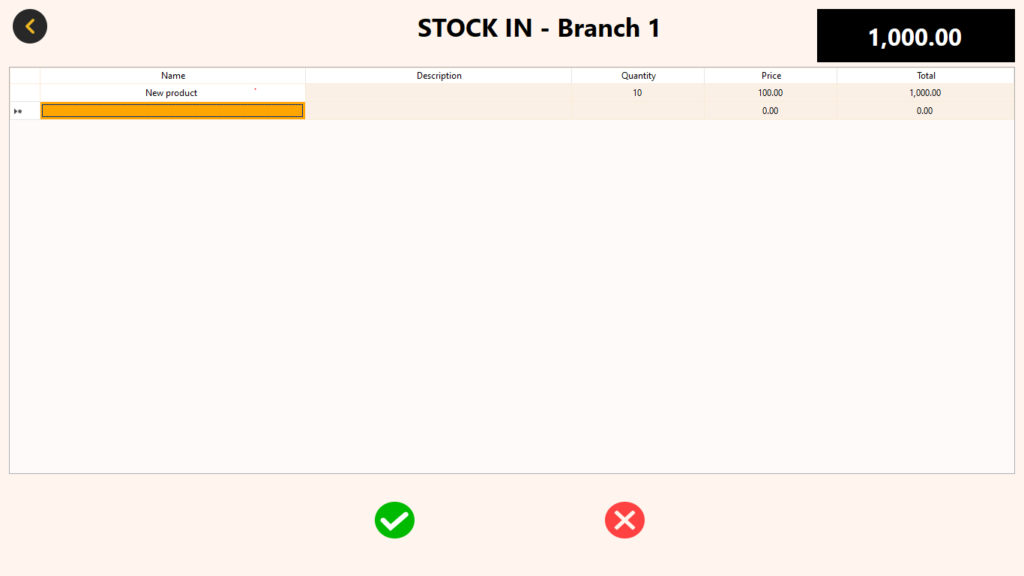
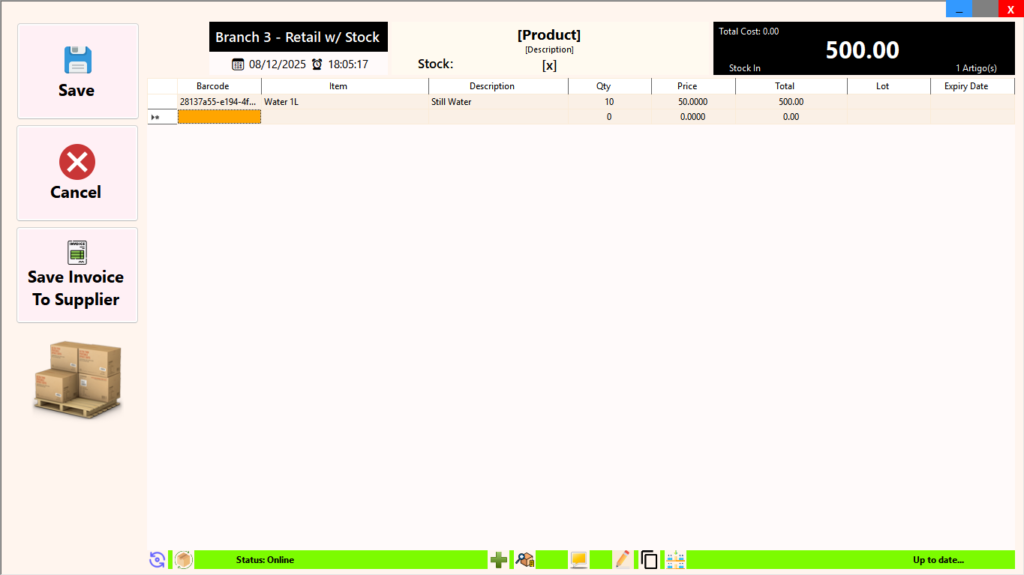
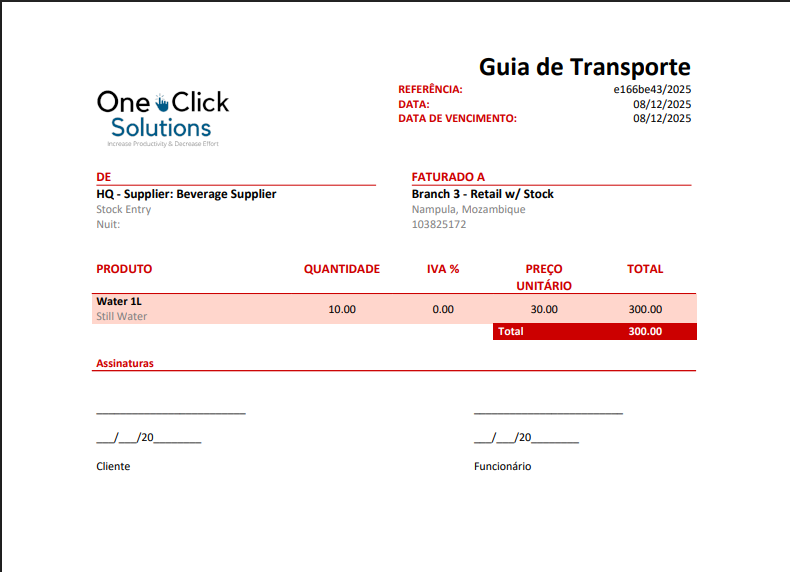
Stock In: Facilitates the process of providing stock to a branch, handling returns, or correcting stock discrepancies. Automatically generates a Guide for Transport upon completion of stock entry. The branch’s POS Module acknowledges the stock sent, allowing for real-time acceptance.
-
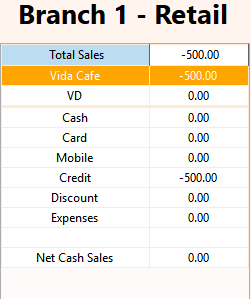
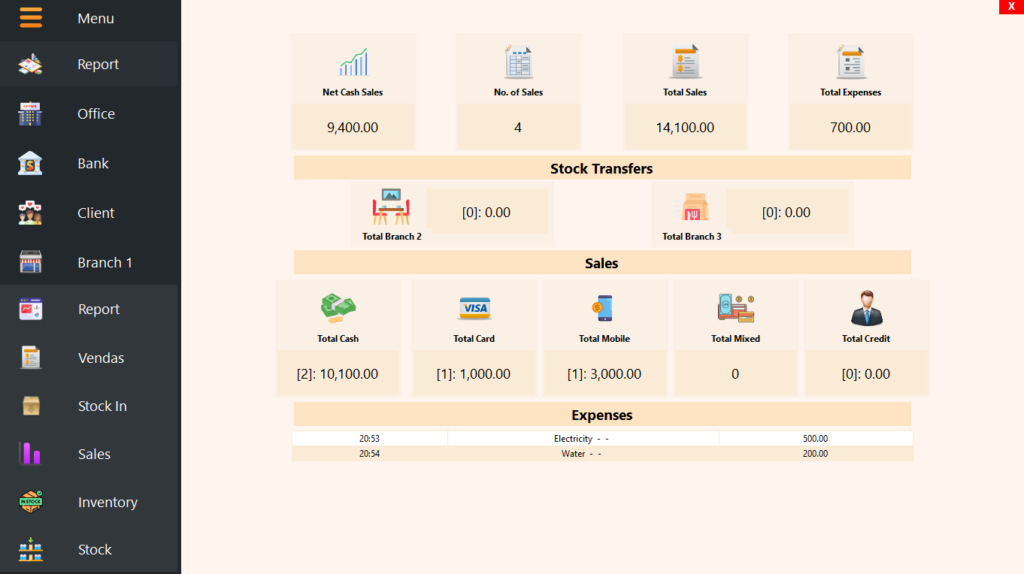
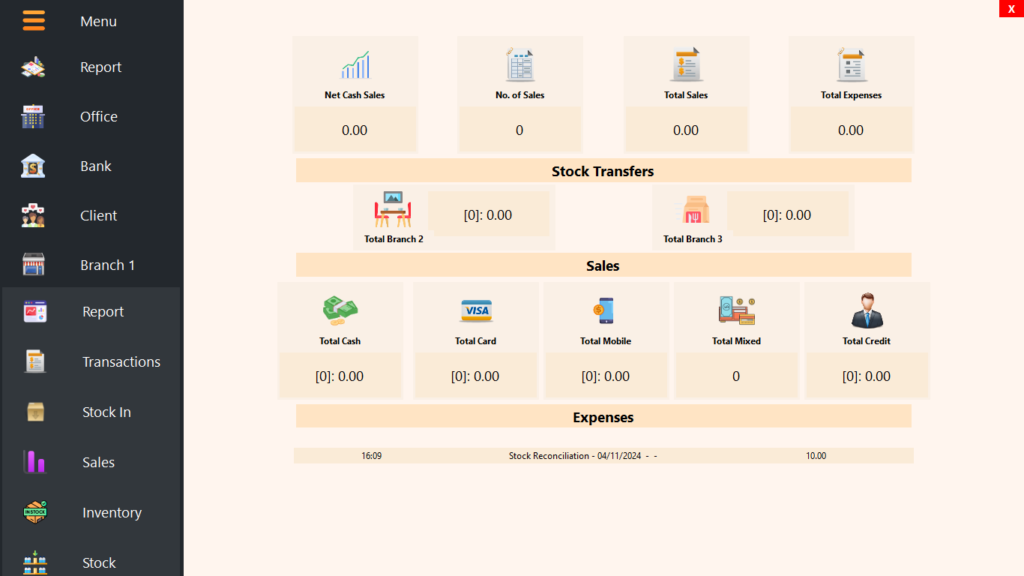
Sales Report: Presents a summarized version of the sales report, offering insights into net cash sales, the number of sales, total sales amount, total expenses amount, total stock transfers, number of payments, their total values for each recorded payment method, and a list of expenses.
-
Inventory Report: Displays the current inventory in monetary and stock terms, showcasing available items at the selected branch. Similar to the Stock Report in the Reporting Module, it provides sorting and searching mechanisms.
-
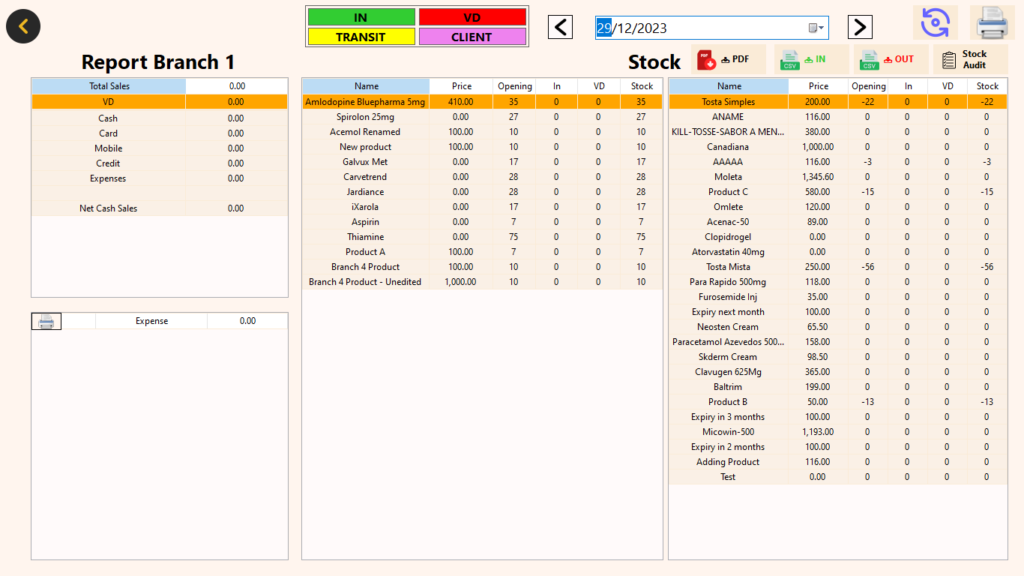
Stock Report: Resembles the Inventory Report but includes the entire product list, including items out of stock. Equipped with sorting and searching functionalities, it offers a comprehensive overview of stock status at the branch.
Sales & Stock Report
This feature offers a comprehensive sales overview, delineating buyers (public or clients) and detailing payment methods and respective amounts. Similar to the Office in the Reporting Module, it also itemizes branch expenses. On the stock side, the initial table displays current stock, with the view icon revealing out-of-stock items. It tracks stock receipts, inter-branch transfers, and sales to the public or clients, providing opening and closing stock balances.
Additional Features:
- Resync Page: Manually update for the latest information (to save data but could be auto-refreshed on request).
- Print Screenshot: Capture and print a snapshot of the page.
- Print Expense List: Document and print detailed expense records.
- Download PDF: Acquire a comprehensive PDF of the entire stock list.
- Download CSV: Export CSV files for all stock entries and exits.
- Stock Audit: Verify and reconcile stock accuracy for improved reliability.
Transactions (In & Out)
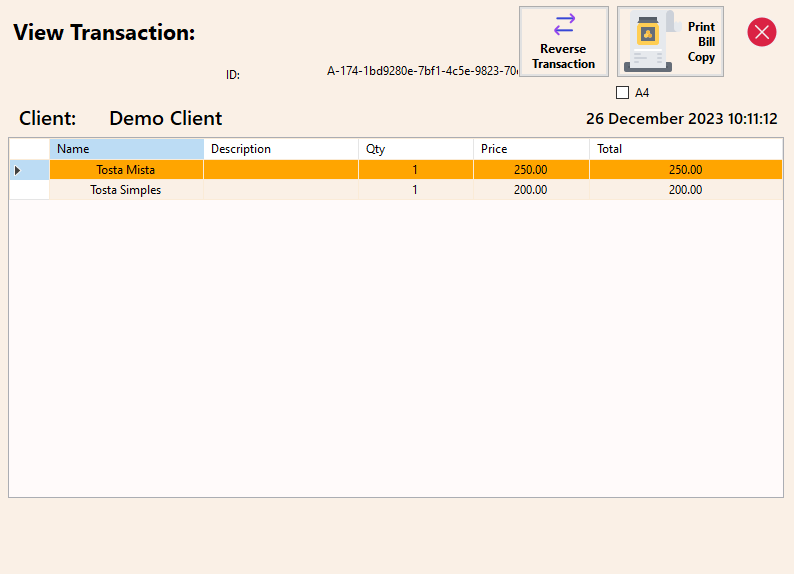
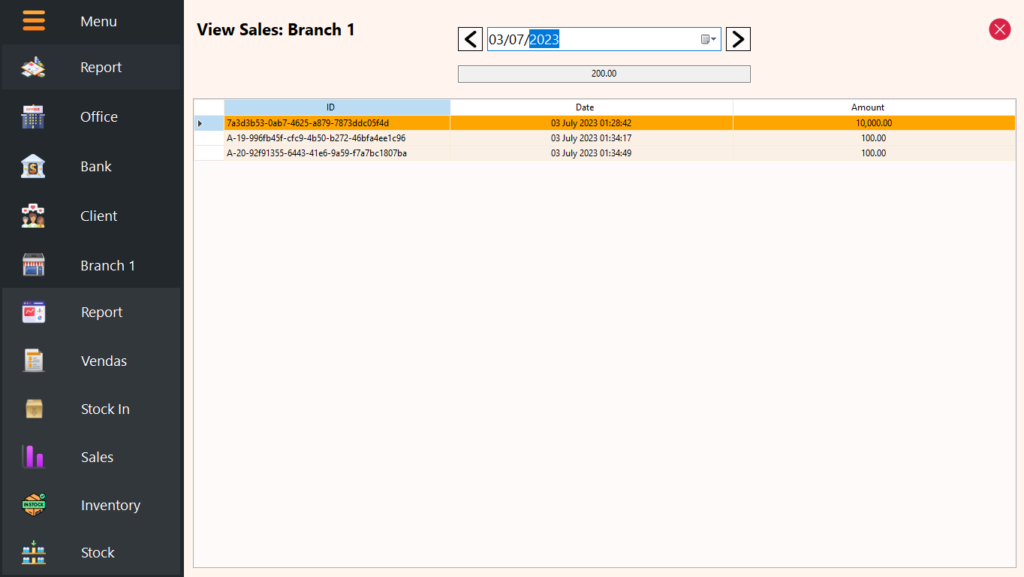
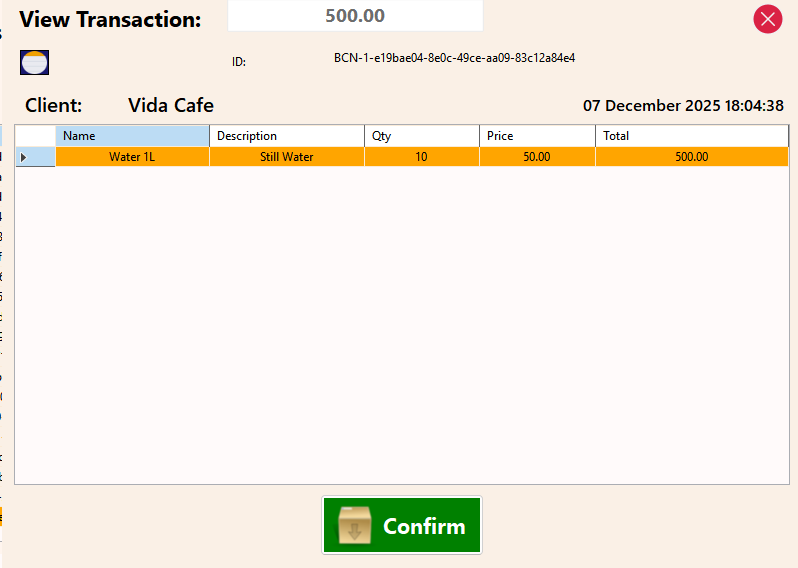
This feature presents a detailed list of all transactions for a specific day (in & out), encompassing transaction ID, timestamp, and amounts. For deeper analysis, each transaction can be individually examined, offering the functionality to reprint the transaction on A4 or Thermal printing paper.
Note: The system automatically assigns internal IDs to sales. However, the invoice number follows a structure: [Branch’s Serial Letter]-[Invoice Number]-[System ID].
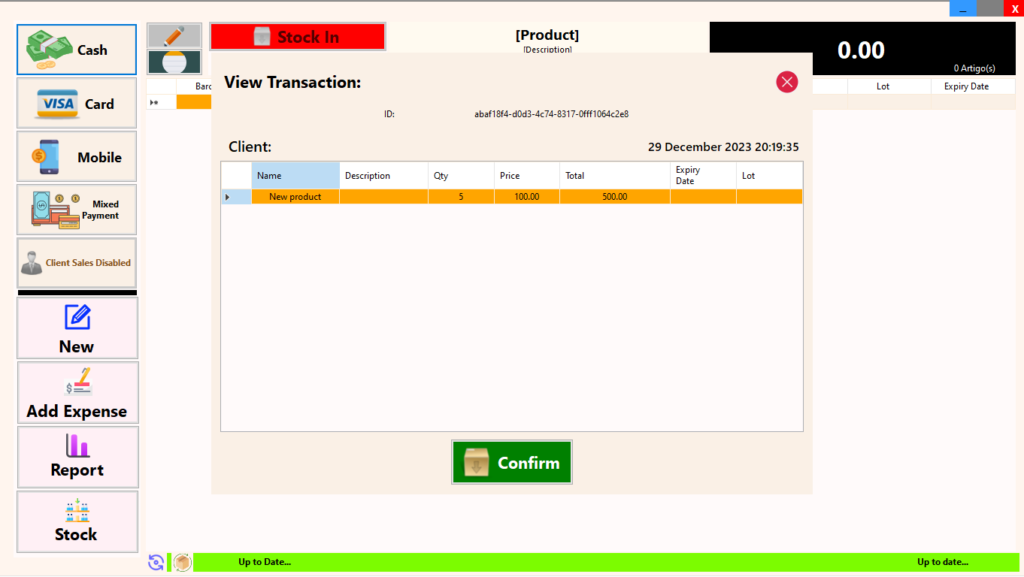
Note: Transaction IDs serve as indicators for various transactions. If the ID comprises a mix of numbers and letters, it denotes a stock-in from the ERP side. In the case where the initial characters align with another branch’s serial, it signifies a stock transfer; otherwise, it indicates a sale.
Stock In
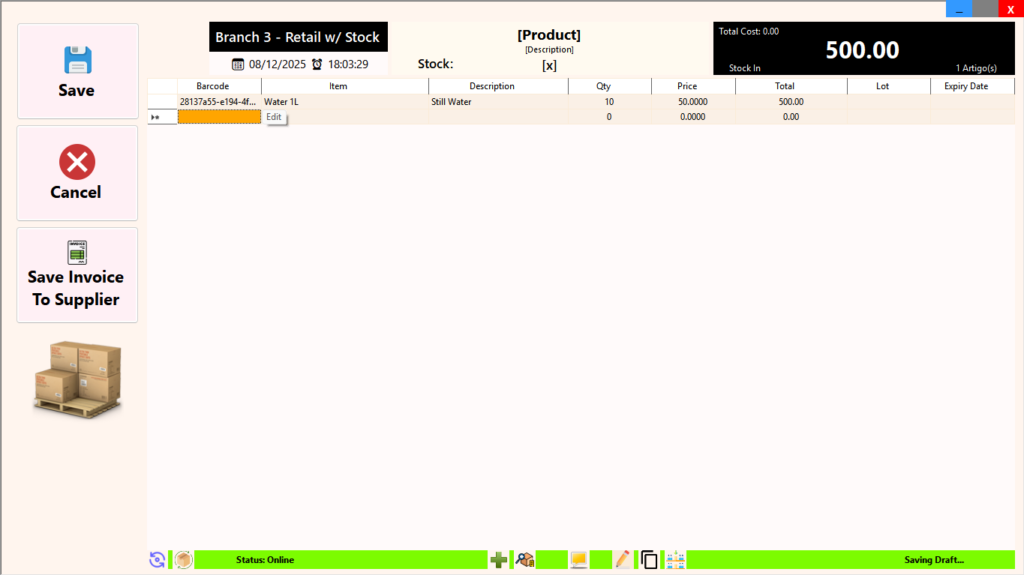
The Stock In feature facilitates processing returns, adjusting stock as needed, and, until the introduction of the purchasing feature, serves as the method for making stock entry to a branch after purchase. Comparable to using the POS Module for selling to the branch, this feature is available with both the Name-based POS and Barcode-based POS options, offering flexibility based on the company’s system preferences. Upon confirmation of stock entry, a Transport Guide in PDF format is automatically generated, and the branch’s POS receives a notification indicating the successful stock entry.
Note: The POS Module explains the interface in details.
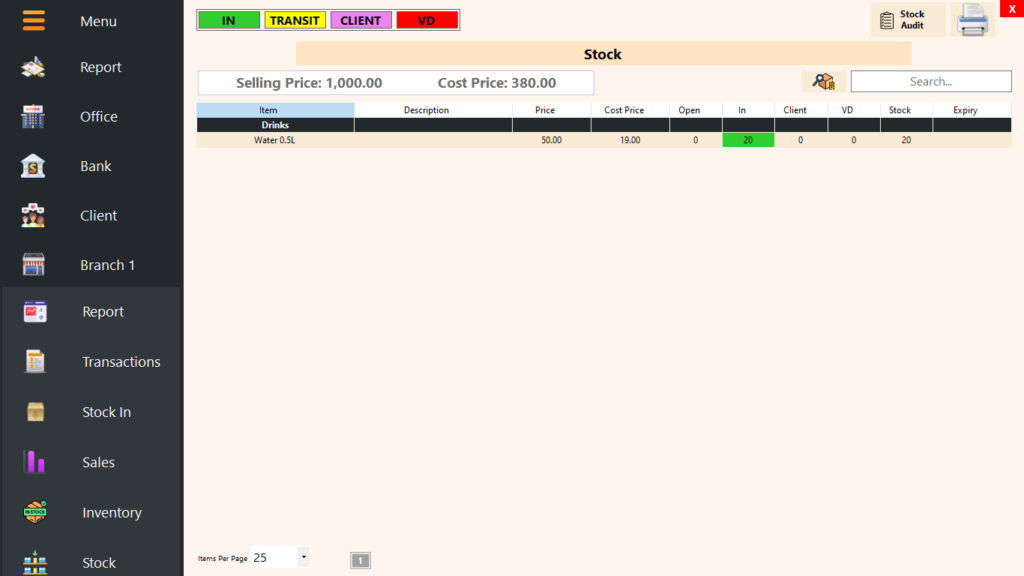
Weighted Average Costs: (28.08.24)
With the Weighted Average Cost feature, stock management becomes seamless. Instead of setting a cost price during product addition, you simply enter the cost during stock entry. Once confirmed, the system automatically calculates and updates the weighted average cost, ensuring consistent, accurate cost calculations across your inventory.
The screenshots below show:
-
Product Setup
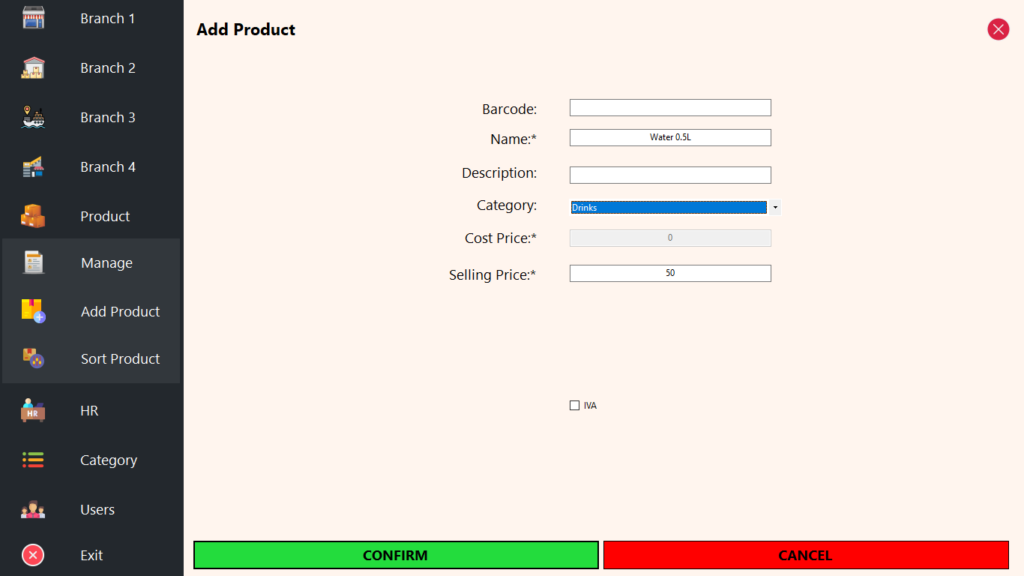
First, add Water 0.5L to the inventory and set the selling price for customers.
(Screenshot: Product addition screen showing Water 0.5L with selling price set.) -
Stock Entry with Cost Price
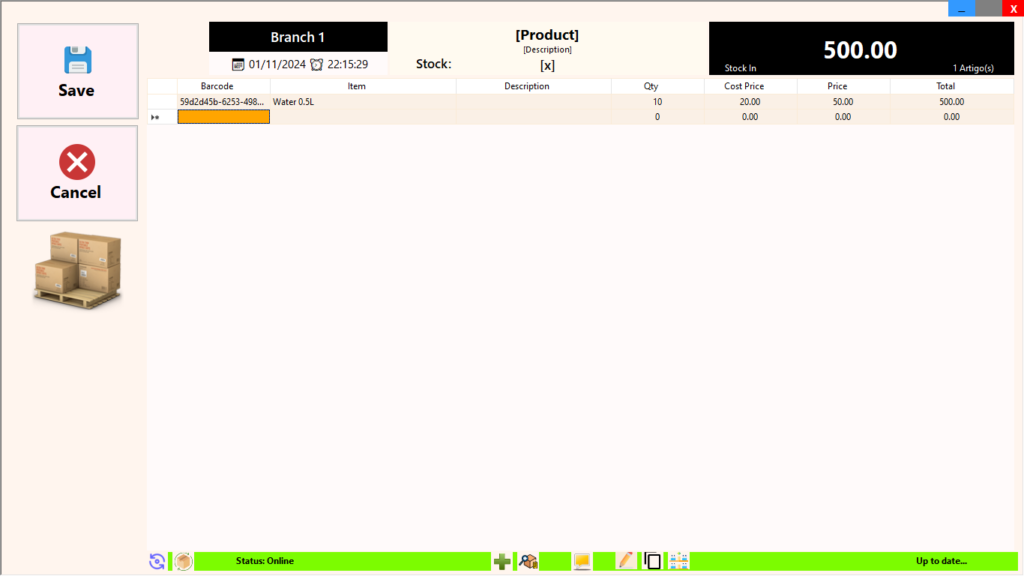
When receiving new stock, input the cost price per unit.
For example, enter 10 units at $20. The system records this cost against the inventory.
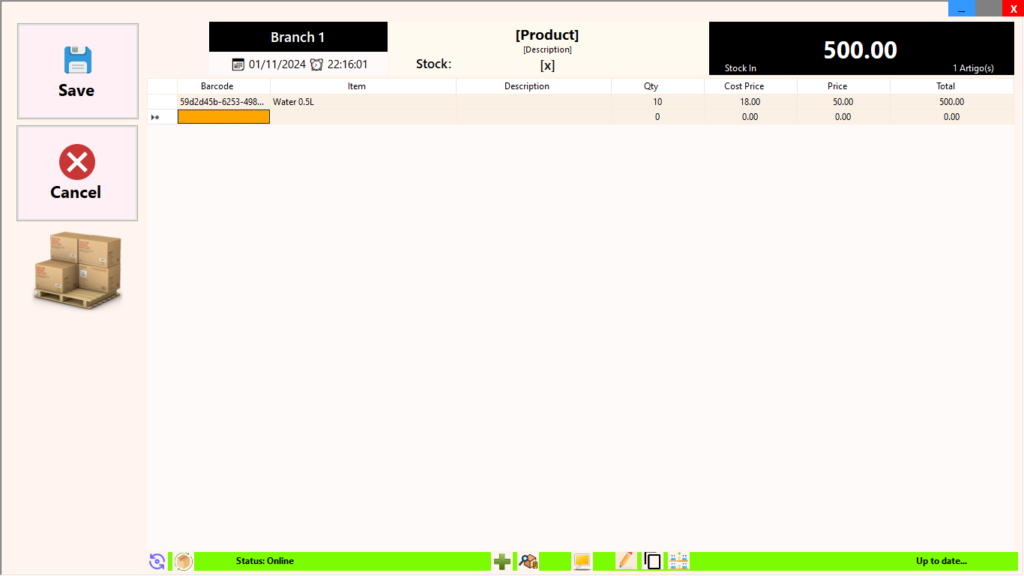
(Screenshot: Stock-in entry for 10 units at $20 & another at $18.) -
Automatic Weighted Average Update
Adding a second entry for 10 more units at $18 allows the system to automatically calculate the weighted average cost.
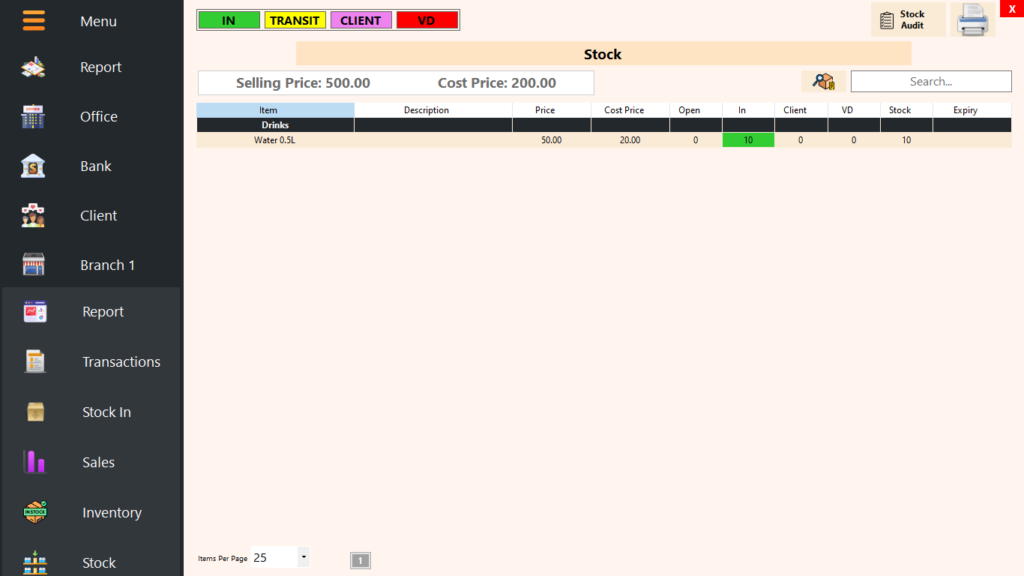
With this update, the new Weighted Average Cost (WAC) is $19 per unit, displayed in the inventory details.
(Screenshot: Updated inventory view with WAC of $19 for Water 0.5L.)
The weighted cost of each entry seamlessly updates your inventory, ensuring accurate and consistent pricing calculations across all stock levels.
Purchasing (12.07.25)
The Purchasing feature allows you to register stock entries as official supplier purchases, not just manual stock adjustments.
When recording a purchase, stock is added as usual, but the entry is now linked to a supplier invoice. This means the system treats the transaction as a real purchase from a supplier, fully connecting inventory movement with accounting records.
For each purchase:
Stock is increased for the purchased items
The supplier invoice is recorded
The amount is automatically reflected in the supplier’s account
Financial accounts are adjusted accordingly
This creates a complete and traceable link between what was bought, who it was bought from, and how much is owed or paid.
The Purchasing feature ensures supplier balances, stock levels, and financial records remain synchronized thus removing guesswork and reducing accounting errors.
Credite Note (22.01.25)
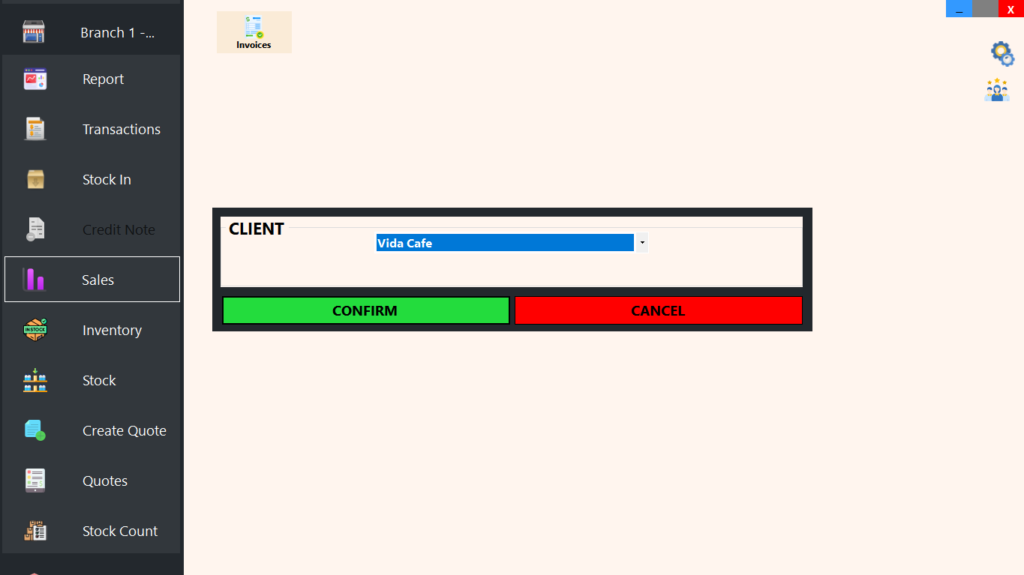
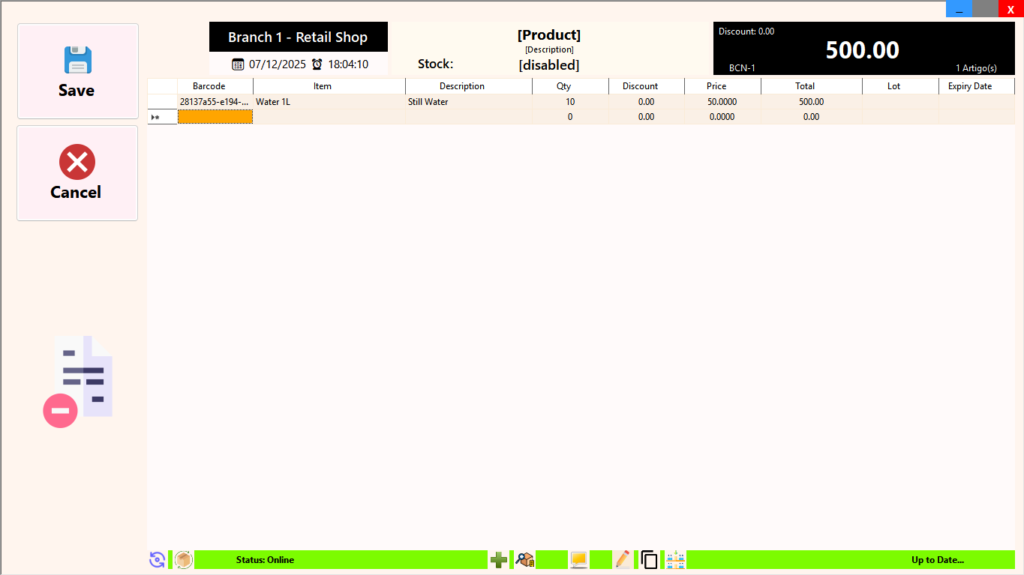
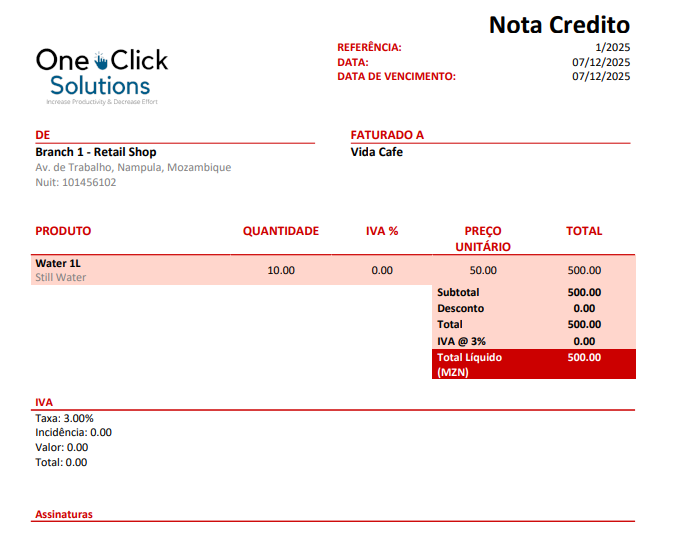
The Credit Note feature allows you to professionally handle customer returns while keeping your accounts, stock, and reports perfectly aligned.
When a credit note is issued, the client’s account is automatically adjusted for the value of the returned goods. At the same time, the system makes a corresponding stock entry, returning the items back into inventory without manual intervention.
The original sale is also transparently reflected as a sales return, ensuring that client statements, sales reports, and financial summaries remain accurate and audit-ready.
Key Benefits:
Adjusts the client balance automatically
Restores stock for returned items
Records the transaction as a sales return in reports
Eliminates manual corrections and accounting errors
Ensures consistency across ERP, POS, and inventory
Sales Report
The Sales Report provides a condensed overview of today’s sales, featuring net cash sales, the number of invoices, total sales, and total expenses. Additionally, it highlights the total stock transfers that occurred. The report breaks down sales by payment methods (cash, card, mixed payments, credit sales), specifying the number of payments made. It also details the various expenses incurred during the day.
Inventory
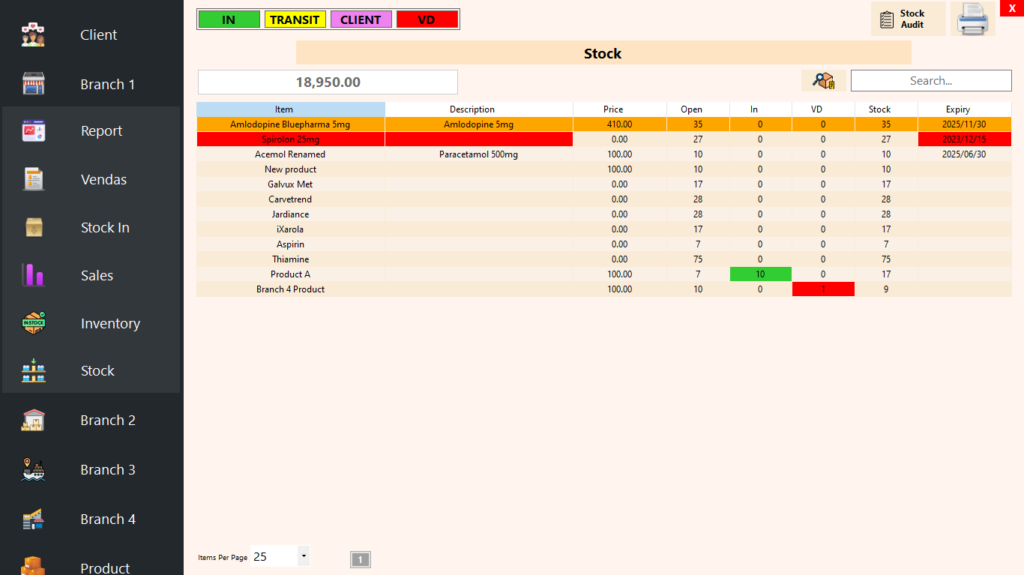
The Inventory Report displays the current available stock, facilitating analysis of product availability, expiry dates, prices, and overall inventory value. The user-friendly interface allows for efficient search and scrolling functionalities, enhancing ease of navigation and stock management. Additional features include the ability to print the stock report and perform a stock audit for comprehensive stock management.
Note: In the absence of stock enforcement, negative stock quantities may occur.
Note: The system automatically employs color codes to distinguish items approaching expiration and those already expired.
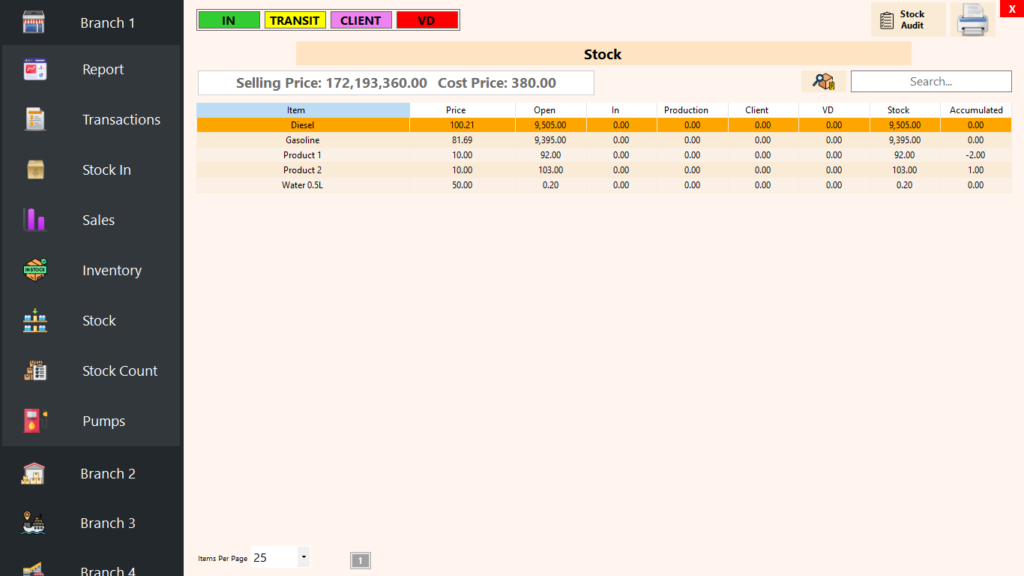
Stock
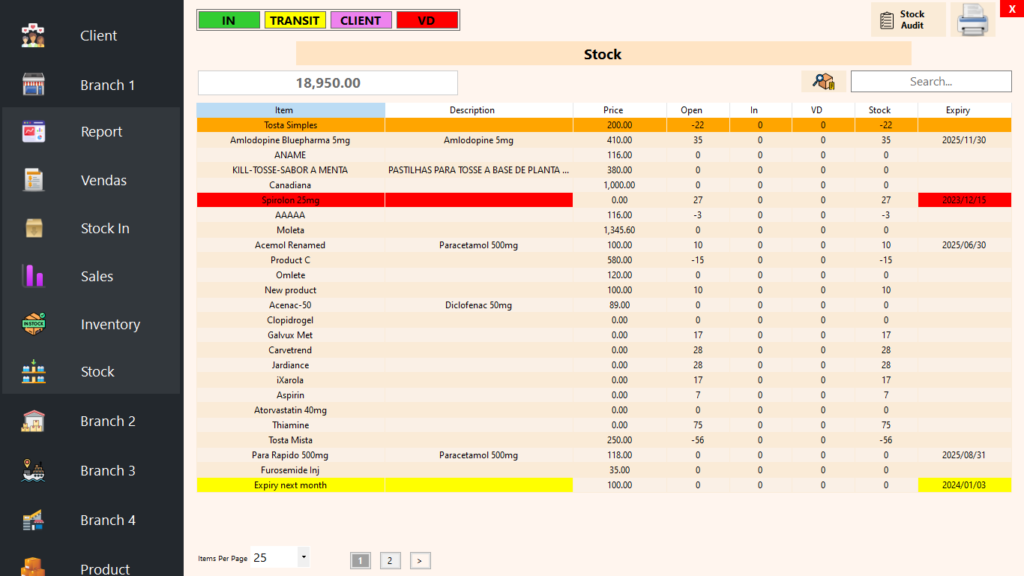
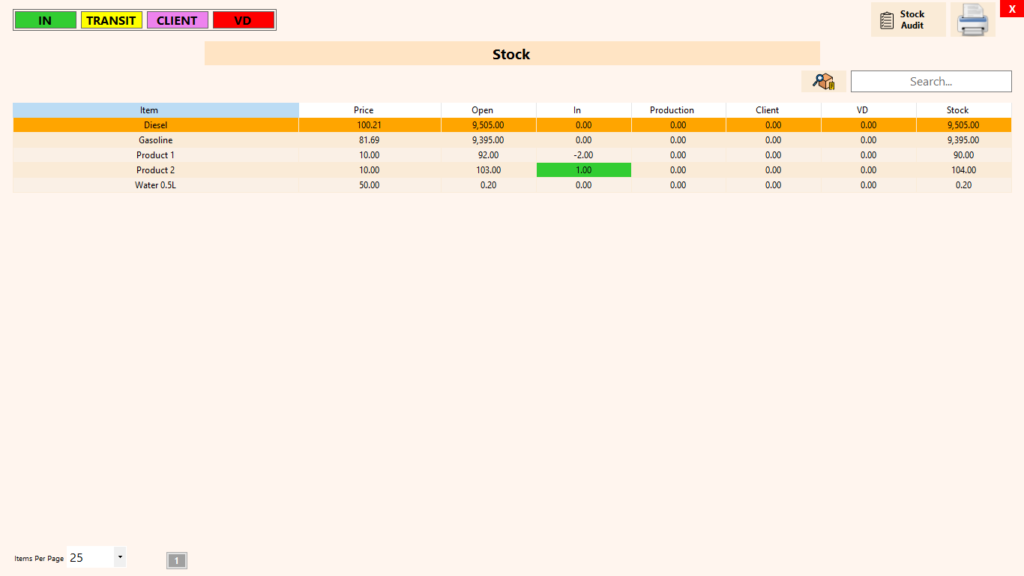
The Stock Report provides a detailed view of the current inventory based on the company’s product list, offering insights into items in and out of stock. The user-friendly interface allows for efficient search and scrolling functionalities, enhancing ease of navigation and stock management. Additional features include the ability to print the stock report and perform a stock audit for comprehensive stock management.
Note: In the absence of stock enforcement, negative stock quantities may occur.
Note: The system automatically employs color codes to distinguish items approaching expiration and those already expired.
Note: The system excludes items with negative quantities when calculating the inventory value.
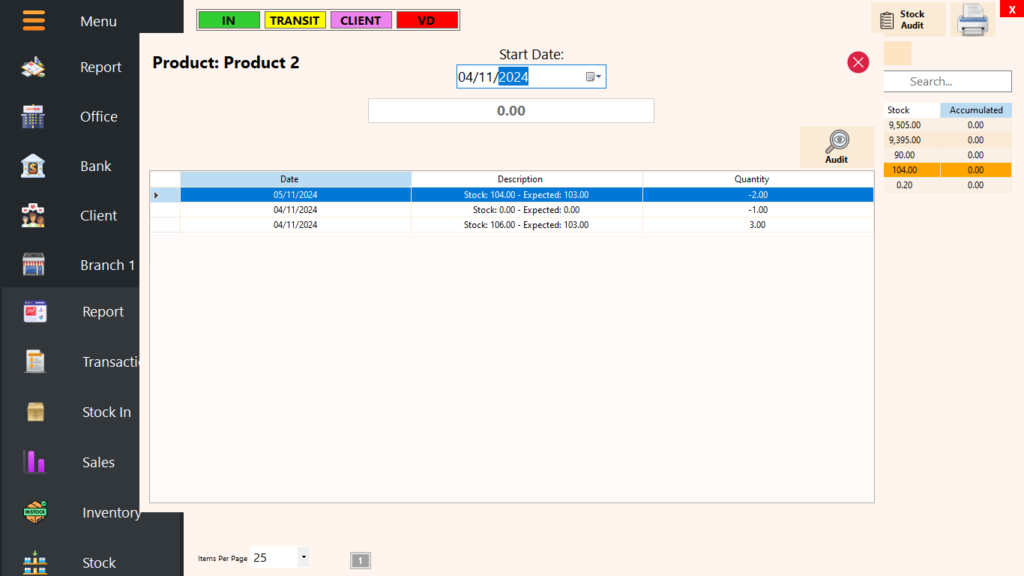
Product History & Audit (13.07.25)
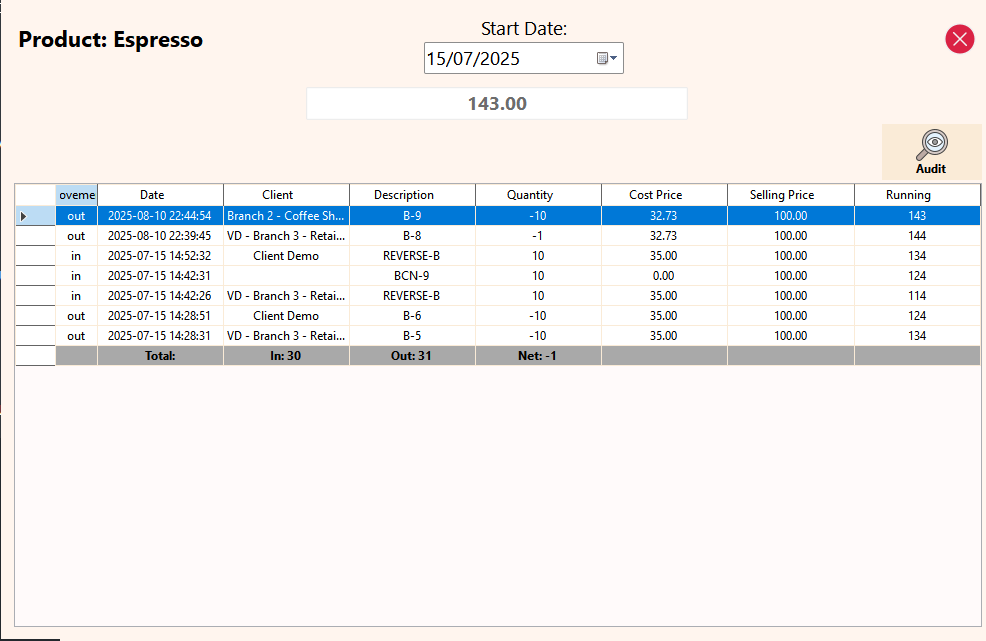
The Product History and Audit feature provides a complete historical view of how a product’s stock has changed over time, giving you full visibility into every movement.
From a selected starting date, the system lists every stock movement in and out, showing exactly how the product balance evolved after each transaction. Each listed transaction can be opened to view the related document, such as the invoice or credit note it was sold or returned on.
For every movement, the system displays:
The cost price
The selling price
The quantity in or out
The running stock balance after each transaction
This makes it easy to trace discrepancies, analyse pricing history, and understand stock behaviour at any point in time.
Stock Audit
The built-in audit function verifies stock accuracy by recalculating all recorded stock entries and exits from the selected date. The system compares the calculated balance against the current stock level to confirm consistency and highlight any differences.
This ensures:
Stock figures remain reliable
Errors are detected early
Inventory data is fully auditable and transparent
The Product History and Audit feature gives you complete confidence in your stock — from the first entry to the latest sale.
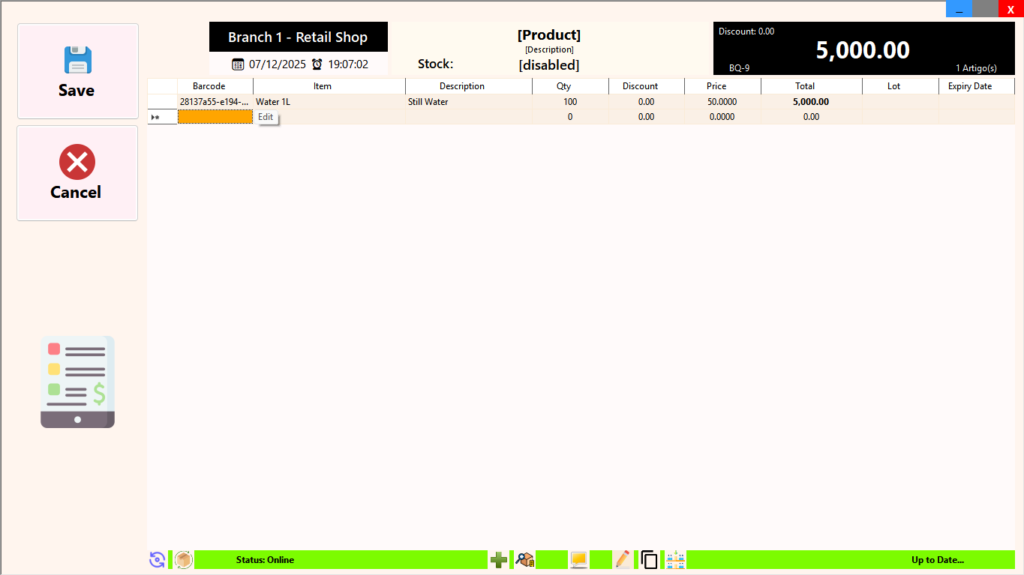
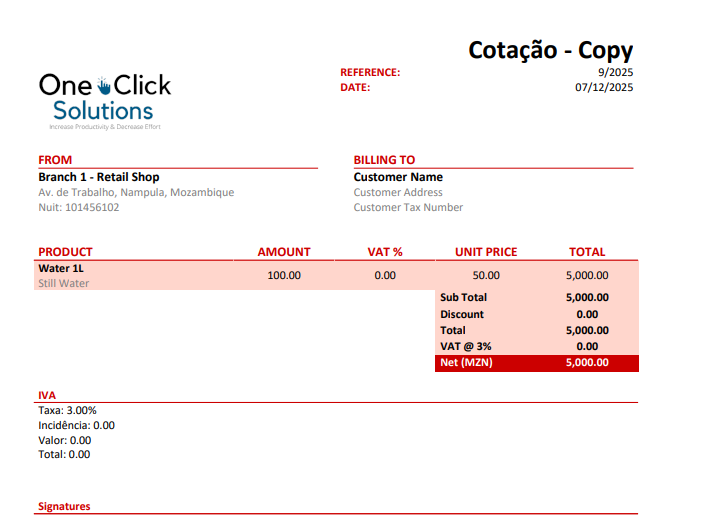
Create Quote (15.02.25)
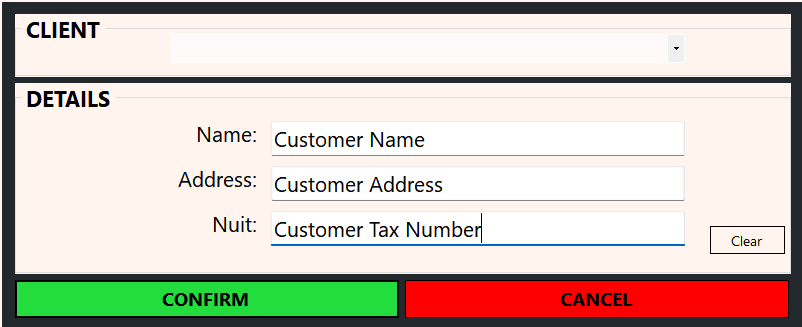
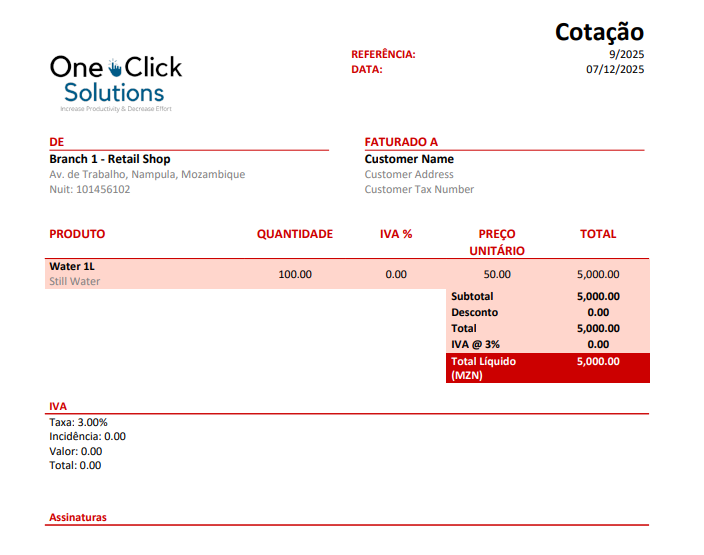
The Quote feature allows you to quickly create and share a formal price proposal with a client before any sale takes place.
Whether the client is new or already existing, you can prepare a detailed quote that includes products or services, quantities, pricing, discounts, and taxes — all without affecting stock levels, accounts, or sales reports.
Once created, the quote can be sent directly to the client, giving them clear visibility of what is being offered and at what price. This makes it easy for clients to review, approve, or request changes before committing to a purchase.
How it works
Create a quote for new or existing clients
Add items, quantities, discounts, and taxes
Share the quote with the client for review
No stock movement, no accounting entries, no financial impact
Convert the quote into a sale or invoice once approved
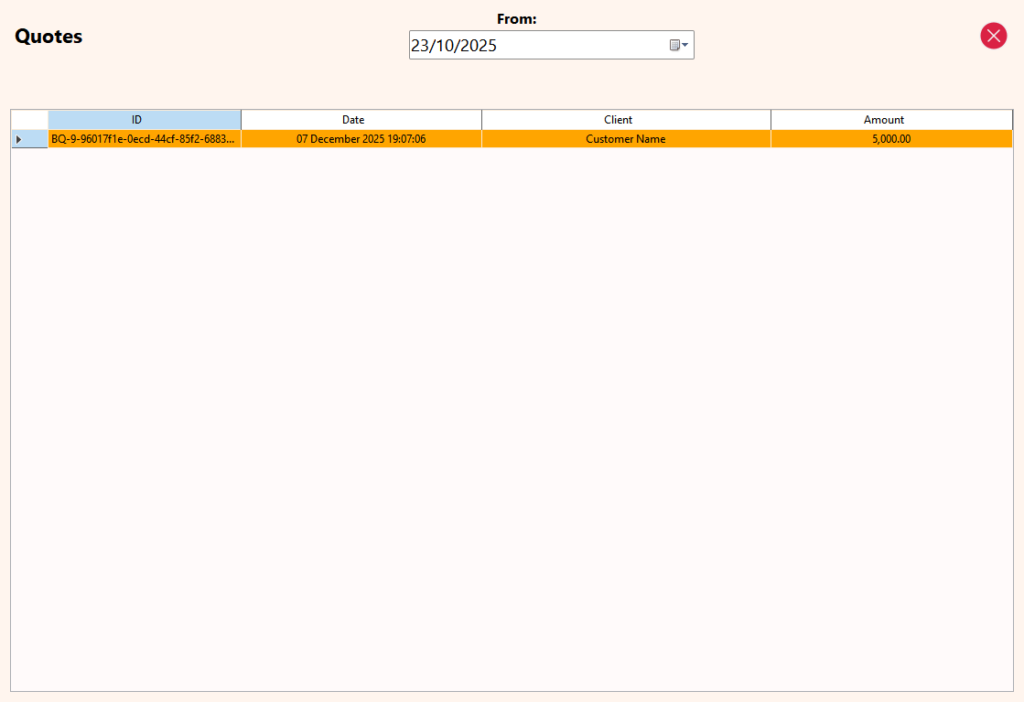
Manage Quotes (15.02.25)
The Manage Quotes feature provides a complete overview of all quotes created within a selected date range.
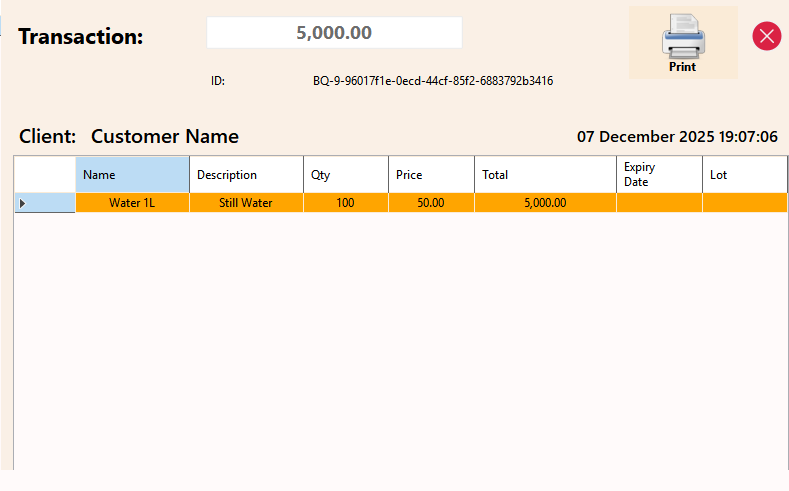
From this section you can:
View any previously created quote
Duplicate a quote to reuse it for another client or scenario
Track what has been sent, reused, or converted
POS Integration:
Quotes can be converted directly into an invoice once the client confirms
Quotes can be duplicated and reused, making repeat pricing fast and consistent
This workflow saves time, reduces errors, and ensures pricing consistency across sales.
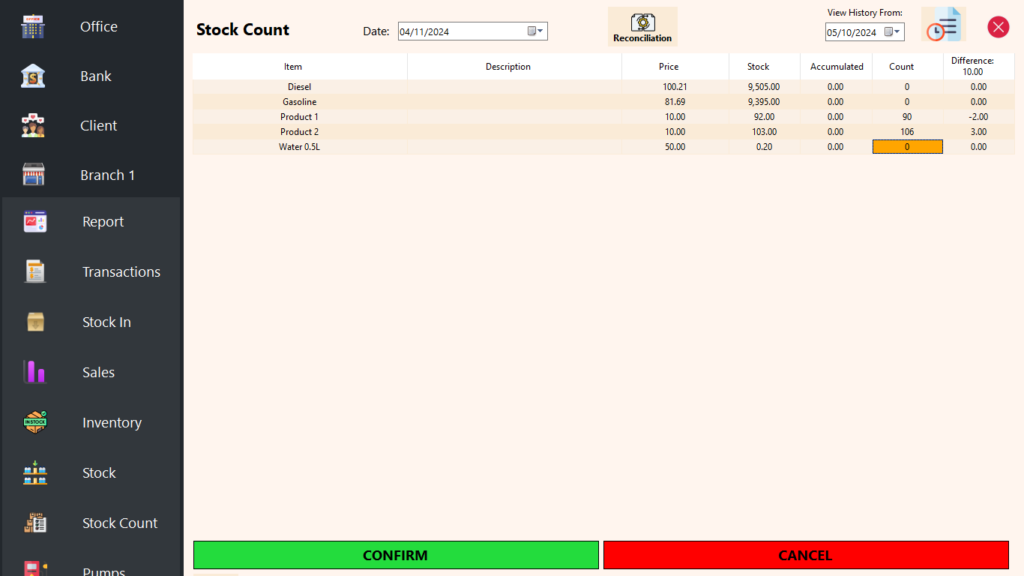
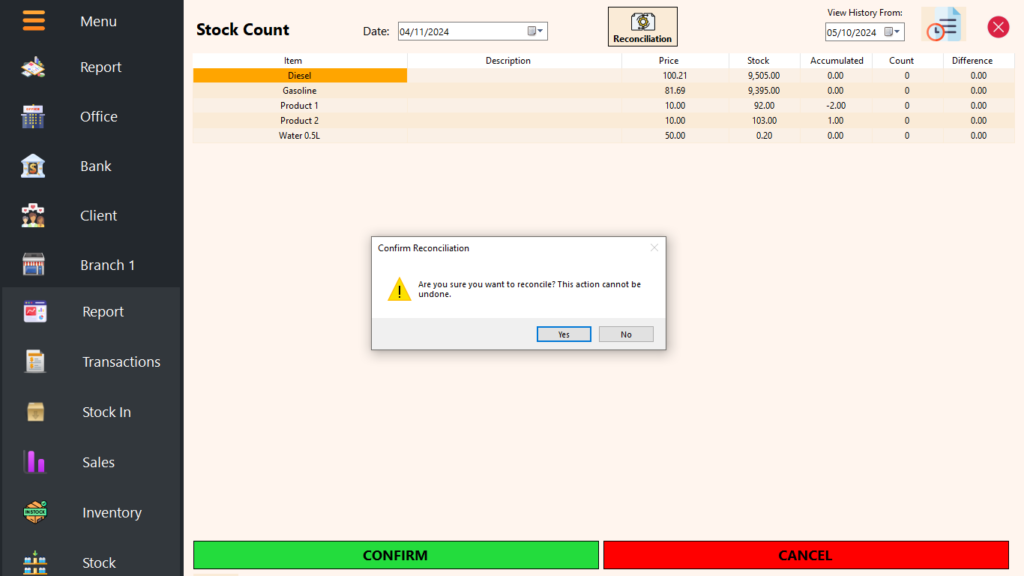
Stock Count & Reconciliation (04.11.24)
Stock Count
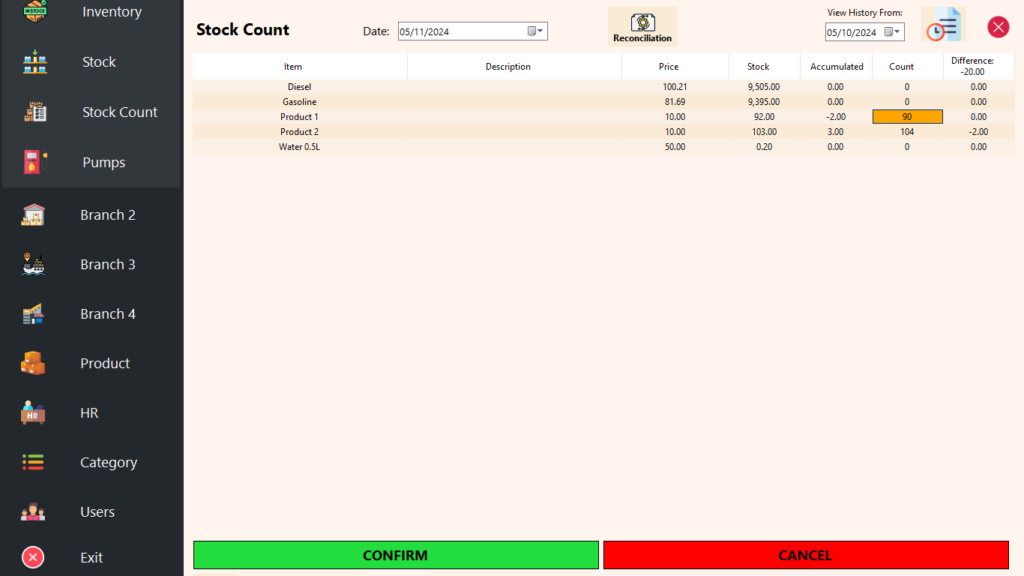
Easily perform stock counts at any time, as frequently as needed. The stock count feature lists existing stock and records any discrepancies, displaying these differences in accumulated results. A detailed history of each product’s accumulated stock counts is available for reference.
Example: If the system shows 10 units but your physical count reveals 8, the accumulated difference will be -2. Later, if you count again and find 9 instead of 10, the accumulated difference updates to -1.
Stock Reconciliation
When it’s time to reconcile stock, all accumulated stock count differences are consolidated. The stock level is adjusted via a stock entry, which requires acceptance on the POS side before finalizing. Additionally, any variance from stock counts is recorded as an expense: a positive entry for stock losses and a negative entry for stock gains.
Product
The Product Module is the central hub for adding, editing, updating, duplicating, and managing the company’s product list. It is seamlessly linked to all branches, ensuring that any modifications to the product list are instantly reflected in real-time across all branches.
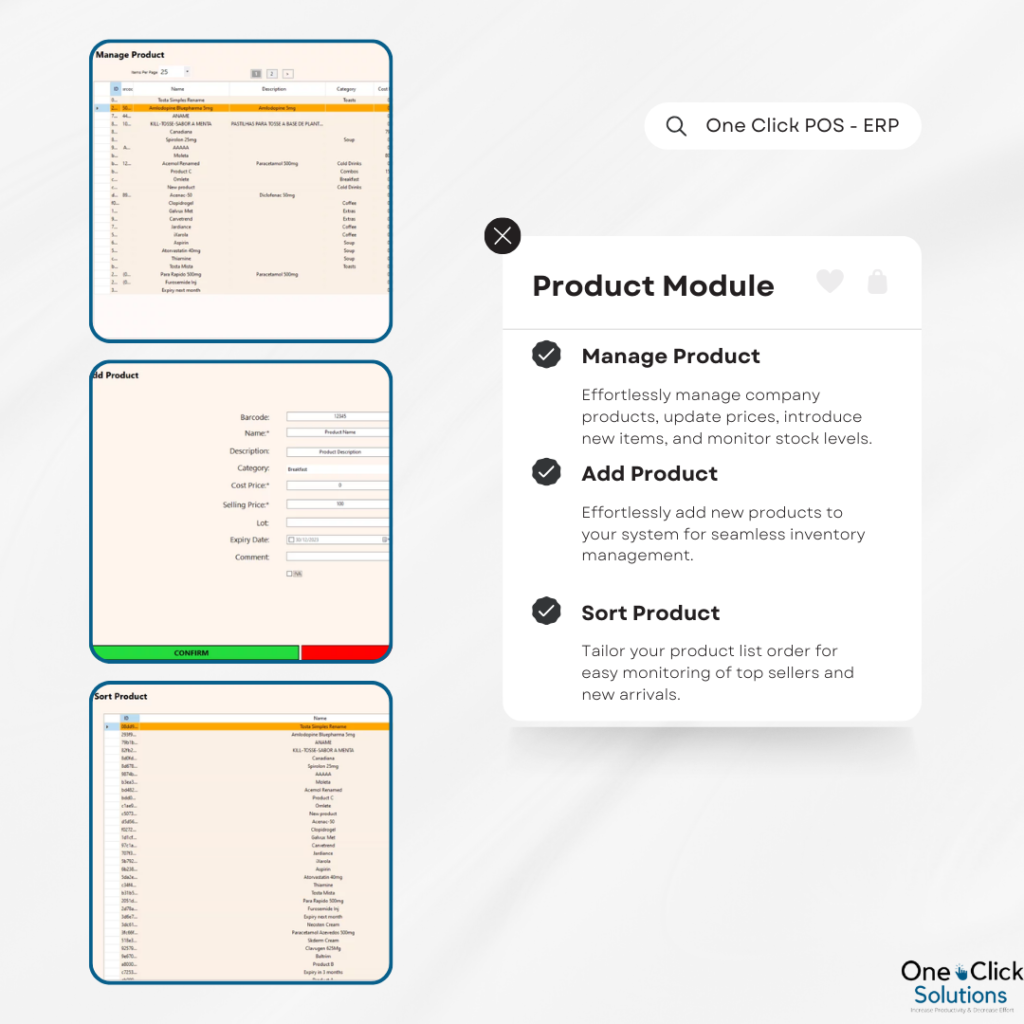
Manage Product
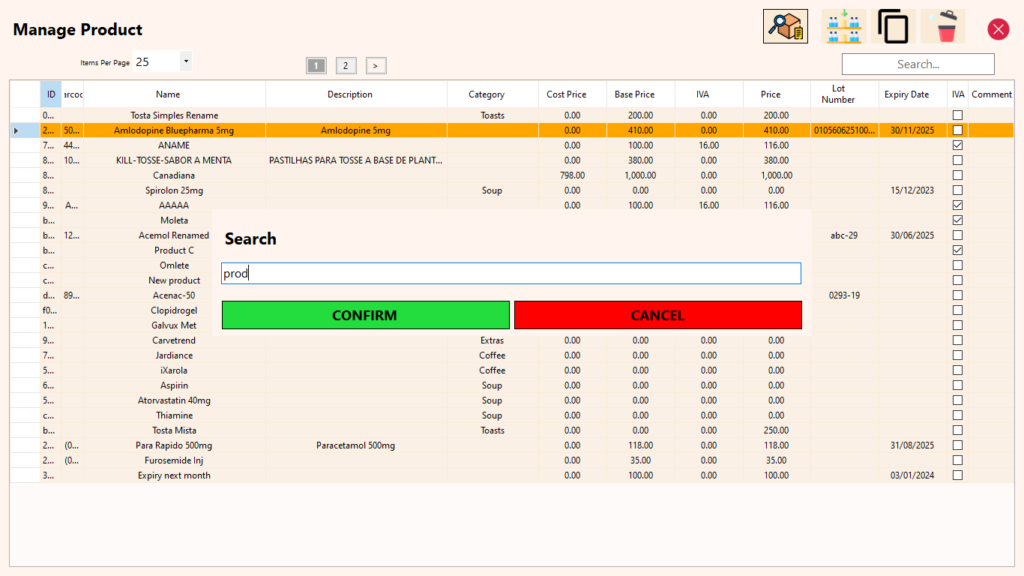
The Manage Product feature serves as the central hub for comprehensive product management, offering essential functionalities like pagination, sorting, and searching. It provides a detailed overview of each product, including properties like barcode, name, description, category, cost price, price before VAT, VAT, price with VAT, lot numbers, expiry dates, and an additional field for the company’s internal use.
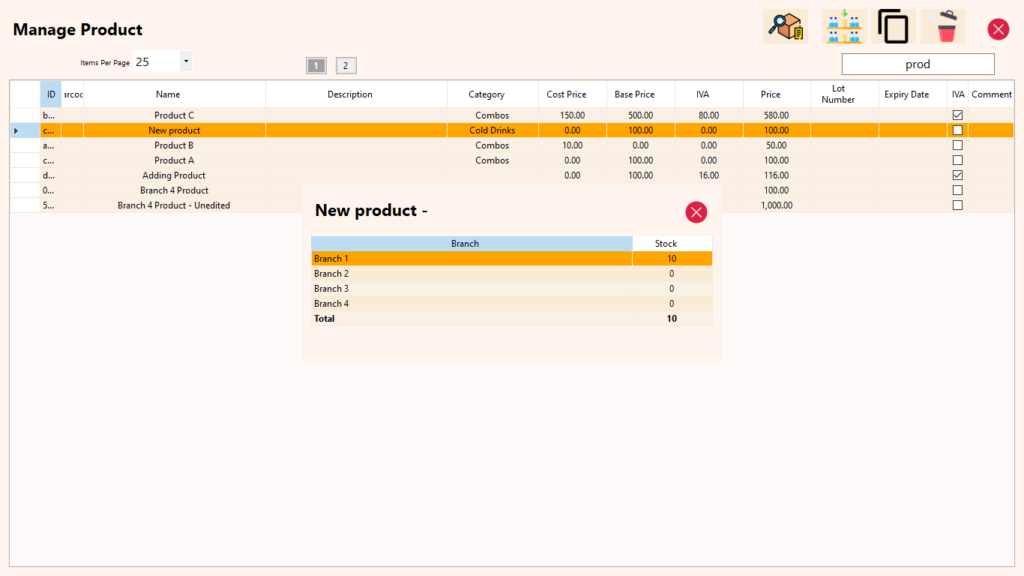
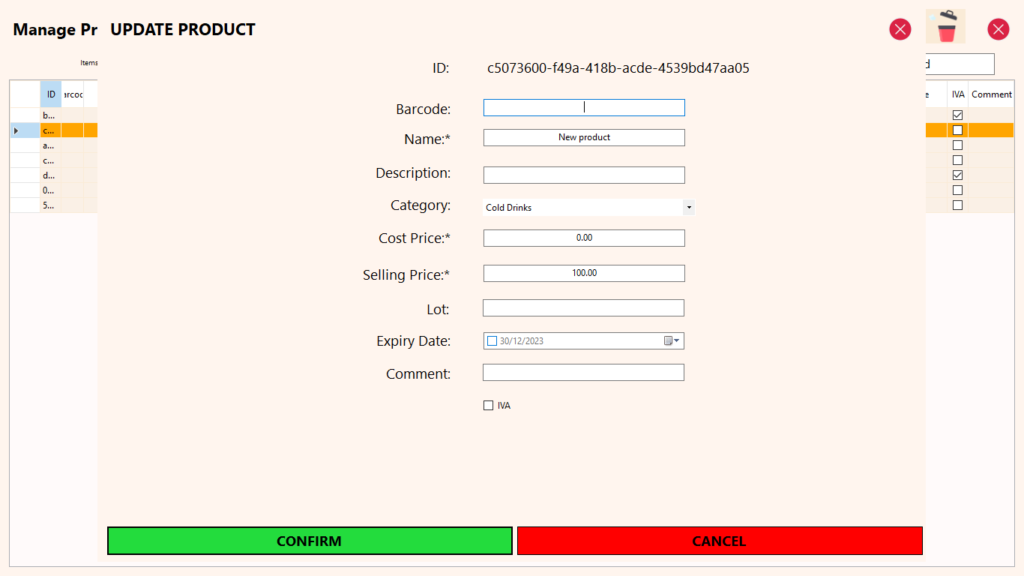
This feature allows seamless editing and updating of products, with changes reflected in real-time across all branches. Before making edits, the current stock of the product is displayed in all branches, providing insights into the inventory levels. Checking stock levels and product details is facilitated, eliminating the need to navigate to the stock report.
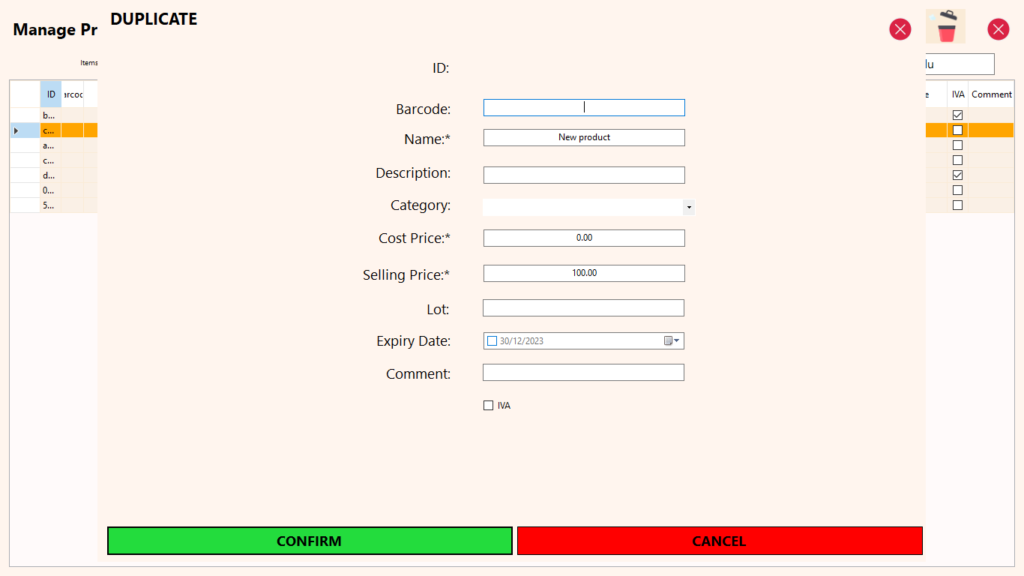
Product deletion is conditional, only allowed when there is no existing stock across any branches. Additionally, the duplication feature enables the creation of product variations with distinct properties, such as different prices, lot numbers, and expiry dates. This system efficiently manages various stock instances of the same product, streamlining the process of adjusting specific properties while keeping others consistent.
Add Product
Add Product in the Product Module:
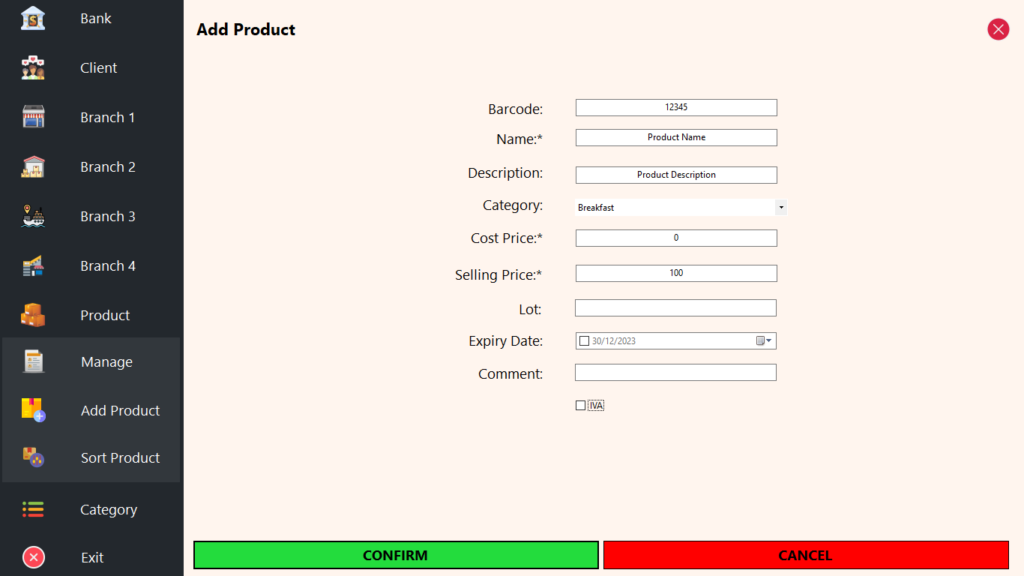
The Add Product feature enables the creation of a new product with customizable properties to suit your inventory management needs. The product properties include:
- Barcode (optional): Scan your product’s barcode for efficient identification.
- Name (required): Assign a name to the product.
- Description (optional): Provide a detailed description of the product.
- Category (optional): Categorize the product for better organization.
- Cost Price (required): Set the cost price of the product, even if it’s zero.
- Selling Price (required): Specify the selling price, even if it’s zero.
- Lot (optional): Include a lot number or code for the product.
- Expiry Date (optional): Set the expiry date for the product.
- Comment (optional): Utilize an extra field for company-specific information.
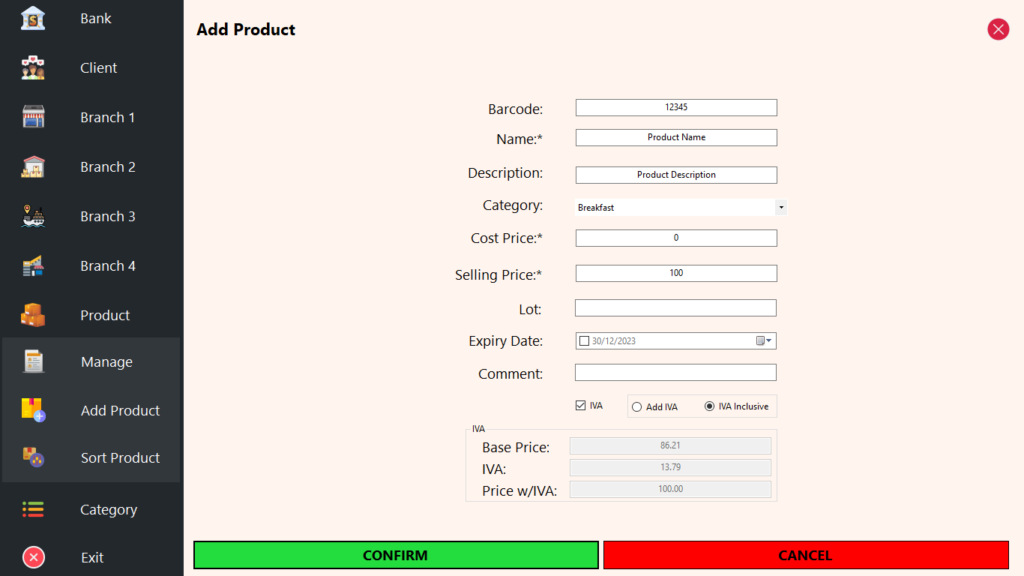
- IVA/VAT (optional): Tick if the product is subject to IVA/VAT.
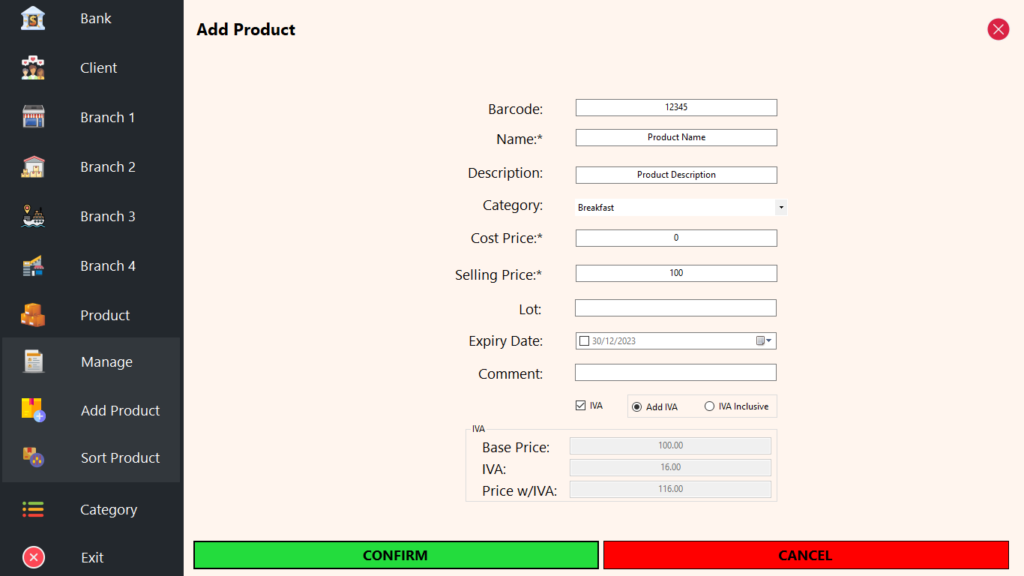
For IVA/VAT-inclusive products, two options are available:
- Add VAT to the selling price (IVA/VAT percentage set during system setup).
- Indicate that the selling price already includes IVA/VAT.
Upon adding a product, it is automatically included in all branches with a starting quantity of zero, ready for stock allocation.
Note: The crucial distinction between the “Add” and “Duplicate” product features lies in the Duplicate function’s ability to preserve the fixed properties of a product, such as its name and description. This enables you to have identical products with variations in specific properties.
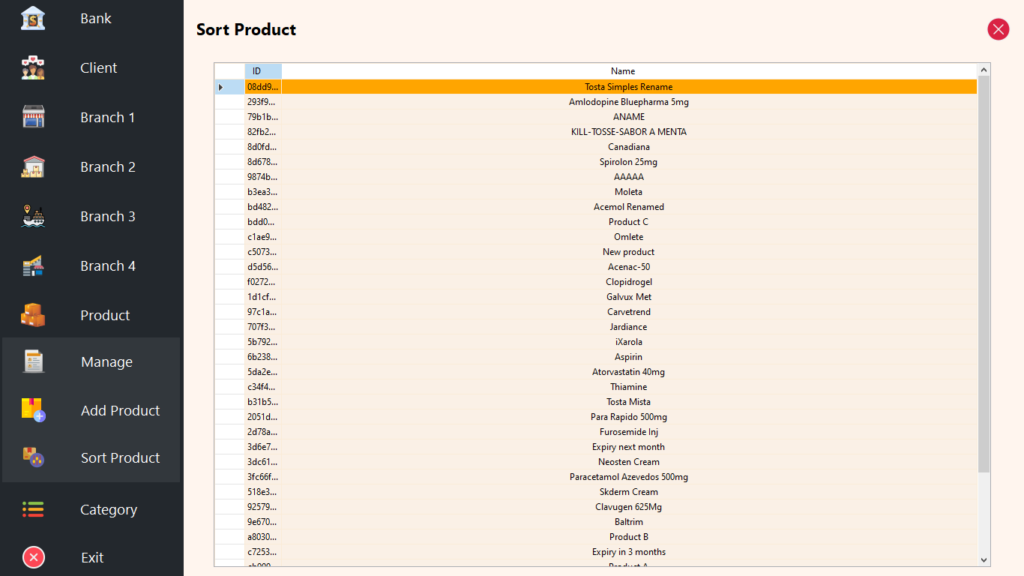
Sort Product
The “Sort Product” feature is applicable when a company utilizes fewer than 300 products. By default, products are ordered alphabetically unless the settings are adjusted to use Categorical or Tailored/Custom sorting.
This feature empowers users to customize the order of their products, which is then reflected across various reports displaying the product list (dashboard, stock report, manage product, inventory, etc.). This is particularly advantageous for companies seeking a tailored approach to monitor their products based on specific criteria. For instance, prioritizing best-sellers and new products by placing them in the top 5 ensures that product lists in various reports align with the desired order, facilitating efficient product tracking.
Note: By default, the addition of a new product places it at the end of the sorting list.
HR
The Human Resources (HR) Module is the central hub for managing all employee-related activities, including records, loans, overtime, absences, leaves, and salary payments. It is seamlessly integrated across the organization, ensuring that any updates or changes are instantly reflected in real-time across all departments.
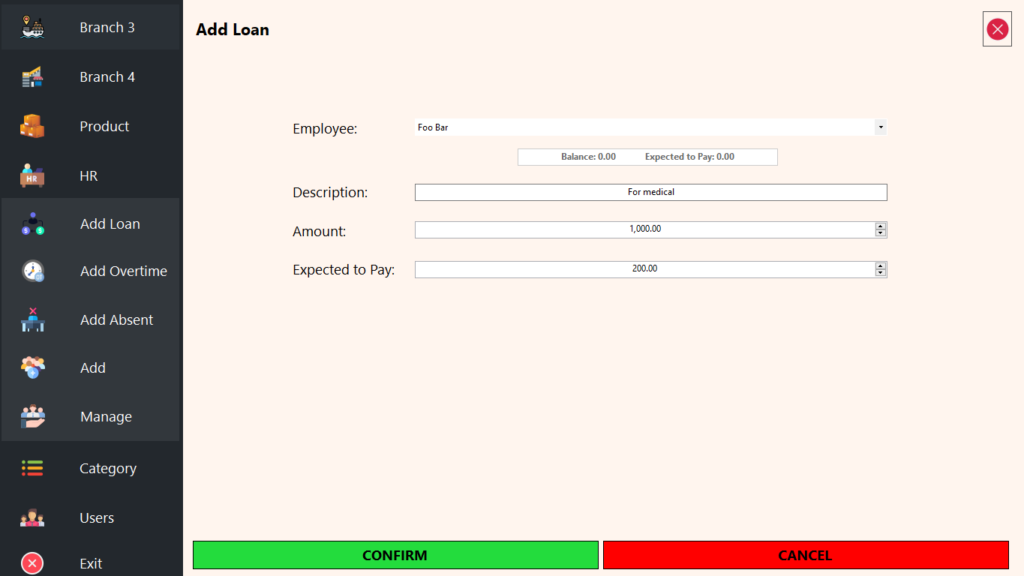
Add Loan
The Add Loan feature allows you to record a loan for an employee, displaying their current balance and the amount they are expected to repay at the end of the month. This feature ensures that both the employee and the company agree on the repayment amount, streamlining the process and providing clear insights into expected loan repayments. By adding a loan, it will automatically be added to the employee’s profile, which can be viewed in the Manage Employee section.
Add Overtime
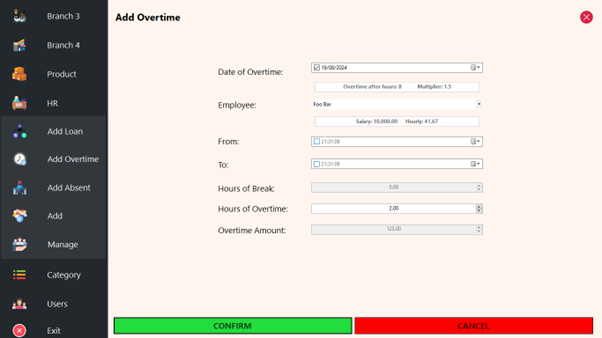
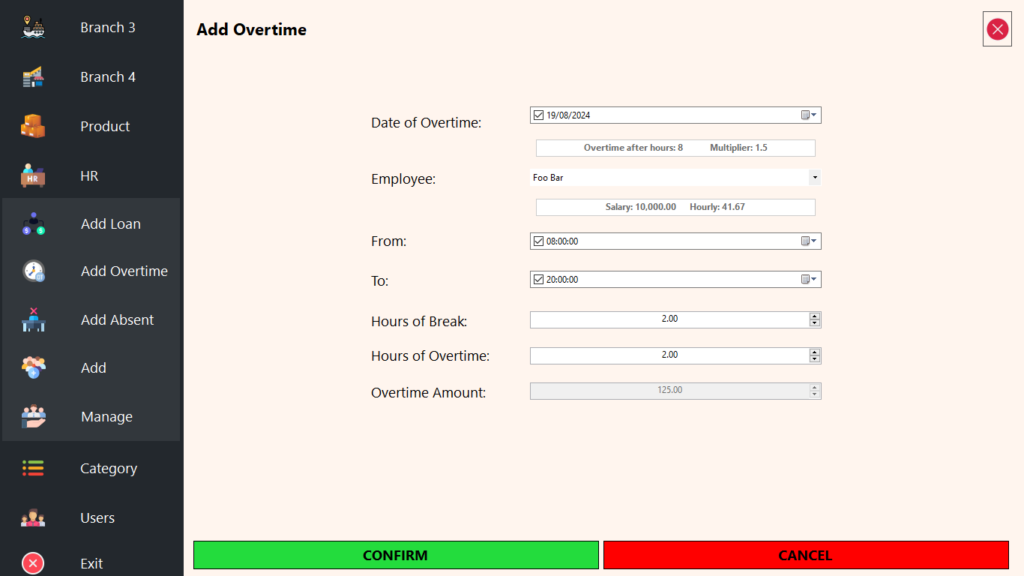
The Add Overtime feature allows you to allocate overtime for employees based on your configured overtime rules. You can either set their working hours for a specific date or directly indicate the number of overtime hours worked. The system lets you apply a multiplier to the overtime hours on their hourly rate, and it automatically calculates and adds the overtime amount, which is then reflected in the Manage Employee section.
Add Absent
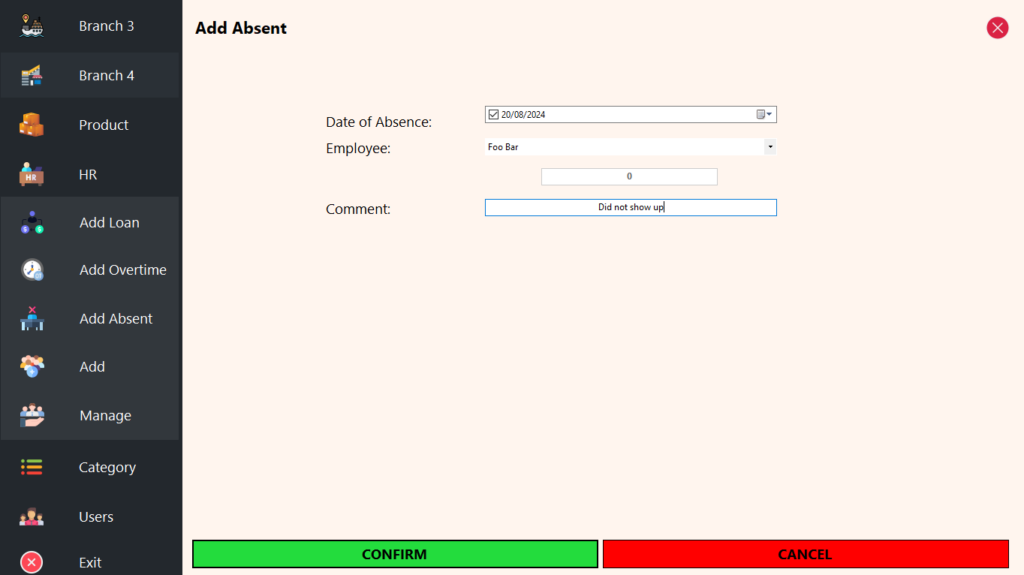
The Add Absent feature allows you to record the date and reason for an employee’s absence. This information is then automatically reflected in the Manage Employee section.
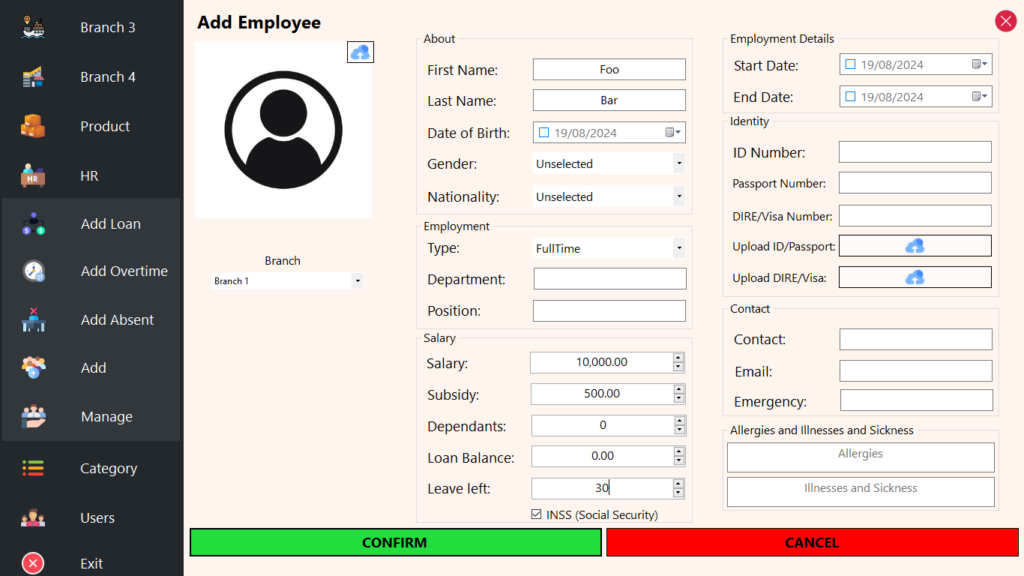
Add [Employee]
The Add Employee feature allows you to add a new employee to the system. You can set the loan balance as an opening balance for data migration and assign the number of remaining leave days for the year.
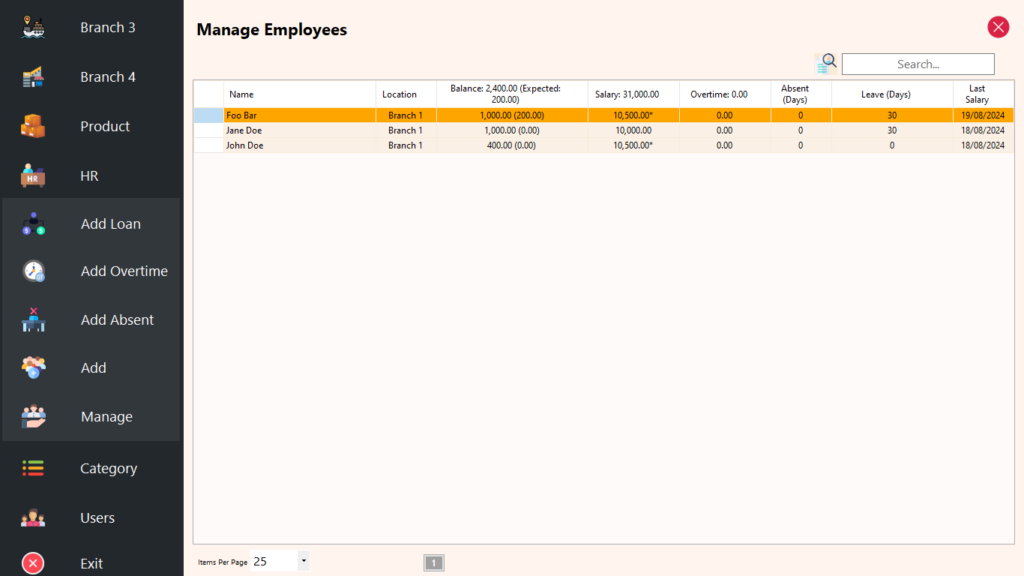
Manage [Employee]
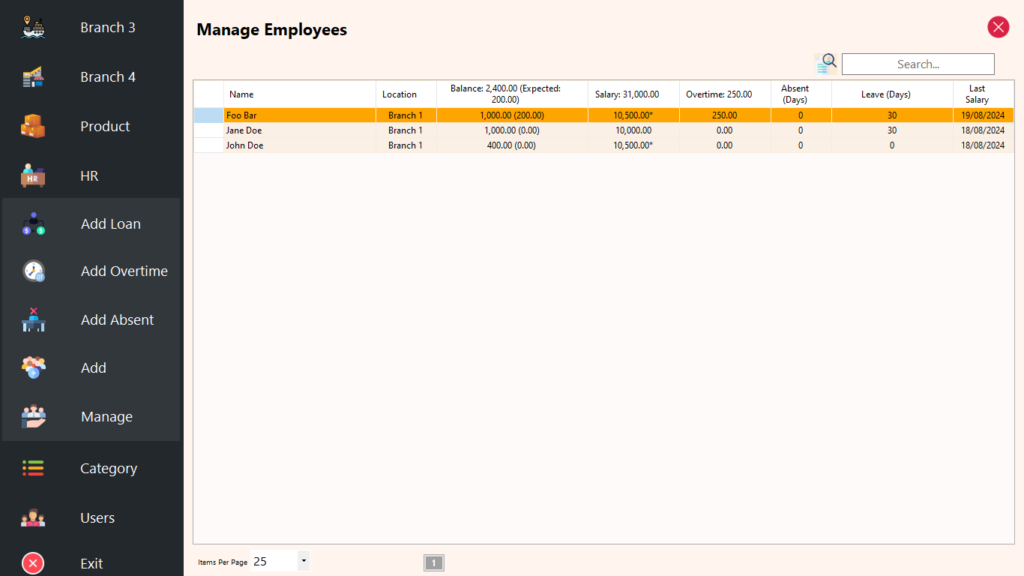
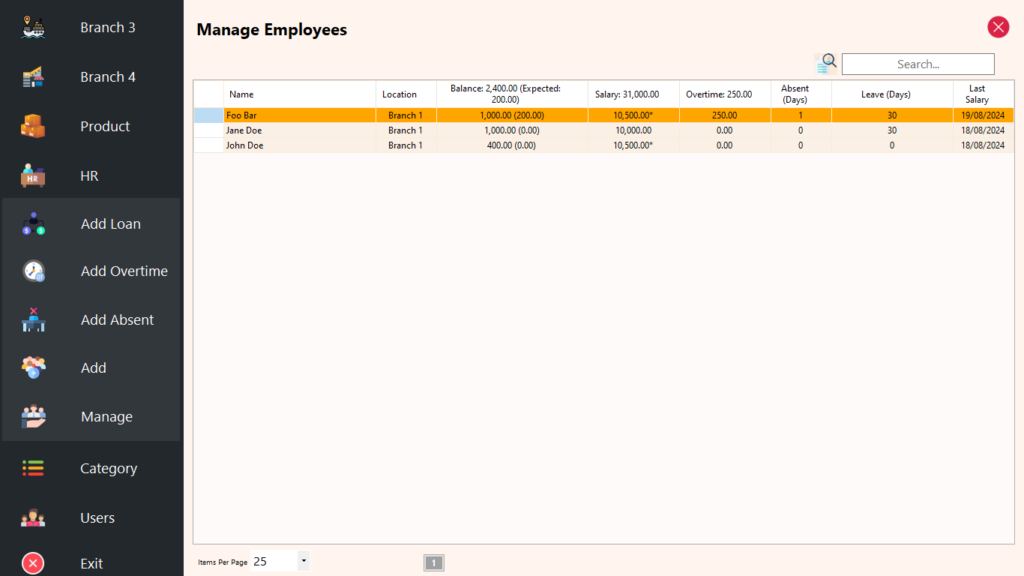
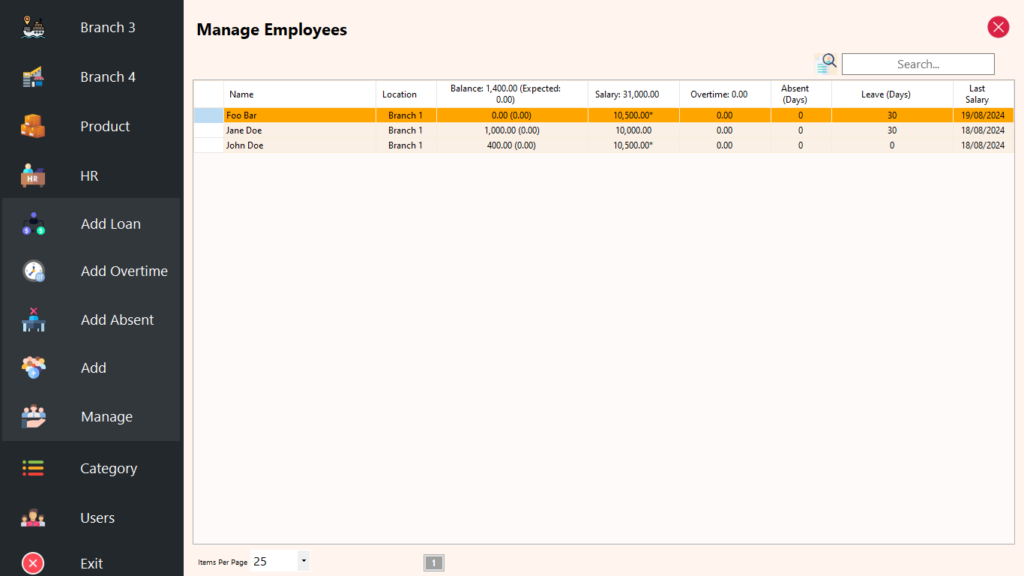
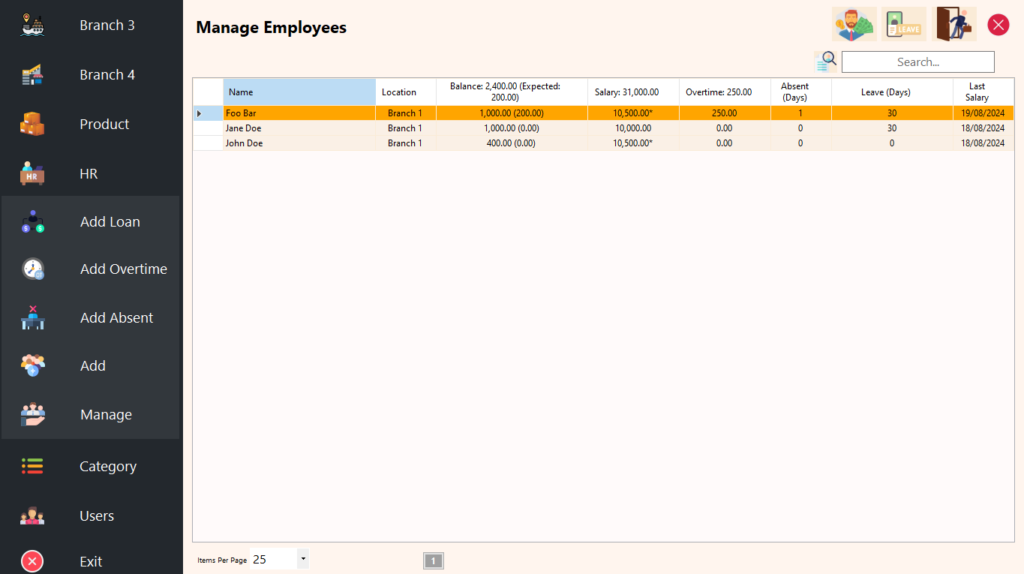
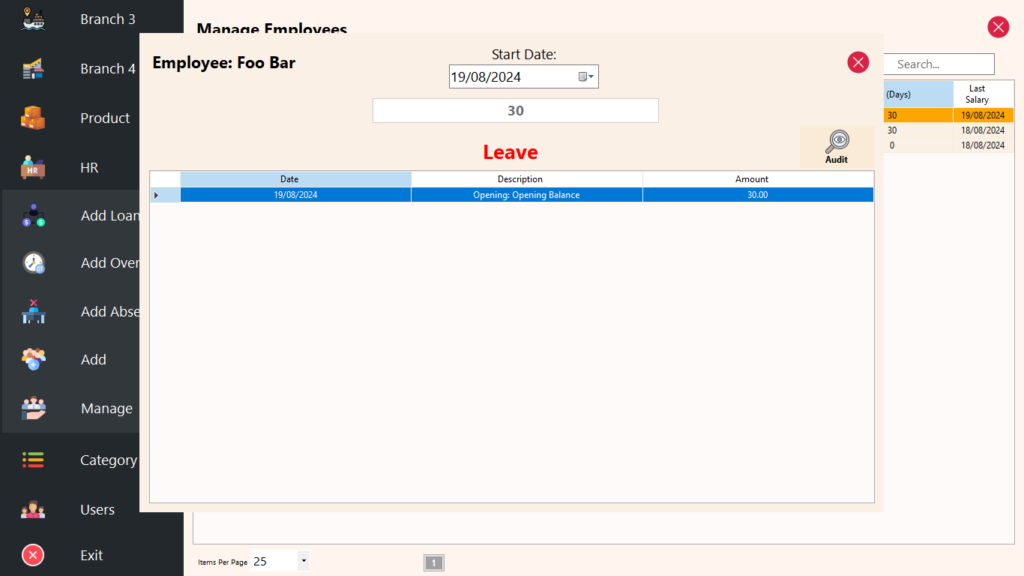
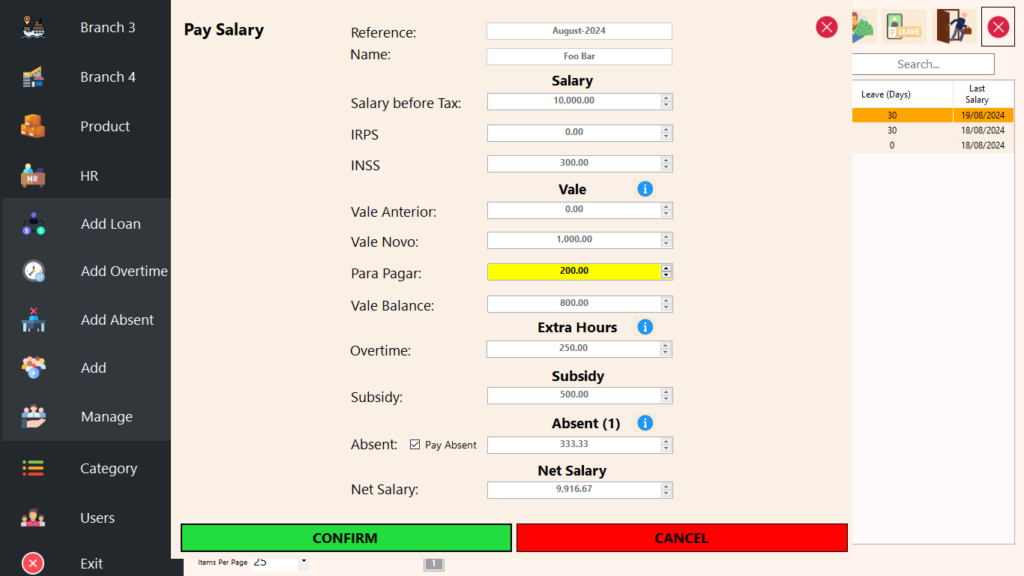
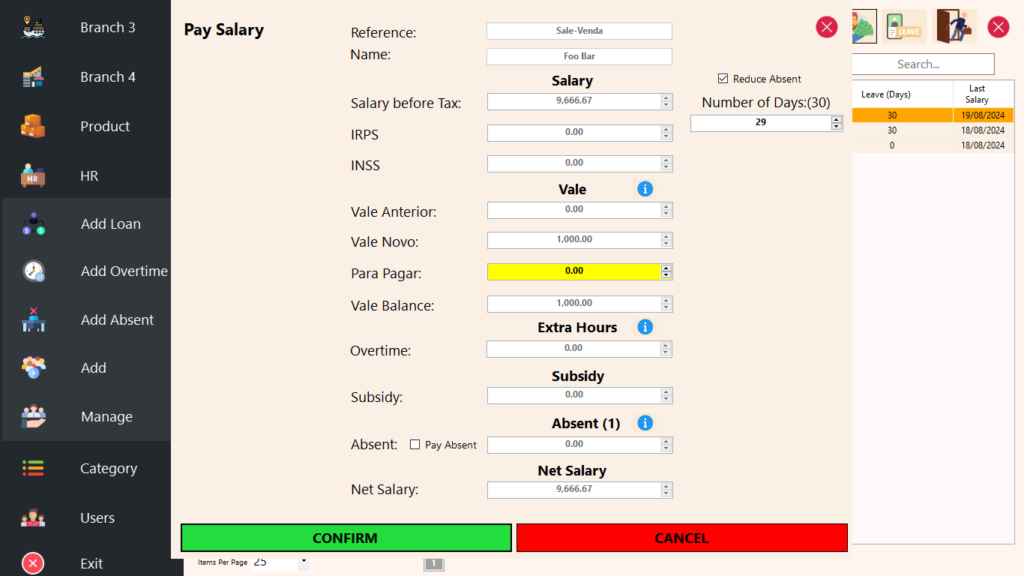
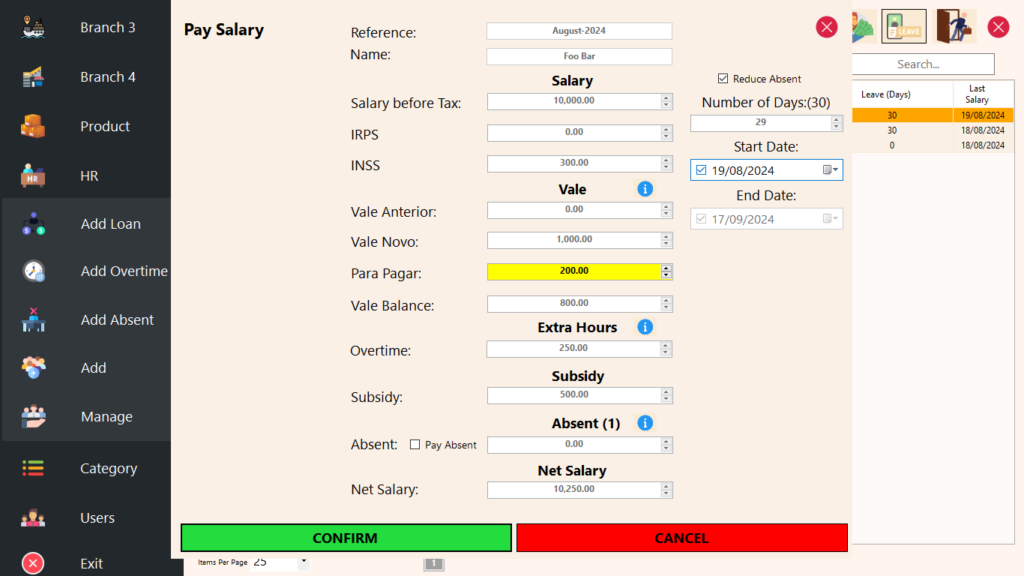
The Manage Employee feature provides a comprehensive overview of your employees’ current status. You can edit or delete employee records, view their loan, absence, and leave histories, and see when their last salary was paid. This feature also allows you to pay an employee by creating a salary slip, enable employees to sell their leave, or process leave claims.
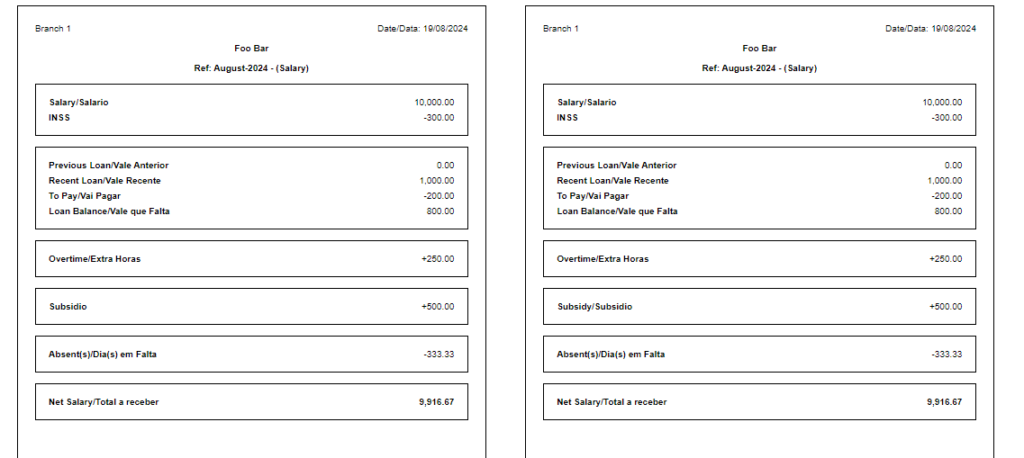
When creating a salary slip, the expected loan repayment amount is automatically set but can be adjusted based on the agreement with the employee. Overtime is automatically included, and any absences can be deducted from the salary or offset against leave. The salary slip is then generated and ready for printing. Once the salary is paid, it automatically reduces the Office Cash Account of the company and updates the employee’s profile.
Employee leave is automatically added each year based on the configurations set in the system, ensuring that leave balances are up to date. Additionally, the system includes audit tools that allow you to review and audit employee balances, absences, leave, and other related records, ensuring accuracy and transparency across all employee data.
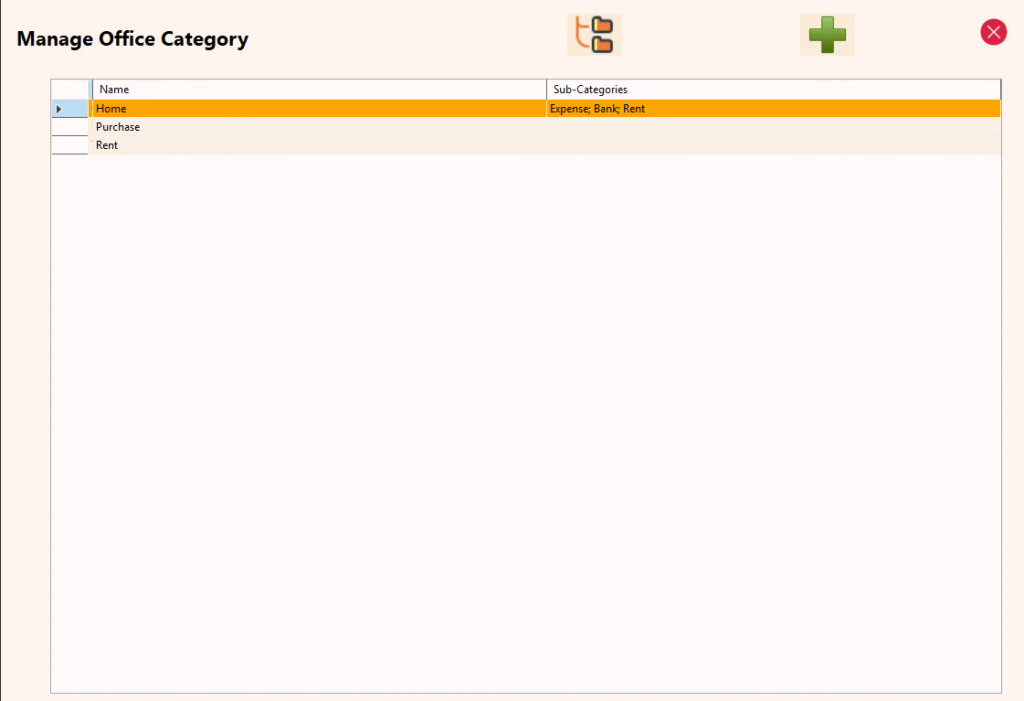
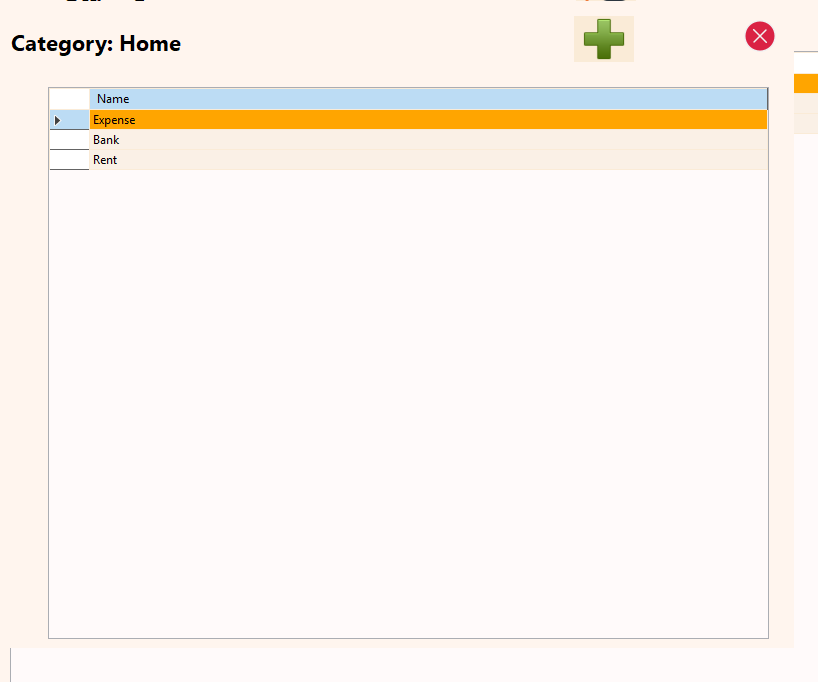
Category
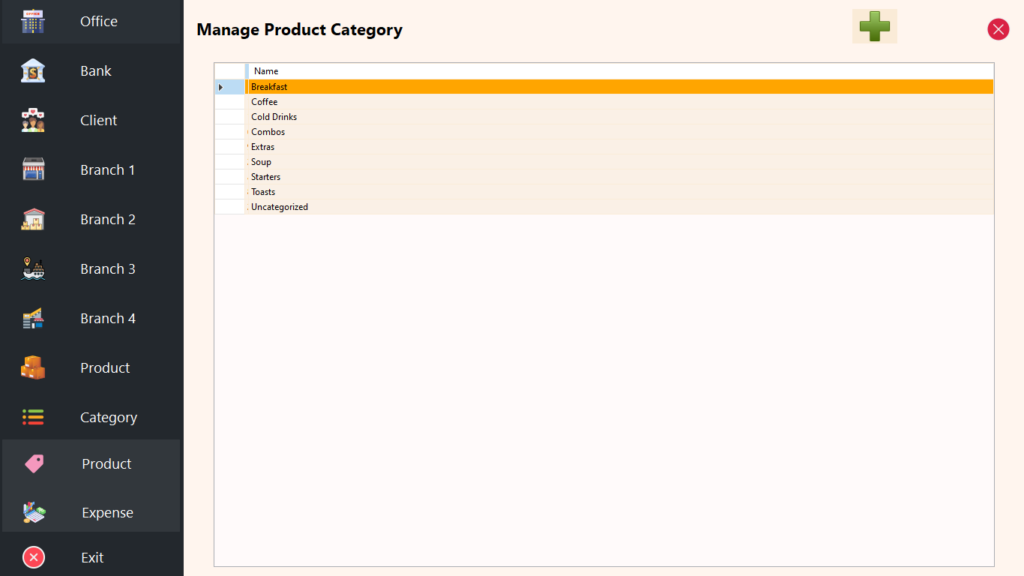
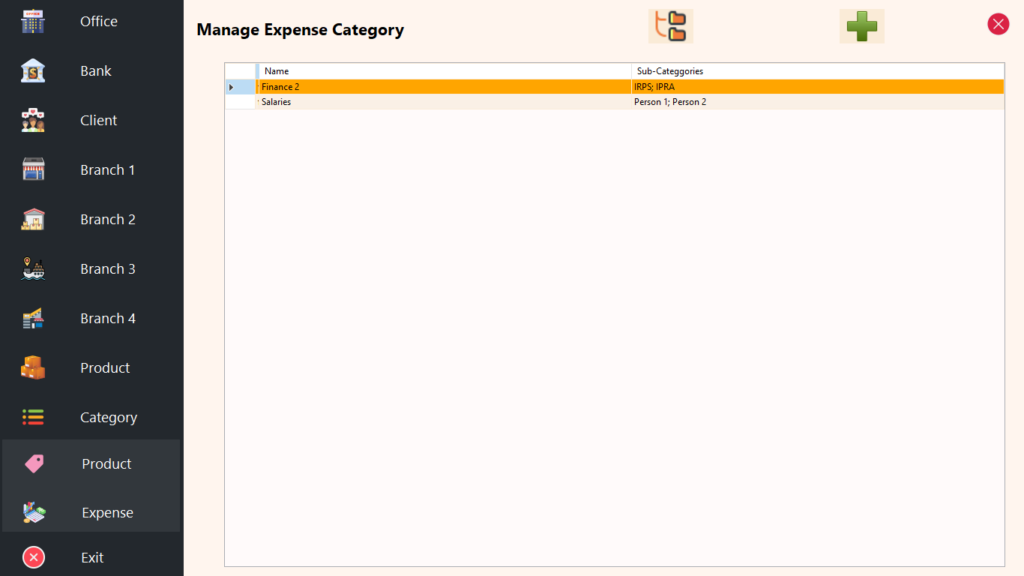
The Category Module enables the creation and management of categories across different areas of the system. As of 03.12.24, it supports three distinct types of categorization:
-
Product Categorization
Products can be categorized into a single level, particularly beneficial for businesses using POS systems such as Takeaway, Coffee Shops, or Restaurants. Category changes apply to all linked products, and deleting a category will automatically move associated products to the default “Uncategorized” group. -
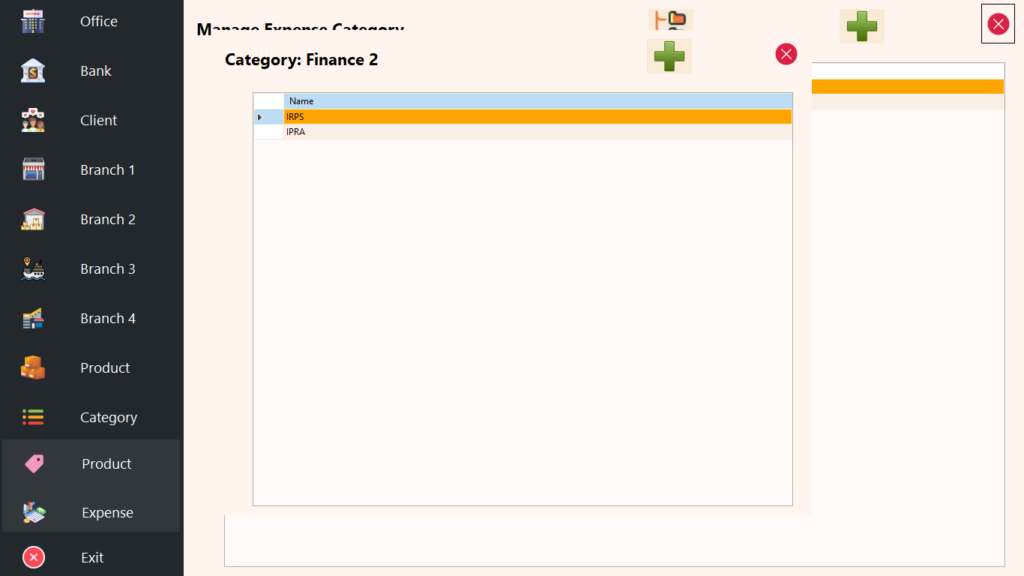
Expense Categorization
Expenses are categorized using a two-level structure: category and sub-category. This setup allows for granular expense tracking and reporting. Edits or deletions to categories do not affect previously recorded expenses, ensuring historical accuracy. -
Office Cashflow Categorization
Office cash inflows and outflows can also be categorized using a two-level system (category and sub-category). This enhances the clarity and precision of financial reporting, especially in the Analytics Insights section of the dashboard. Like expenses, editing or deleting a category does not alter historical records.
Once a category is created, it is immediately reflected across the entire ecosystem, including both the ERP and POS modules, ensuring consistency and integration across all parts of the system.
Bill of Material (BOM)
The BOM feature helps you list out every material and quantity needed to make a finished product. Think of it like a recipe: for each product you sell, you define the ingredients. When you assemble or sell that product, the system tracks and deducts the exact materials used, so you always know what’s left in stock and what it costs to make each item.
Two Ways to Manage BOM in One Click POS
-
Produce on Sale
This option automates production when a sale is made. For instance, if you’re selling a burger, the system instantly deducts the ingredients like bread, tomatoes, cheese, and patty. It will also “auto-produce” any semi-finished goods needed—like bread—during the sale. So if you bake bread in-house, the system adjusts flour and water stock as bread is created and used in the burger. -
Production
This is a step-by-step approach. You can prepare semi-finished goods in stages to be ready for final production. For example, you might bake bread in the morning, then assemble burgers for sale afterward. This process keeps all semi-finished and final goods prepped and ready to sell as needed.
Single and Multi-Level BOM Support
The system lets you set up single-level or multi-level BOMs depending on how you make your products.
– Single-Level BOM: For simpler products, where everything is assembled at once. For example, if a juice requires oranges and sugar, you only track these two ingredients as they go directly into the final product.
– Multi-Level BOM: For more complex products with multiple stages. Think of a burger: if you make both bread and a special sauce in-house, each has its own ingredients (like flour for bread, spices for sauce). These semi-finished items (bread, sauce) are prepared first, then used to assemble the burger. Multi-level BOMs let you manage each part separately, so you know exactly what’s in stock at every stage.
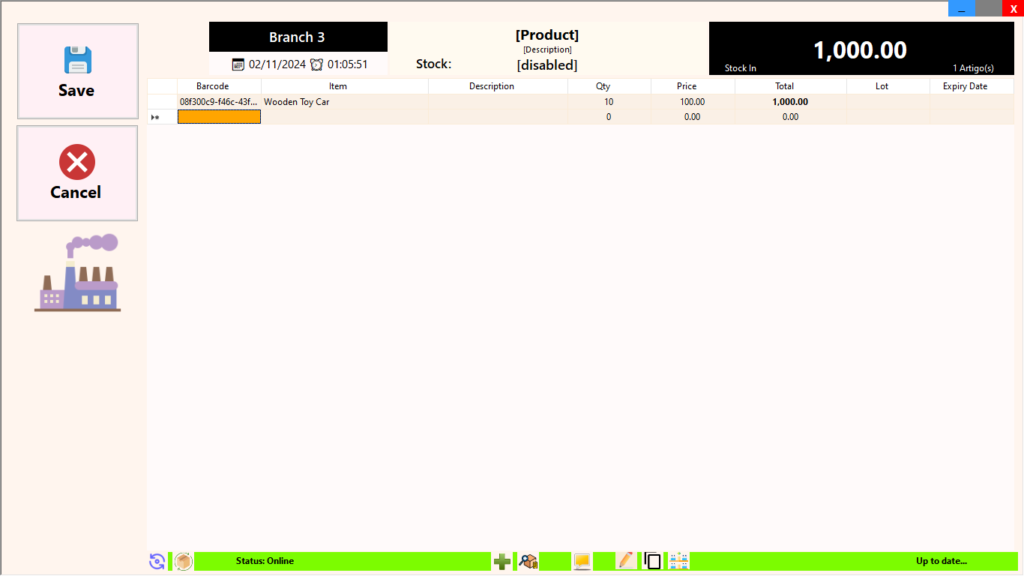
Scenario: Wooden Toy Car
- Finished Product:
- Wooden Toy Car
- Main Components:
- Car Body (in-house production)
- Wood Planks (raw material)
- Wood Glue (adhesive)
- Wheels
- Wood Discs (acquired)
- Axles
- Wood Dowels (acquired)
- Car Body (in-house production)
In the screenshots below we explore how BOM works for the two ways to manage BOM.
Process for Setting Up the Wooden Toy Car BOM
-
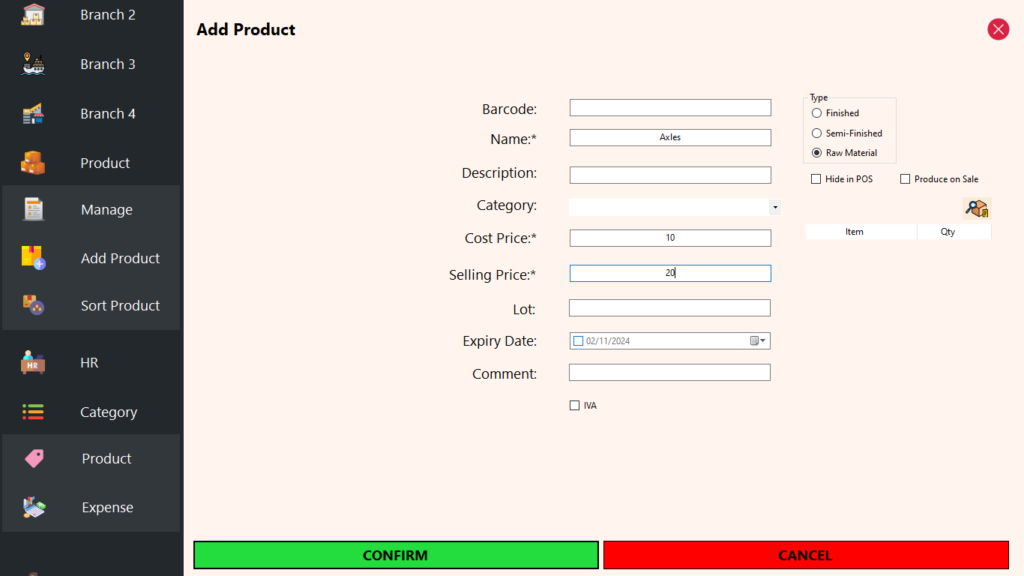
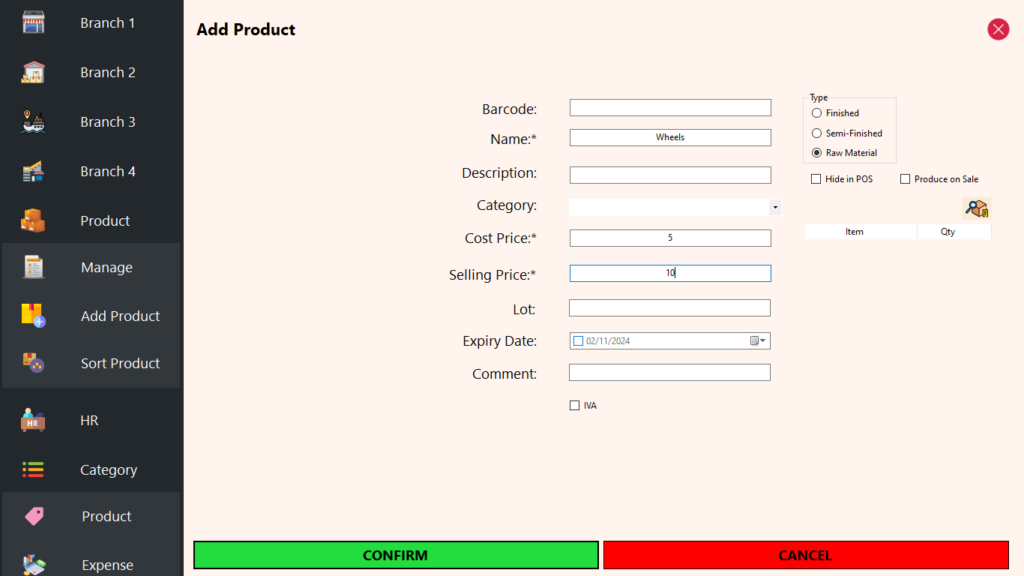
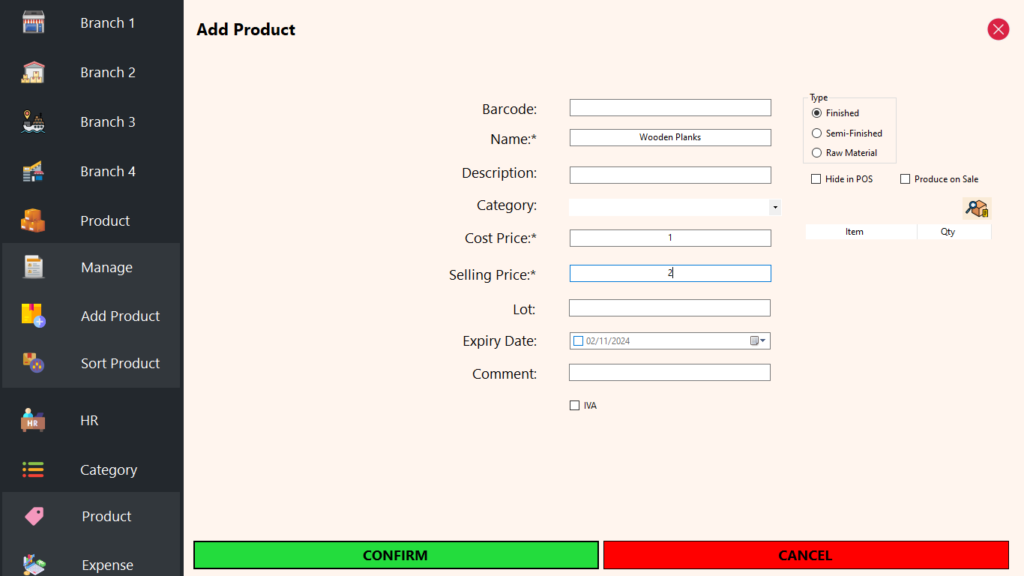
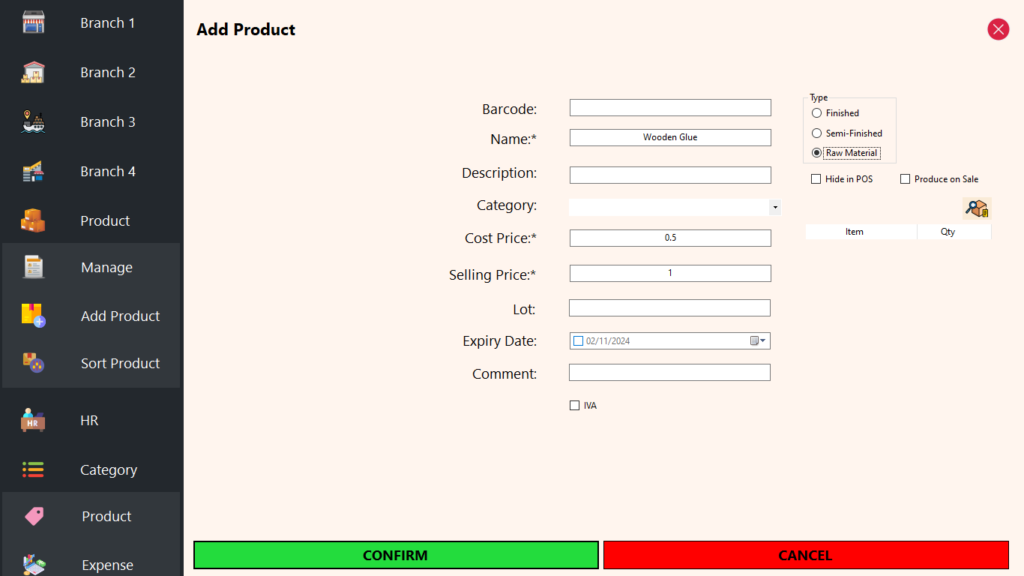
Add Raw Materials:
- We start by adding the necessary raw materials:
- Wood Planks: These are the primary material for constructing the car body.
- Wood Glue: This adhesive is essential for assembling the car body.
- Wheels: These are the round components that allow the toy car to roll.
- Axles: These rods hold the wheels in place.
- We start by adding the necessary raw materials:
-
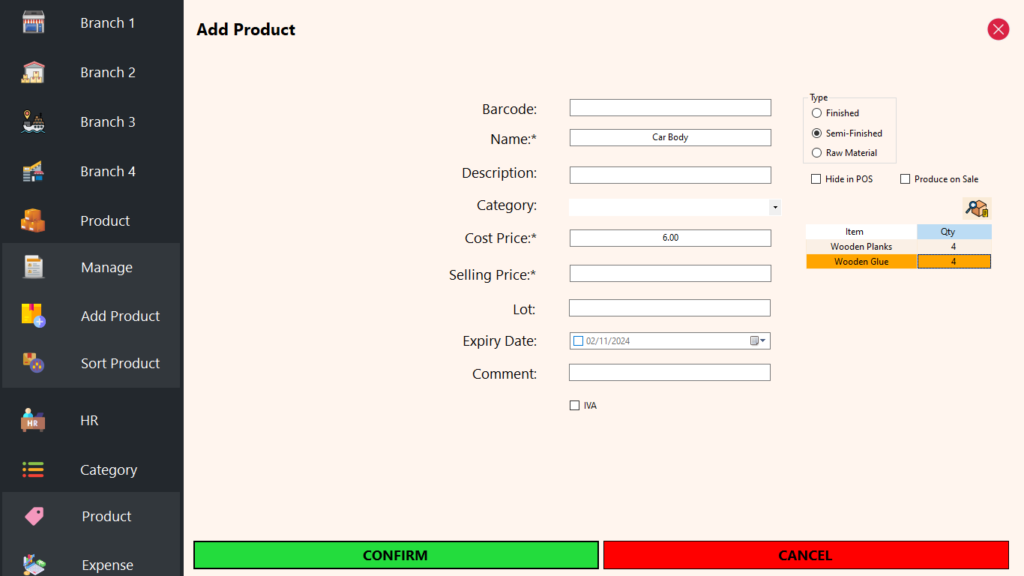
Add Semi-Finished Goods:
- Next, we add the Car Body as a semi-finished good. This product is made up of:
- 4 Wood Planks
- 4 Wood Glue
- The cost price of the Car Body is automatically calculated based on the costs of the raw materials used, but this value can be edited by the user if needed.
- Next, we add the Car Body as a semi-finished good. This product is made up of:
-
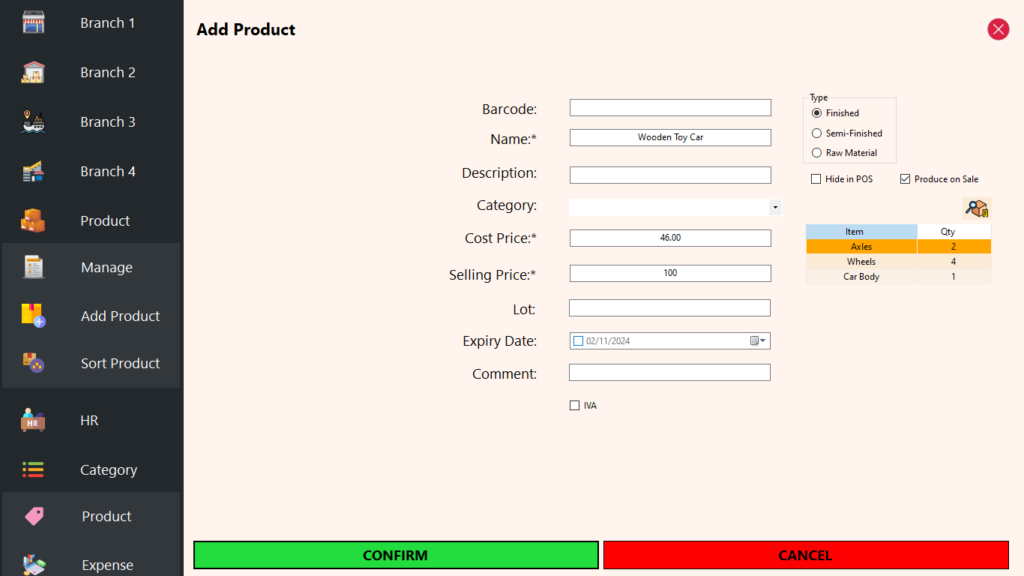
Add Finished Product:
- Finally, we add the Wooden Toy Car as the finished product. The Car Body, Wheels, and Axles are all combined to create the final toy.
- Similar to the semi-finished goods, the cost price for the Wooden Toy Car is also calculated automatically based on the components used.
-
BOM Setup:
- We have already set up the BOMs when adding these products, ensuring that all components and their relationships are clearly defined in the system.
This structured approach simplifies inventory management and ensures that production is efficient and cost-effective when producing the Wooden Toy Car.
Produce on Sale:
We enable the “produce on sale” feature for the Wooden Toy Car, allowing the system to automatically manage inventory when a sale occurs.
Stock Entry of Raw Materials:
-
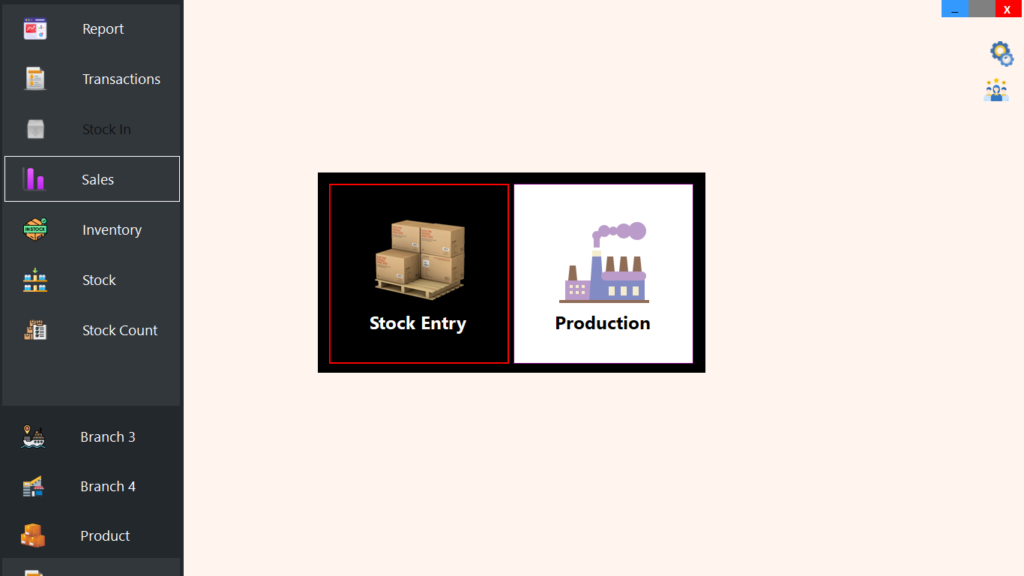
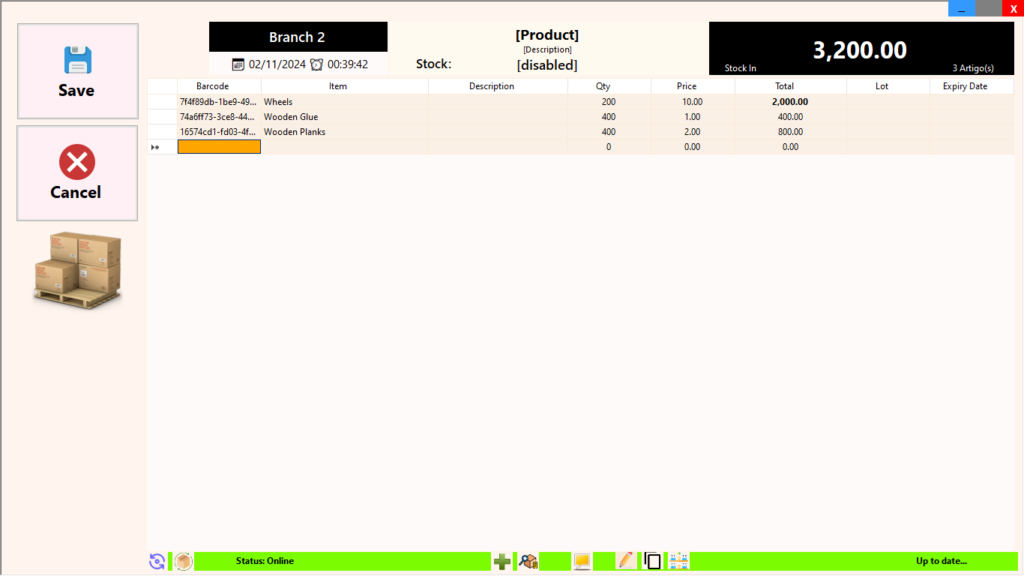
- We begin by using the stock entry feature to input our raw materials into the system. This includes:
- Wood Planks: For example, we enter 400 Wood Planks to ensure we have enough for production.
- Wood Glue: We add 400 Wood Glue to support the assembly process.
- Wheels: We stock 200 Wheels to match the finished product requirements.
- Axles: We enter 200 Axles to pair with the wheels.
- We begin by using the stock entry feature to input our raw materials into the system. This includes:
This stock entry process sets up our inventory for the Wooden Toy Car production, ensuring we have all necessary raw materials recorded in the system before moving on to the sales process.
Sale of Wooden Toy Cars
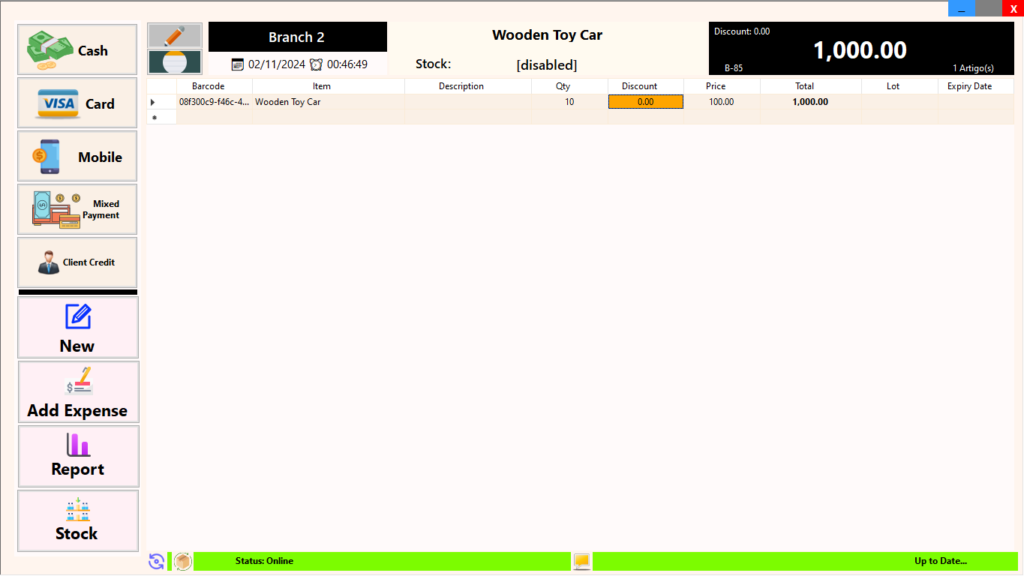
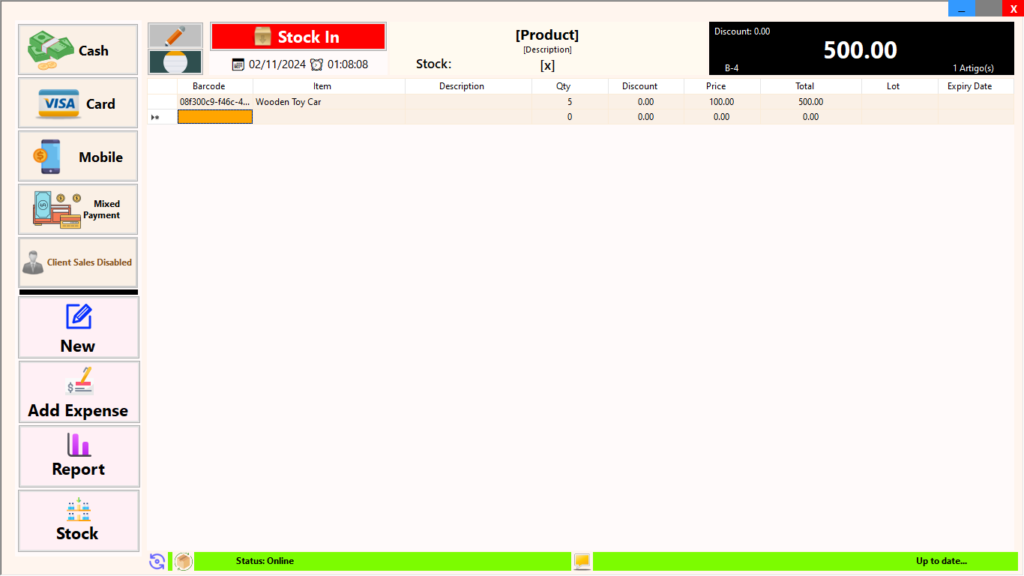
- Making a Sale:
-
- We proceed to sell 10 Wooden Toy Cars to a customer.
- For this scenario, we assume there is no stock control enforced. However, if stock control were enforced, we would need to ensure a stock entry of the finished goods before proceeding with the sale.
-
Automatic Production:
- Upon completing the sale, the system automatically handles the production of the toy cars as per the “produce on sale” feature.
- The production process consumes the following raw materials:
- Axles: 20 axles are deducted from inventory (2 axles per car).
- Wheels: 40 wheels are deducted from inventory (4 wheels per car).
- Car Body Components:
- Wood Glue: 40 glue units are used (4 glue per car).
- Wood Planks: 40 wood planks are used (4 planks per car).
- This results in the production of 10 Car Bodies, which are then assembled to create the 10 Wooden Toy Cars sold.
-
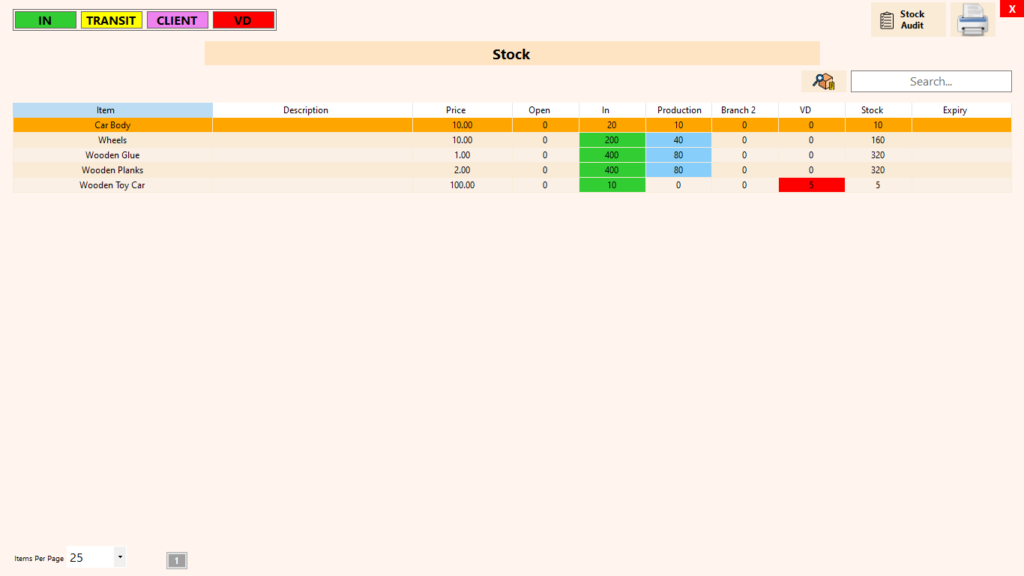
Stock Update:
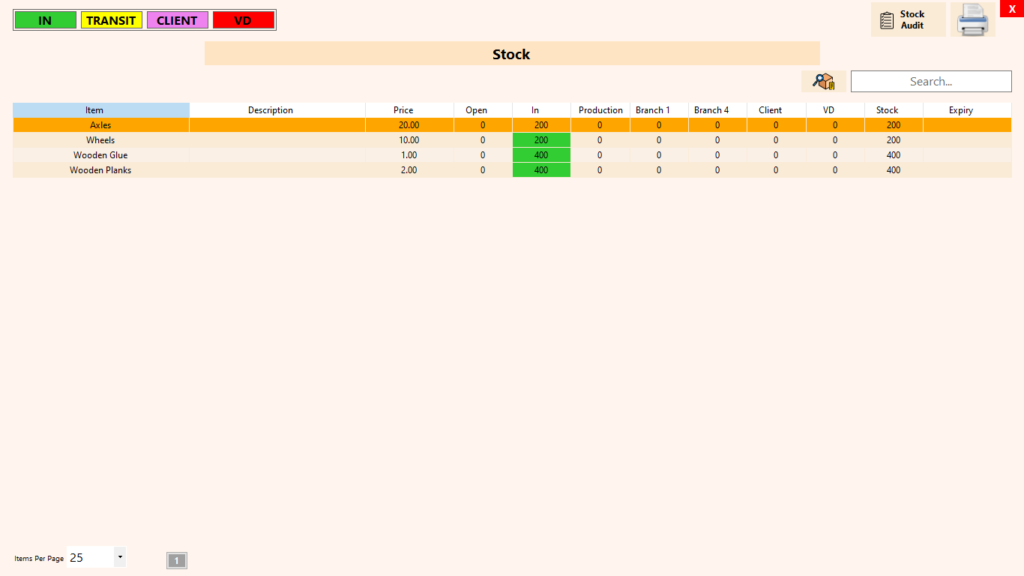
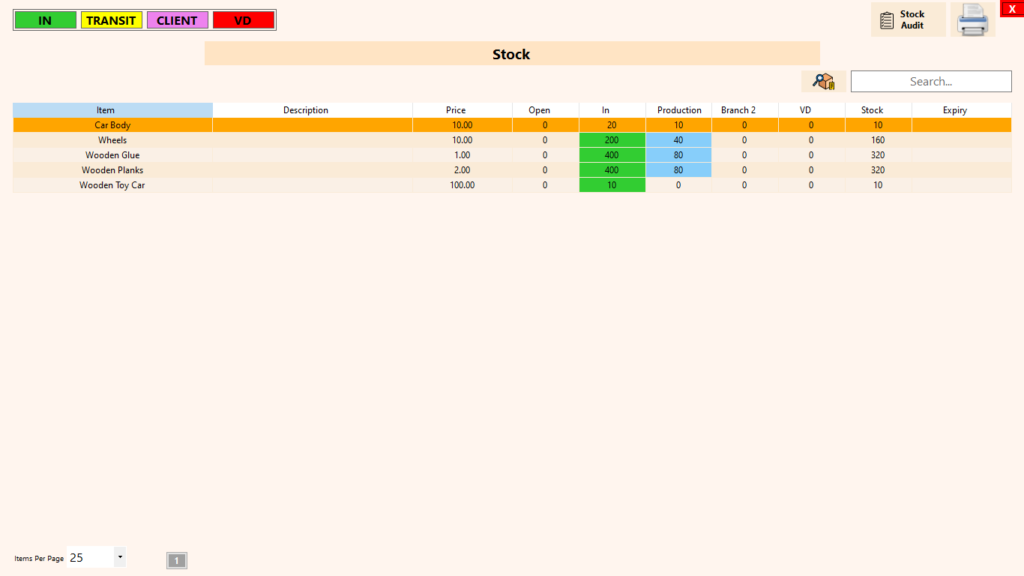
- After the sale, the inventory reflects the following:
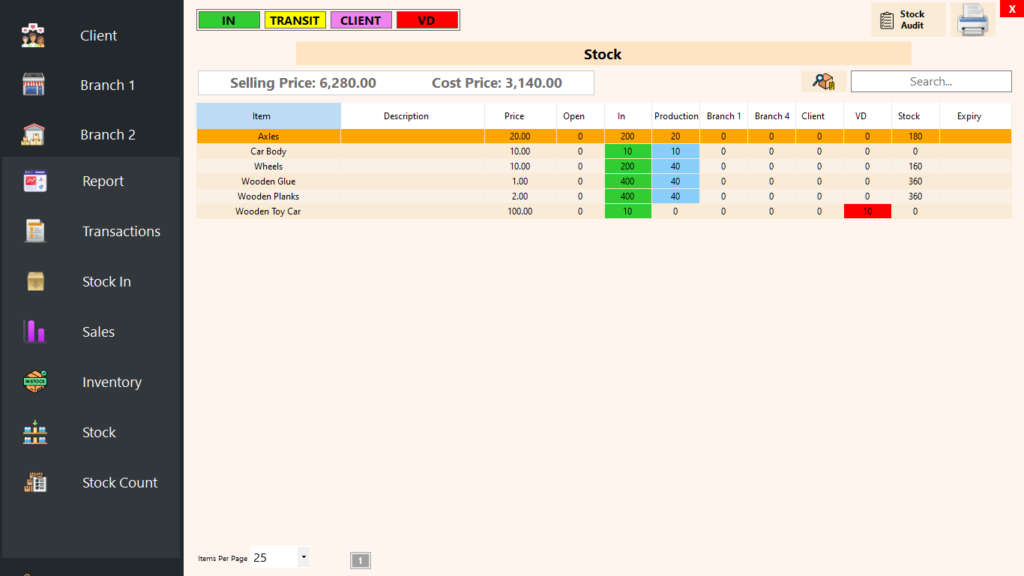
- Axles: 180 remaining (20 used for production, 200 initially stocked).
- Wheels: 160 remaining (40 used for production, 200 initially stocked).
- Wood Glue: 360 remaining (40 used, 400 initially stocked).
- Wood Planks: 360 remaining (40 used, 400 initially stocked).
- Car Bodies: 0 remaining (10 produced and then used).
- Wooden Toy Cars: 0 remaining (10 produce and then sold).
- After the sale, the inventory reflects the following:
The automatic production and stock deduction features streamline the sales process, ensuring accurate inventory management and allowing for efficient operations.
Production:
-
Disable Produce on Sale:
- Before starting the production process, we first disable the “produce on sale” feature for the Wooden Toy Car. This allows us to take a phased approach to production rather than automatically producing items with each sale.
-
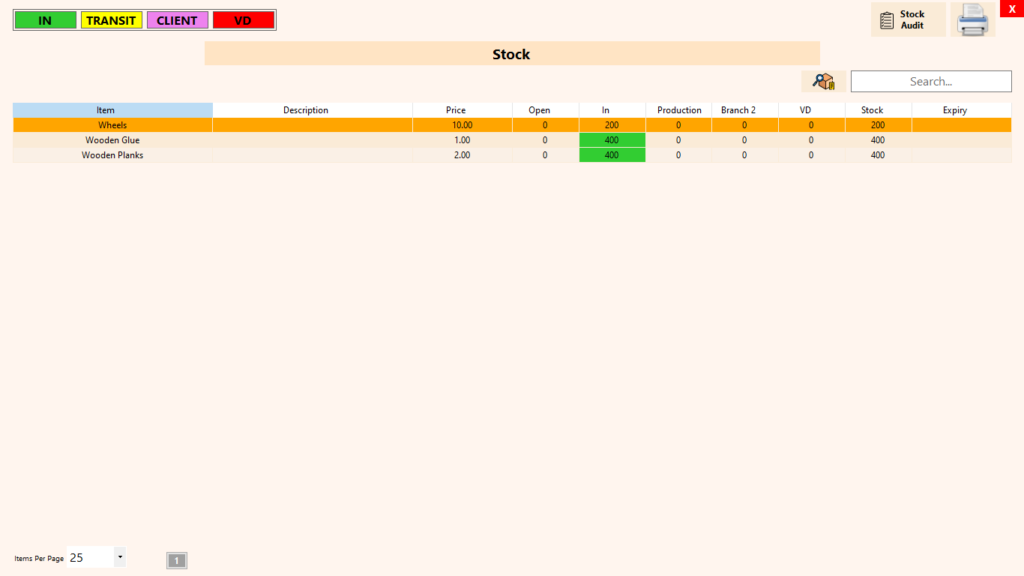
Stock Entry of Raw Materials (same as above):
- Next, we use the stock entry feature to input our raw materials needed for production:
- Wheels: We enter 200 Wheels to ensure we have an ample supply for the toy cars.
- Wood Glue: We add 400 Glue to support the assembly of the car bodies.
- Wood Planks: We stock 400 Planks to provide the necessary material for building the car bodies.
- Next, we use the stock entry feature to input our raw materials needed for production:
-
Production of Car Bodies:
- In this phase, we will produce the Car Bodies required for the Wooden Toy Cars.
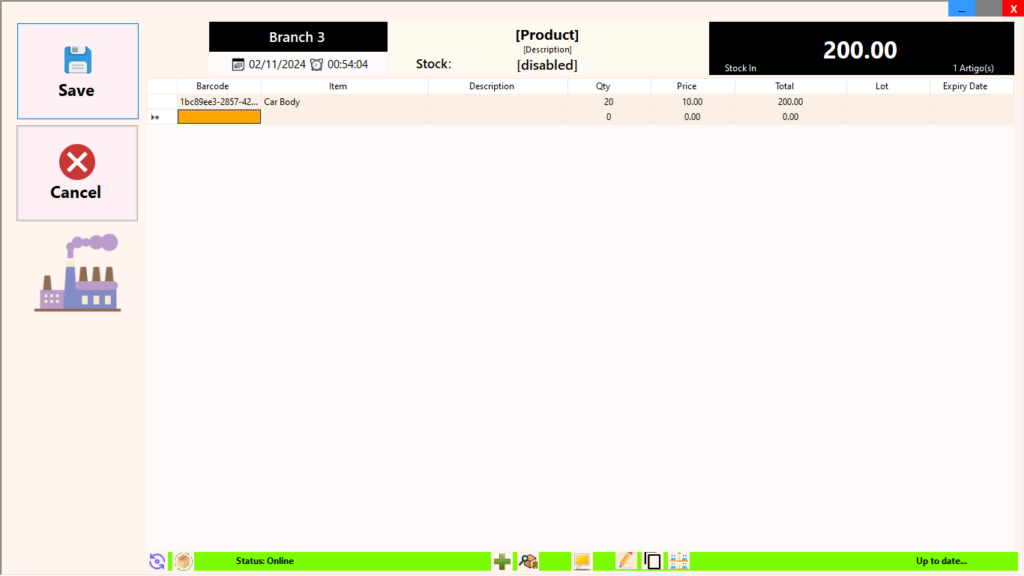
- We begin by using the Production option in the stock entry feature to record our intention to produce 20 Car Bodies.
- Stock Entry for Car Bodies:
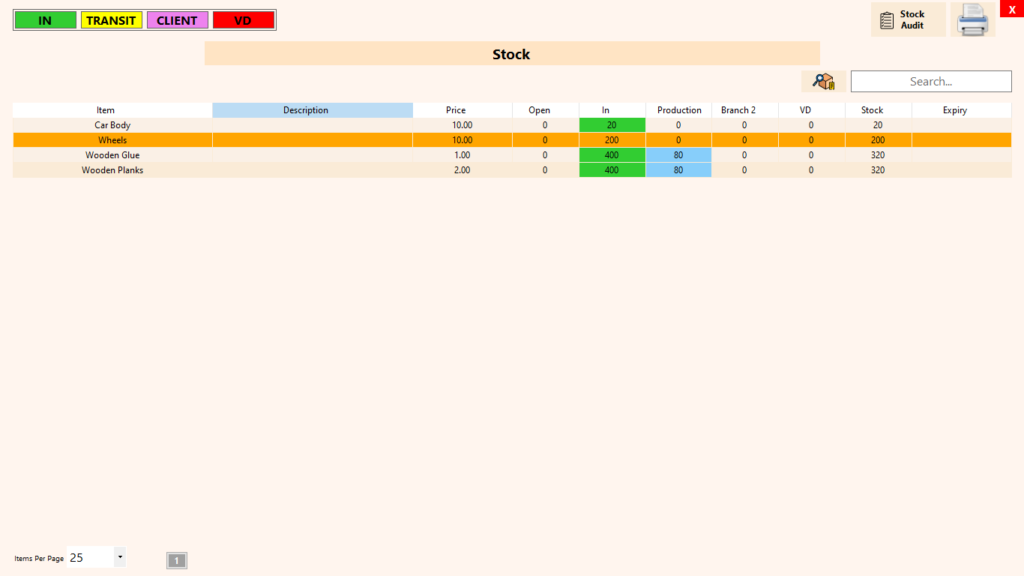
- We make a stock entry for the production of 20 Car Bodies. Once this entry is accepted, the system automatically calculates the required raw materials:
- 80 Wood Planks (4 planks per body)
- 80 Glue (4 glue per body)
- As a result, the system produces 20 Car Bodies and updates the inventory accordingly. This creates an automatic entry that reflects the production of 20 Car Bodies, adjusting the stock levels of wood planks and glue.
- We make a stock entry for the production of 20 Car Bodies. Once this entry is accepted, the system automatically calculates the required raw materials:
Production of Finished Cars:
-
- Next, we proceed to the final assembly of the Wooden Toy Cars.
- We do a production entry for 10 Wooden Toy Cars. Since each toy car requires one car body, the production of these cars will utilize 10 Car Bodies.
- Upon confirming this entry, the system records the production of 10 Wooden Toy Cars, bringing our stock of finished cars to 10
-
Stock Overview:
- After this phased production process, the inventory reflects the following:
- Car Bodies: 10 remaining (20 produced, 10 used for cars)
- Wooden Toy Cars: 10 available for sale.
- After this phased production process, the inventory reflects the following:
-
Selling the Cars:
- Now that we have 10 Wooden Toy Cars ready in stock, we can proceed to sell them. Selling these cars does not affect the stock levels of the raw materials (wheels, planks, and glue) or other products, ensuring clear and efficient inventory management.
Configurations/Settings
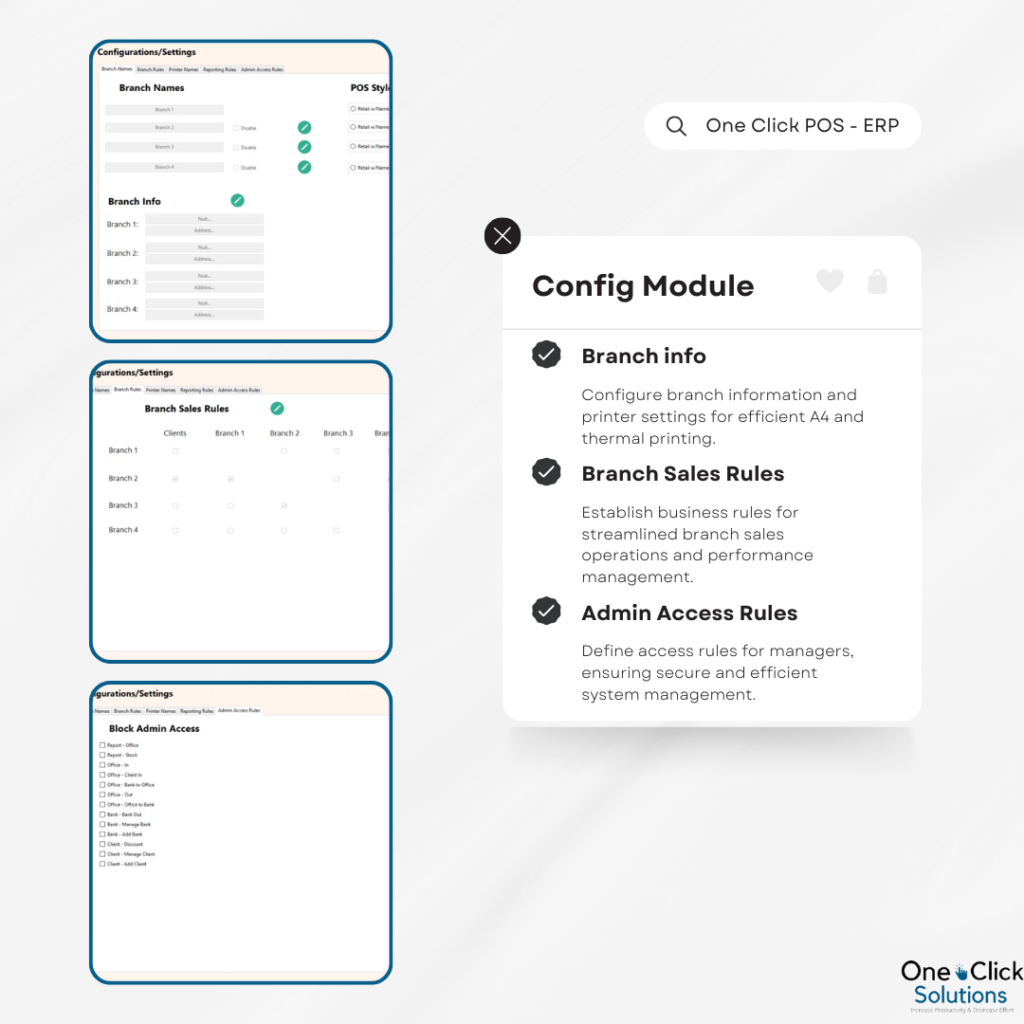
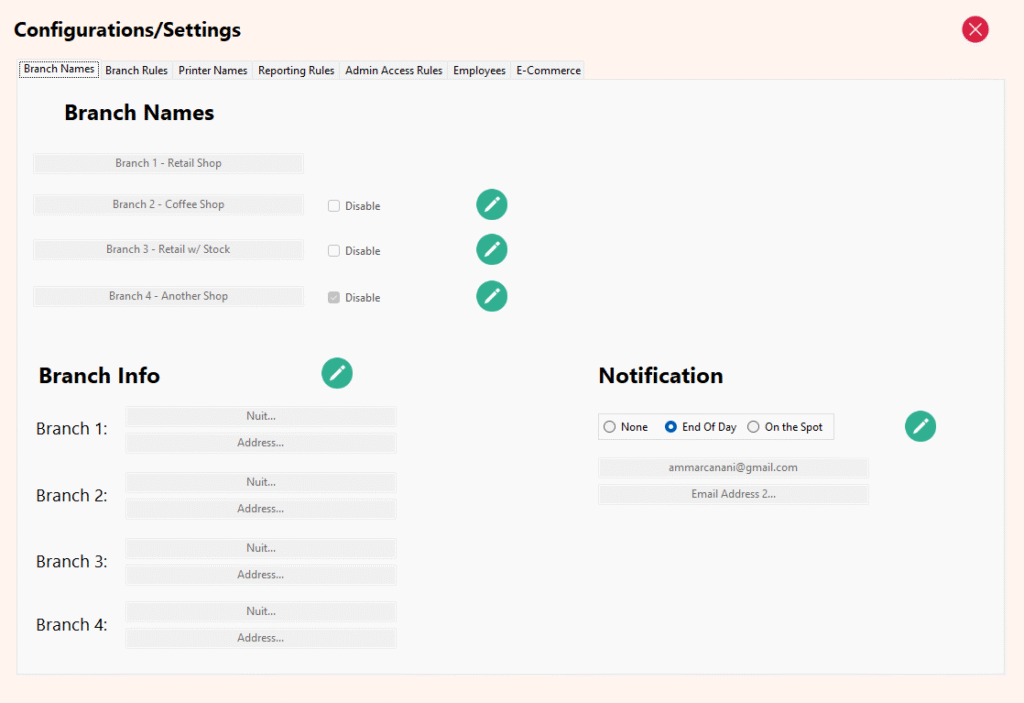
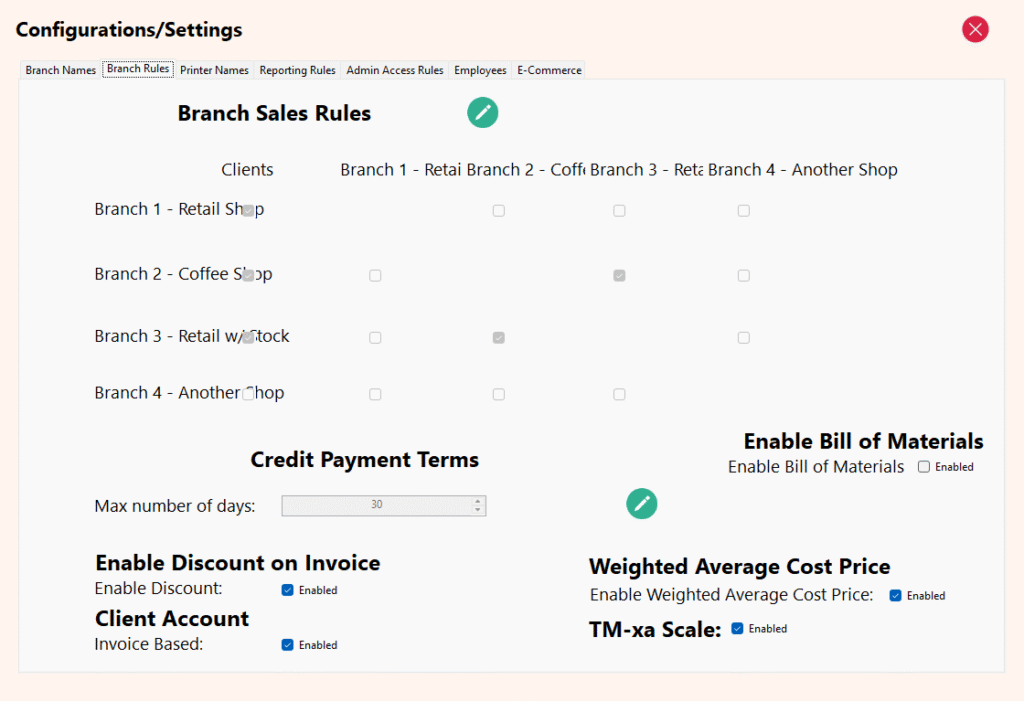
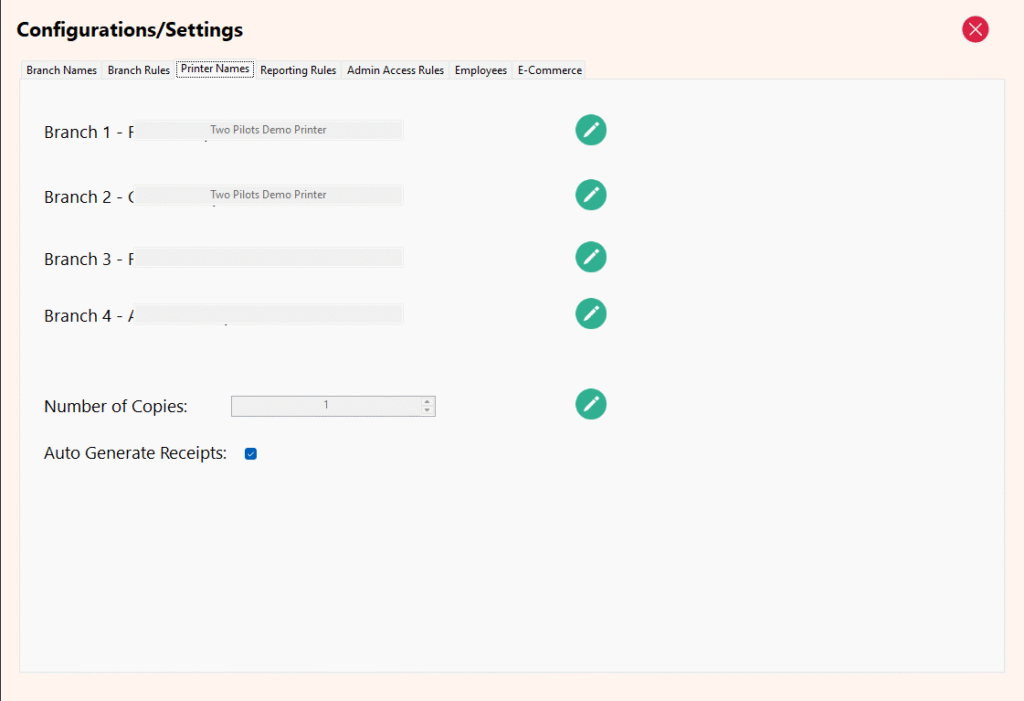
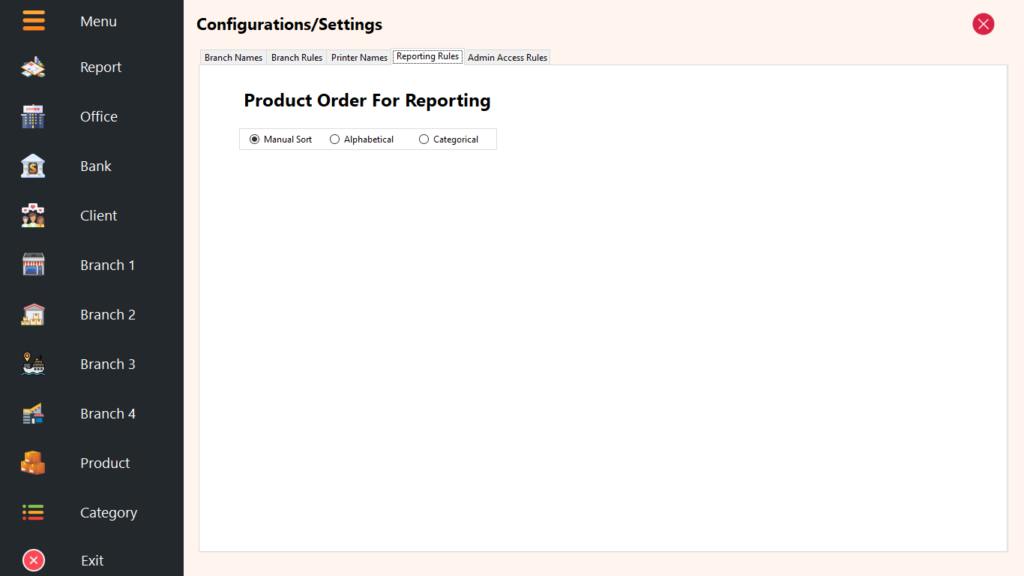
The Configurations/Settings module is where business rules and system parameters are defined. It comprises several tabbed pages:
-
Branch Names:
- Displays Branch Names set up during the initial system configuration.
- Allows disabling branches for faster processing and data efficiency.
- Provides options to set Nuit/Tax Number and Address for invoices.
- For businesses in the Takeaway, Coffee Shop & Restaurant industry, it enables the selection of POS System roles for each branch, facilitating versatile usage.
- Notification type and email addresses for the notifications to be set.
-
Branch Rules:
- Configures business rules for client sales and stock transfers between branches.
- Enables or disables client sales and stock transfers based on company policies.
- Set the max credit payment terms allowed for client credit invoices.
- Enable Bill of Materials feature (14.09.24).
- Enable Discount on Invoice (POS side).
- Enable Weighted Average Cost (WAC) (28.08.24).
- Enable Client Accounts to be Invoice based (22.01.25).
- Integrate with TM-xa Scale (Label Printing Scale TM-A Series).
-
Printer Names:
- Allows the configuration of Thermal Printers used for invoicing.
- Set the number of copies to print for invoices.
- Set the default setting to generate Receipts (28.02.25).
-
Reporting Rules:
- Determines the ordering of products throughout the system.
- Options include Manual Sort/Custom/Tailored (using Sort Product ordering), Alphabetical (listing products alphabetically by name), and Categorical (listing products in categorical order).
-
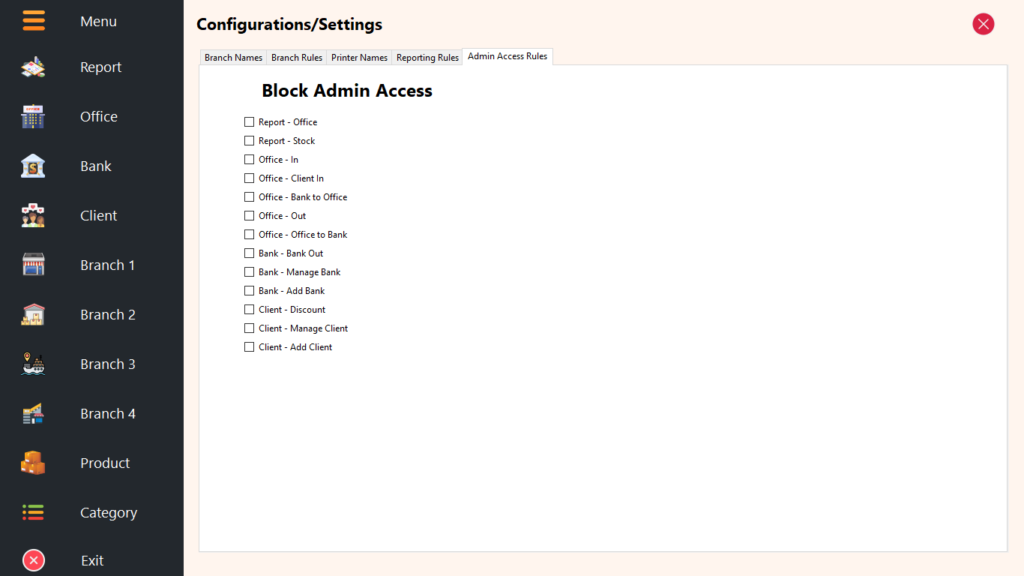
Admin Access Rules:
- Controls access permissions for the Administrator/Manager to access Modules in the ERP Module.
- The Dashboard is disabled by default for the Administrator/Manager role.
-
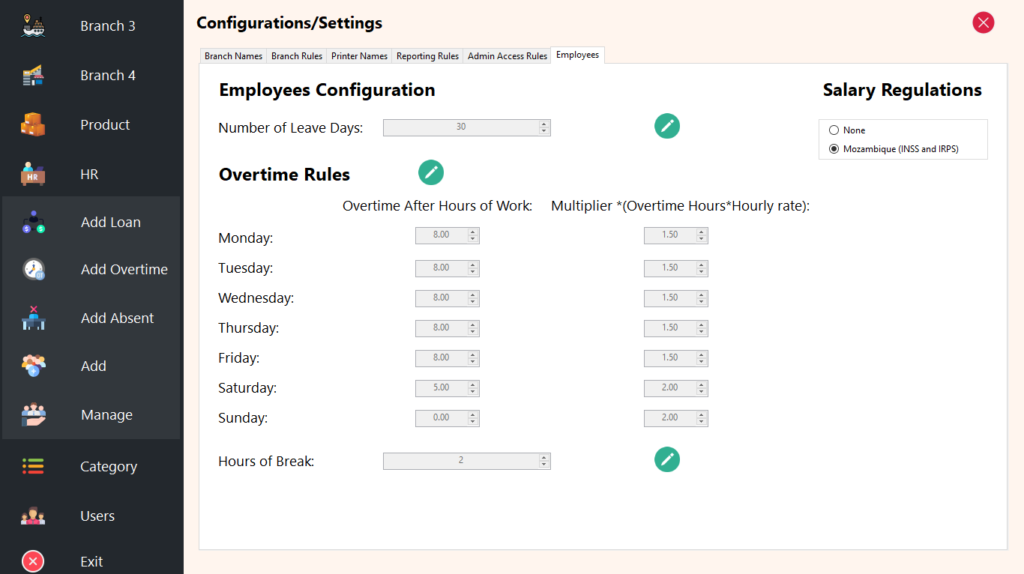
Employees (Released 18.08.24):
- Set the default number of leave days, automatically applied to employees at the start of a new year.
- Configure overtime rules, including when overtime begins and the rate applied per hour.
- Define salary regulations to ensure compliance with company policies.
Restaurant Settings
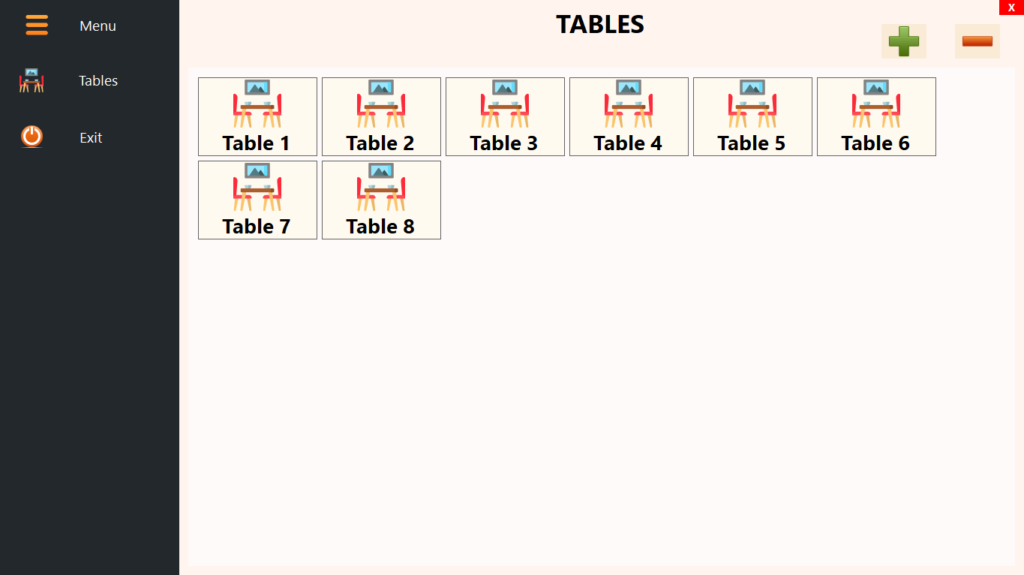
The Restaurant Settings module is tailored for Takeaway, Coffee Shop & Restaurant businesses, encompassing industry-specific business rules. It includes configuration options for the number of tables in the establishment, catering to the unique requirements of the restaurant industry.
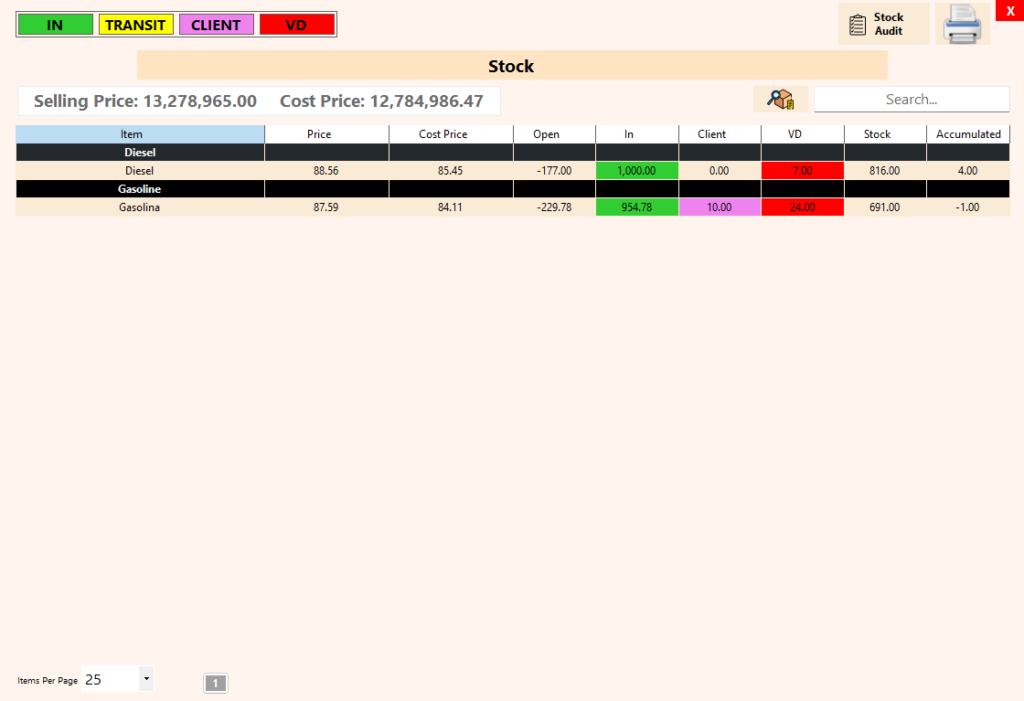
Petrol Station Specific
On the ERP side, the Petrol Station solution focuses on two core management features that ensure accurate stock control and structured pump configuration.
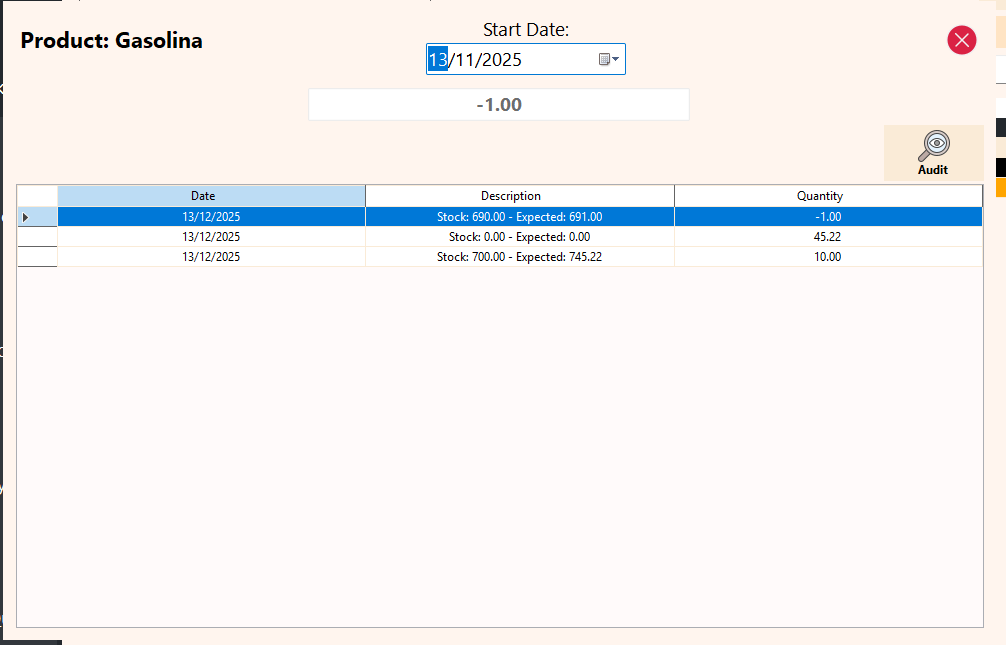
Stock Count & Reconciliation
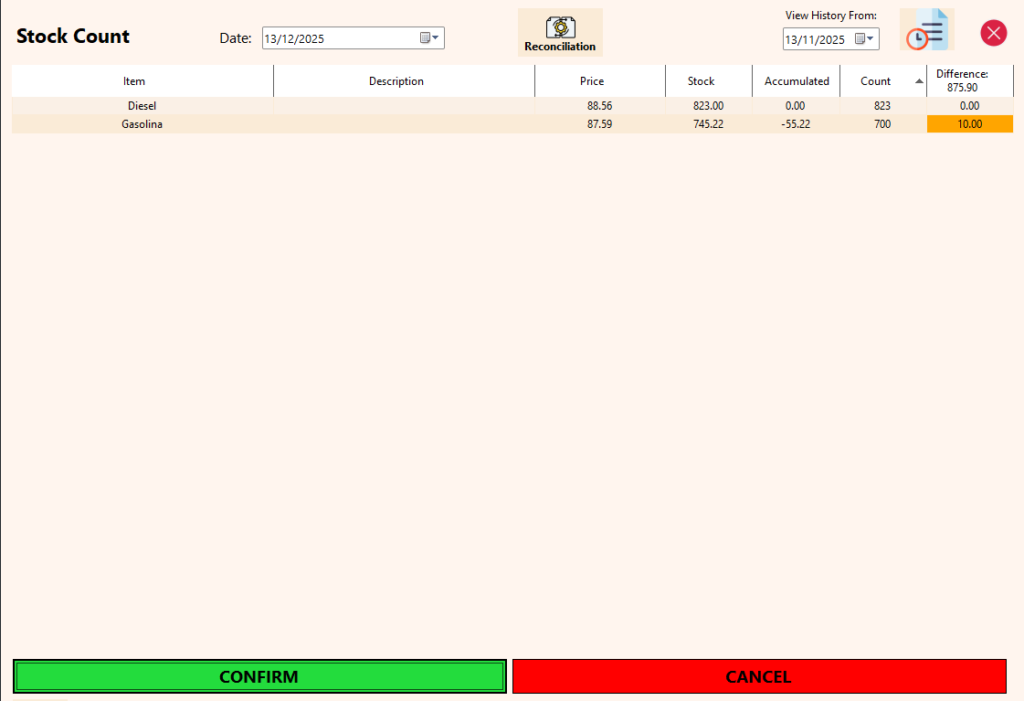
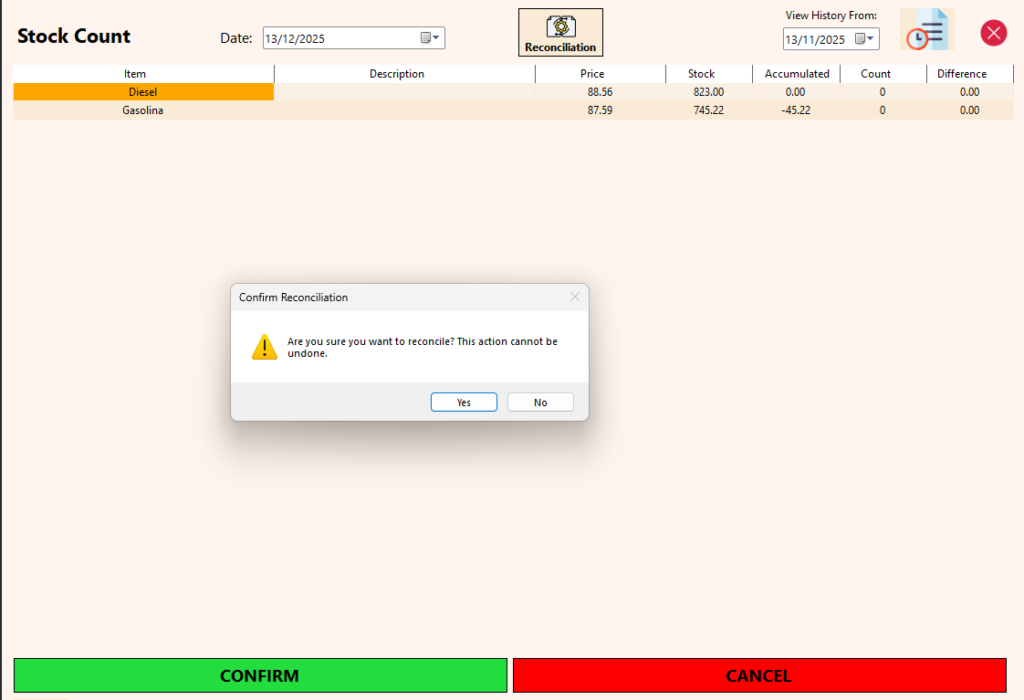
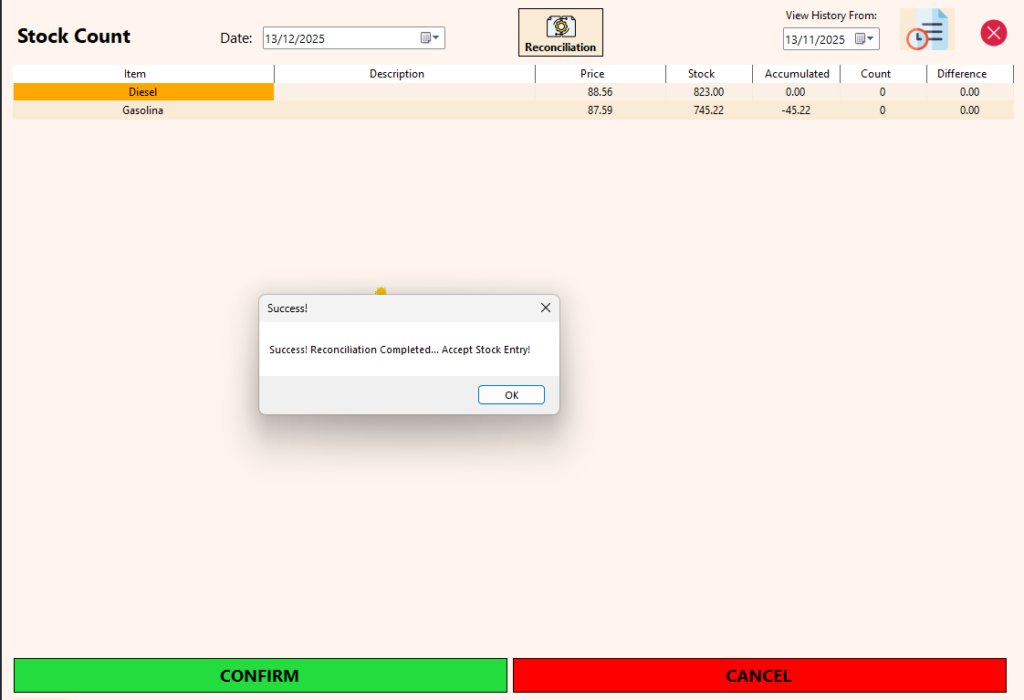
Stock counts allow recording the final physical readings of fuel tanks, enabling the system to calculate the actual stock on hand. By comparing physical readings with system-calculated stock, the ERP automatically highlights cumulative losses or gains per tank over time, providing clear visibility for audits and control. Whenever a reconciliation is performed, the system compares physical readings with system stock, automatically adjusts the tank stock accordingly, and records the resulting gain or loss. These adjustments accumulate over time, giving a clear view of profitability impact, discrepancies, and audit history per tank.
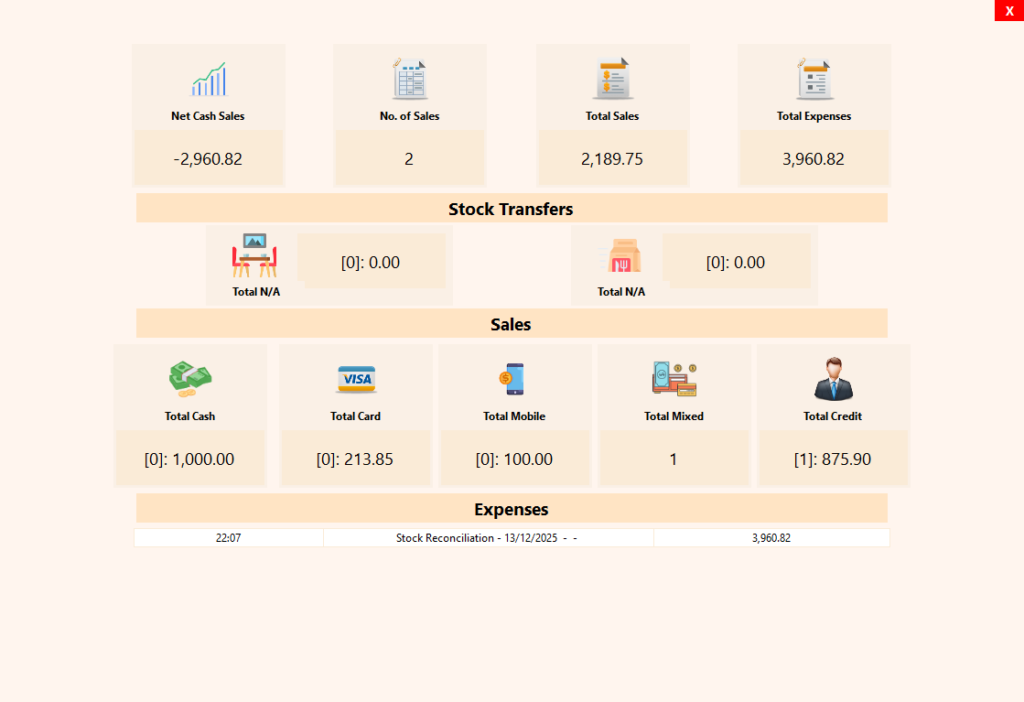
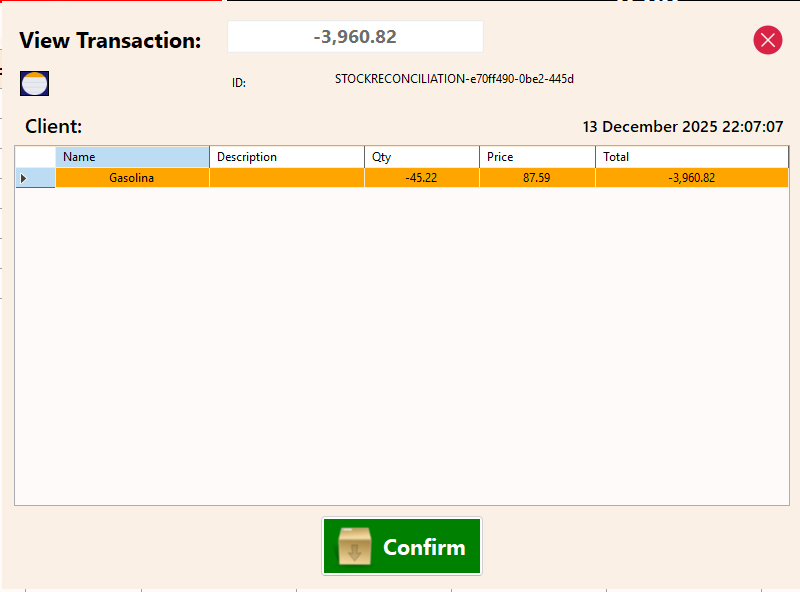
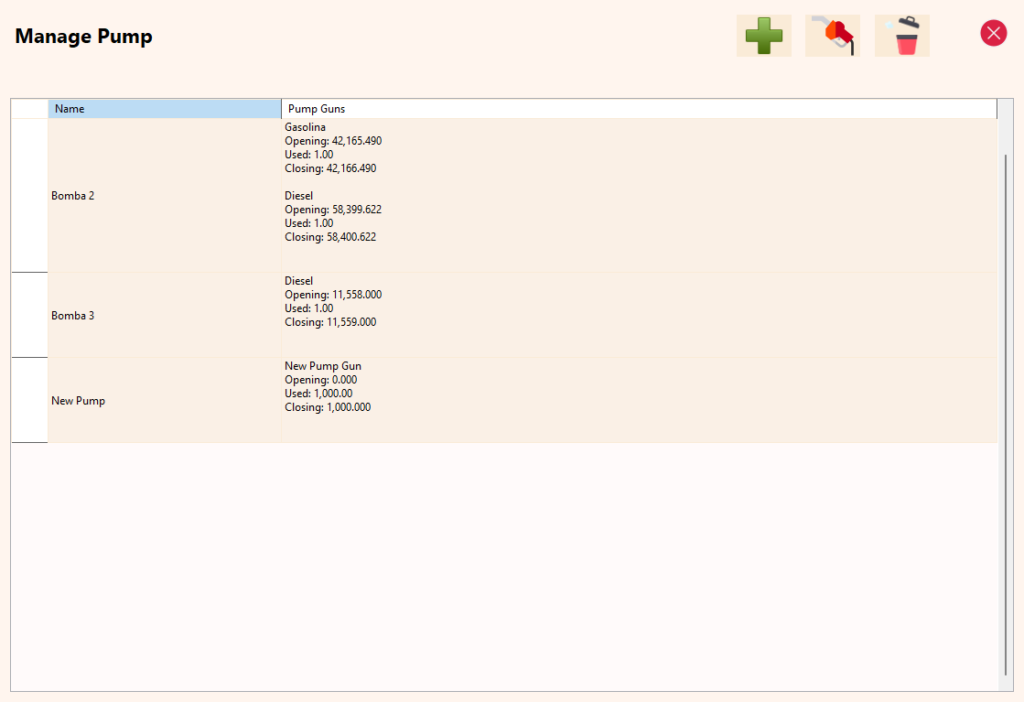
Manage Pumps
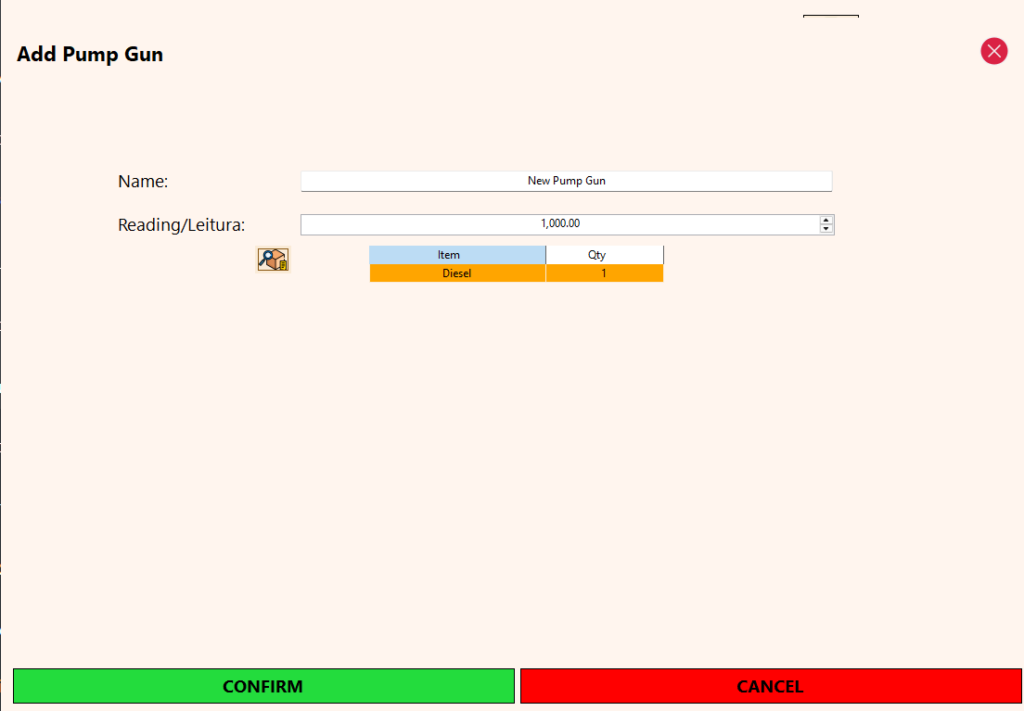
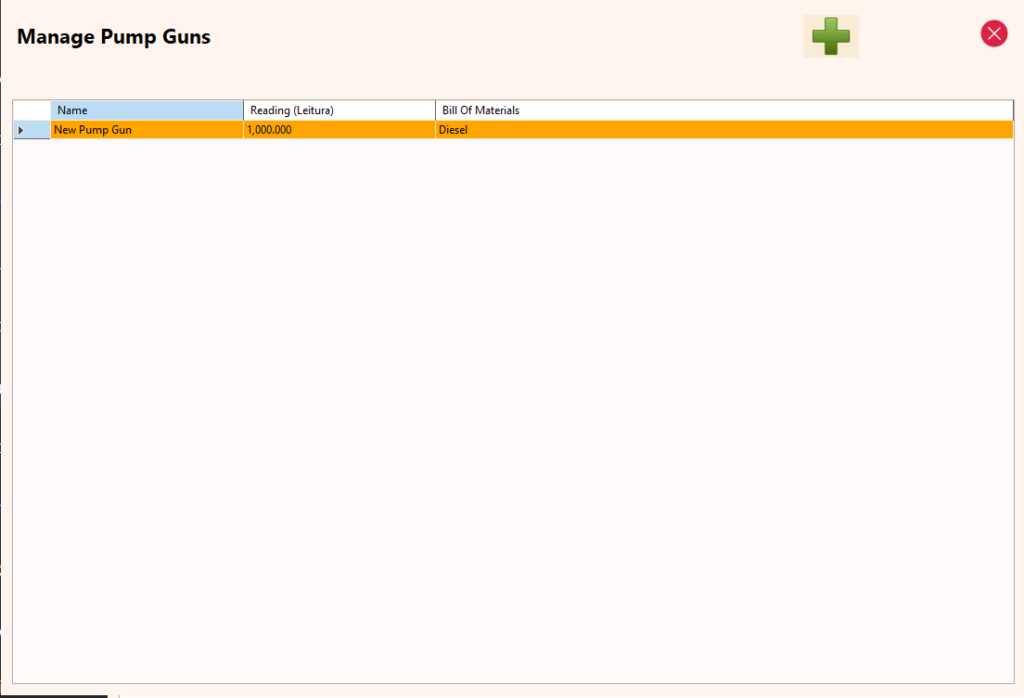
The Manage Pumps feature allows adding and maintaining pumps and their associated pump guns. Each pump is assigned a name and contains one or more pump guns. Every pump gun has its own name, an initial meter reading, and is linked to a specific fuel tank, which is managed as a product in the system. This structured setup ensures accurate tracking of fuel movement from tank to pump to sale.
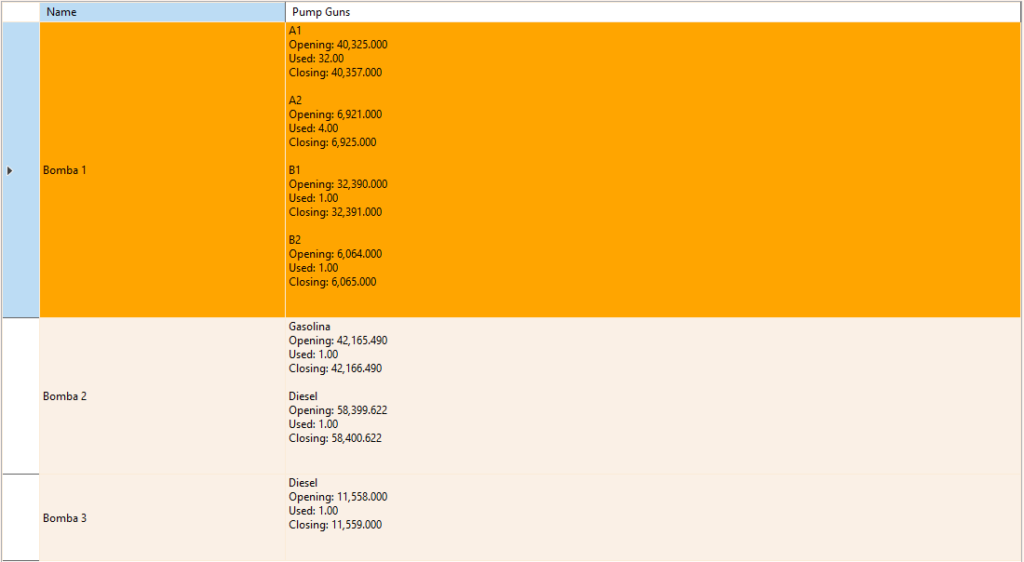
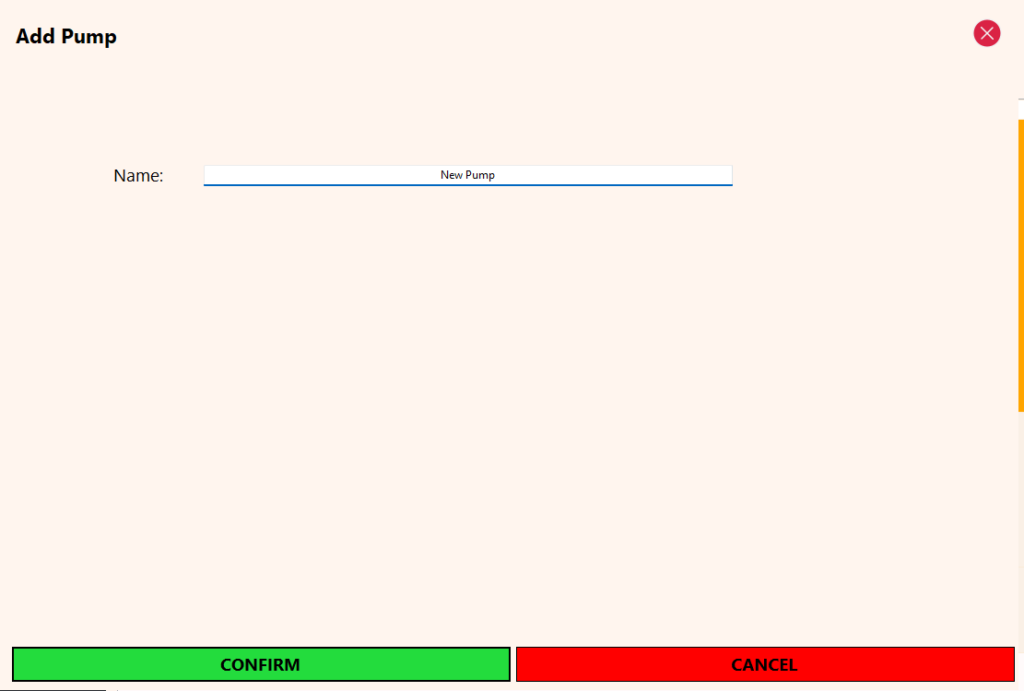
View Client
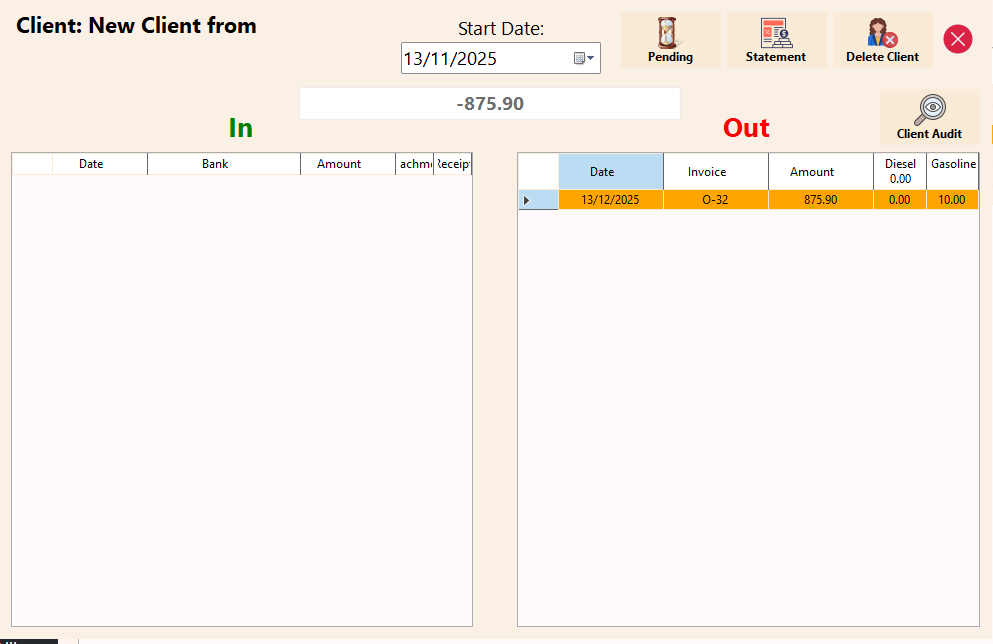
The client profile provides a clear fuel summary per invoice, showing total Diesel and Gasoline quantities sold. This gives an instant overview of invoice contents without opening individual transaction lines, especially useful for credit clients.
View Inventory
The inventory view displays current tank stock levels along with cumulative gains and losses calculated from completed stock counts. A daily overview of gains and losses is also available, helping identify trends, discrepancies, or operational issues over time.
Property Management (Hotel, Motel & Conference Hall) Specific (05.12.25)
The ERP Module has key features required for the administration to setup the system to manage their business. These include managing room types, rooms, timings for check-in & check-out and setting custom pricing for clients.

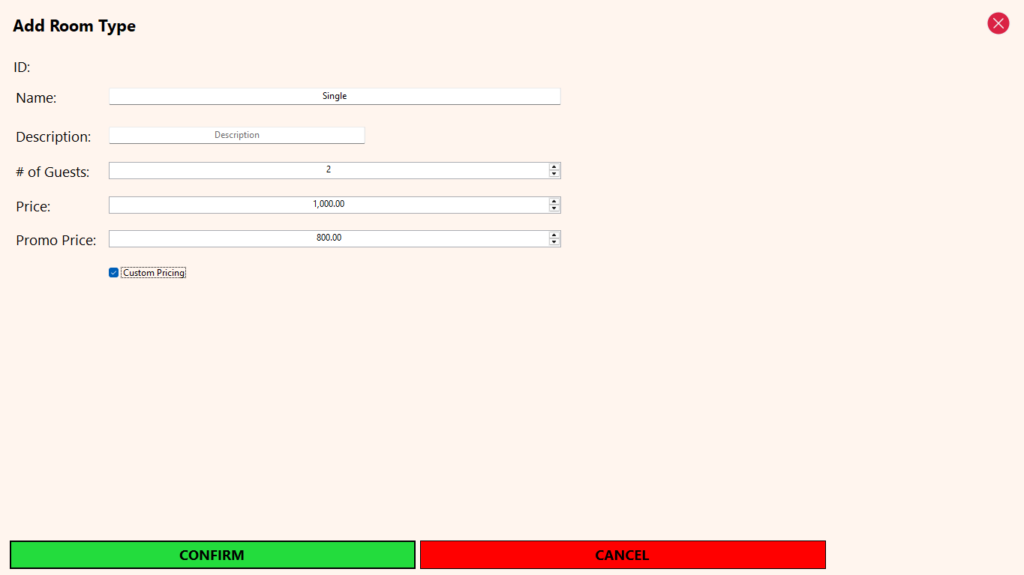
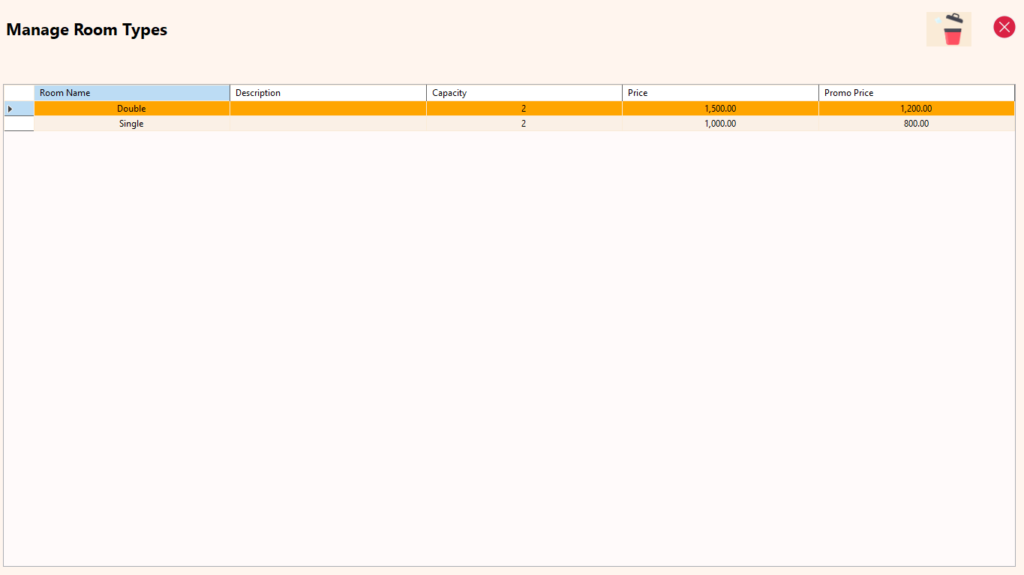
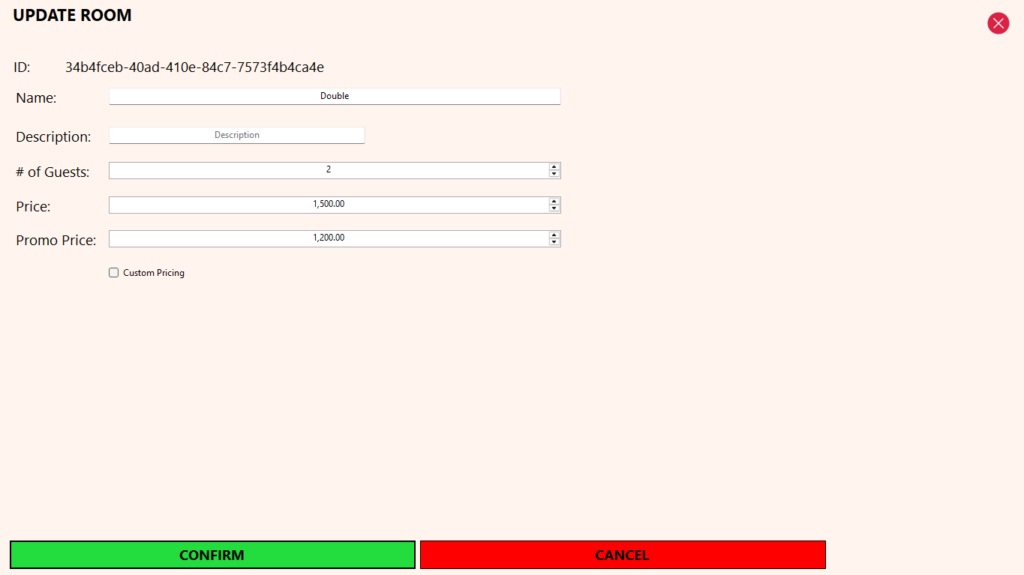
Manage Room Types
The Room Types feature serves as the foundational setup for accommodation management within the Property Management System.
Room types act as templates used when creating rooms and reservations, defining the standard configuration and pricing for each category of accommodation.
Each room type includes:
A name and description (e.g. Standard, Deluxe, Suite)
Maximum number of guests allowed
Standard price
Promotional price (optional)
A Custom Pricing option, which allows prices to be edited during reservation creation when enabled
The system allows users to:
Add, edit, view, and delete room types
Maintain a one-time setup structure, where room types are created once and reused
Update pricing over time without affecting historical reservations or reports
This approach ensures pricing consistency, reduces repetitive data entry, and provides flexibility for seasonal rates, promotions, or negotiated bookings while keeping the overall system structured and easy to manage.
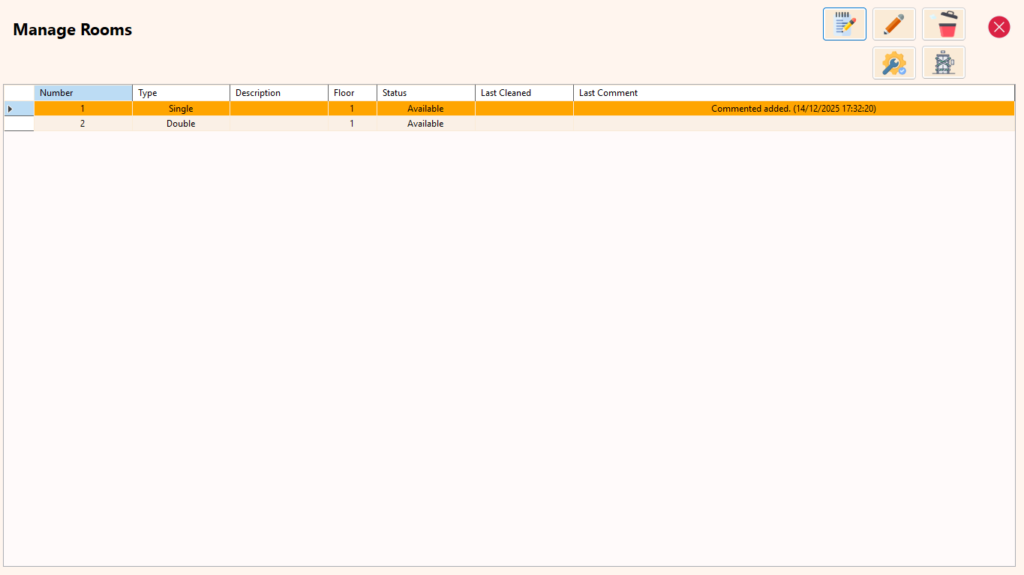
Manage Rooms
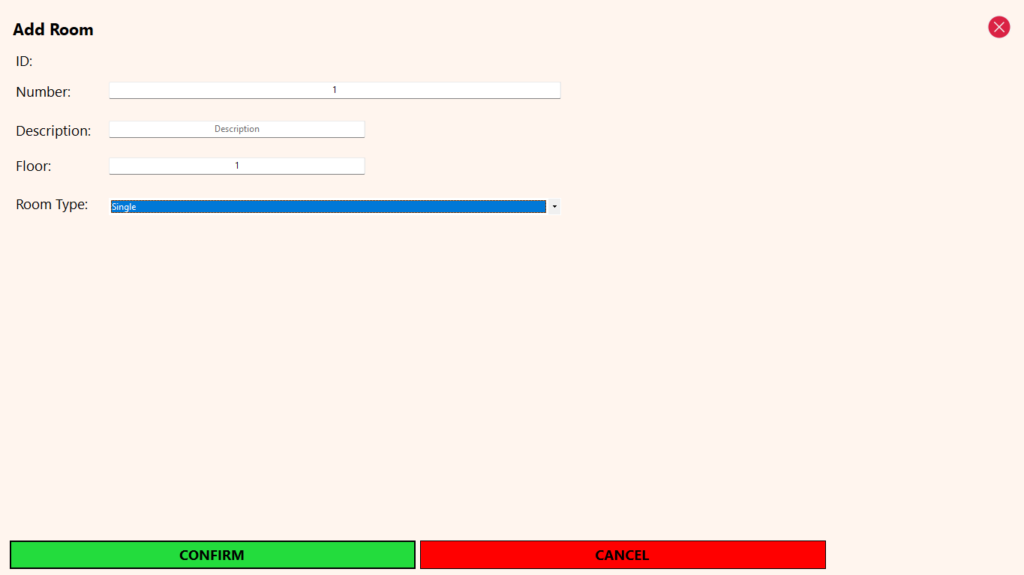
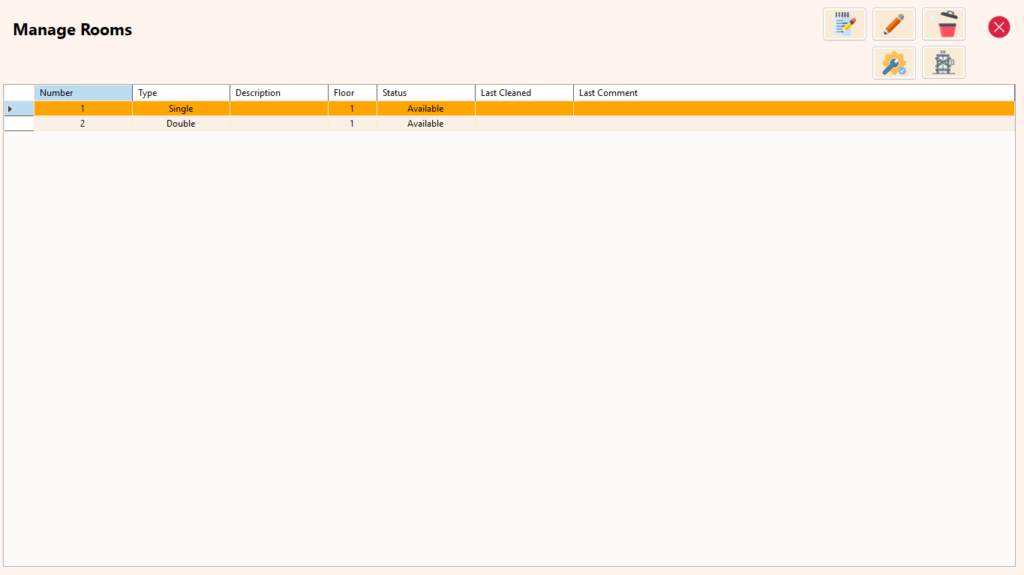
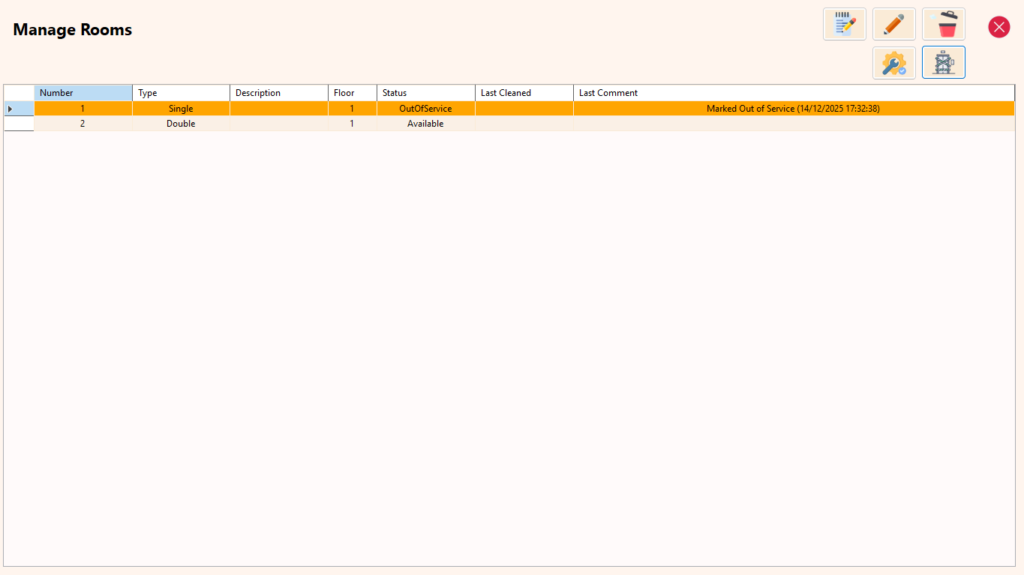
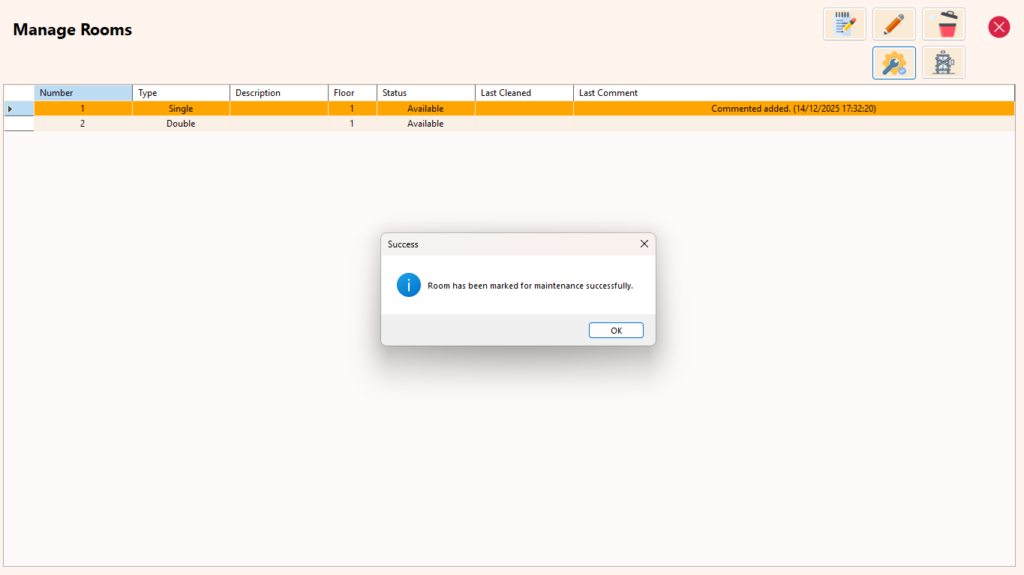
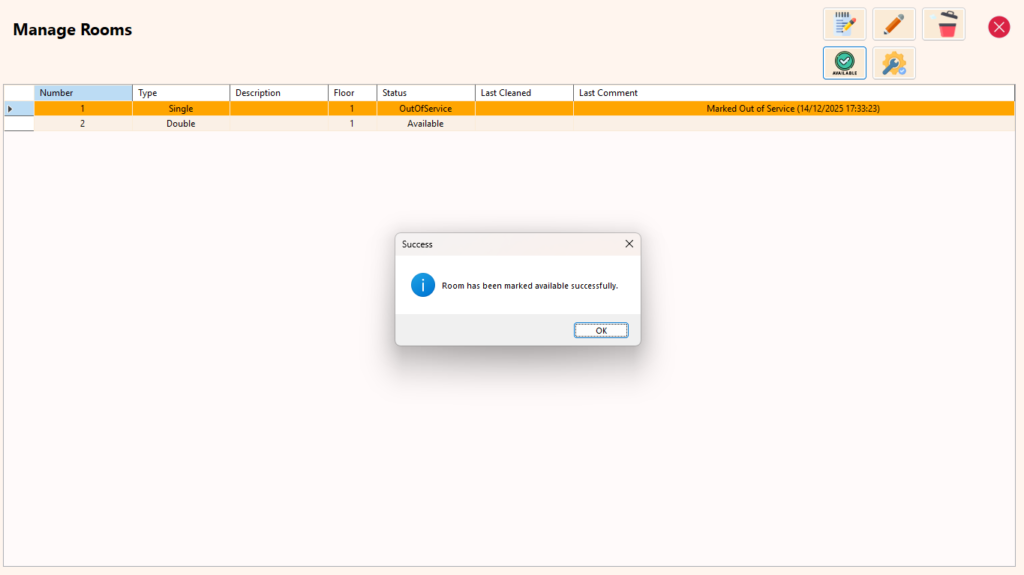
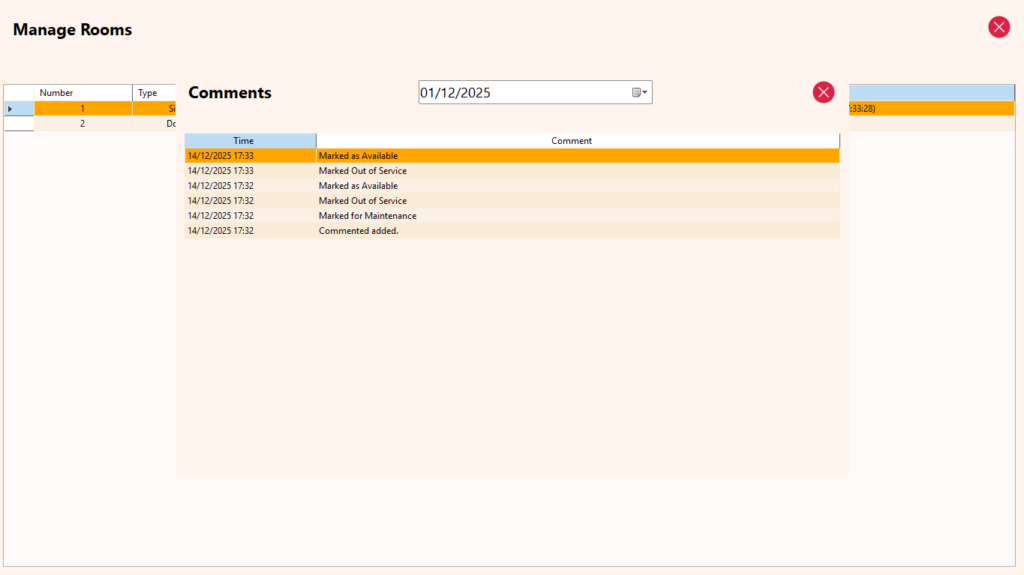
The Manage Rooms feature provides full control over the physical accommodation units within the property, covering both configuration and operational status.
Each room is created by linking it to a Room Type, ensuring that pricing, guest limits, and default settings are inherited consistently from the predefined room model.
For each room, the system records:
Room number or identifier
Room description
Floor number
Assigned room type
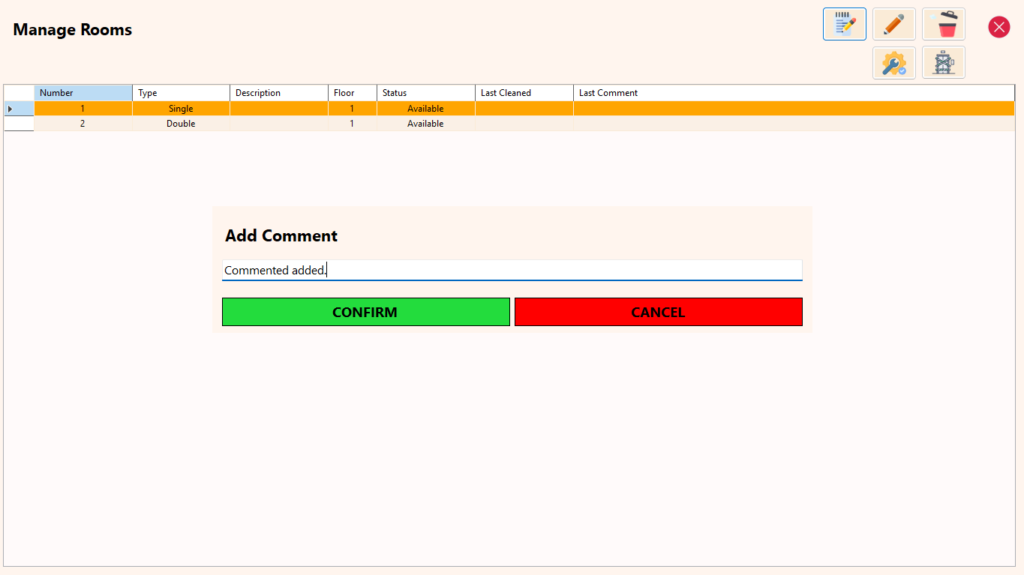
The system allows users to:
Add, edit, view, and delete rooms
Organize rooms by floor and room type
Add comments to rooms for internal notes or operational observations
View room comments history for better tracking and communication
Mark rooms as:
Clean
Under maintenance
Out of order
Available
These room statuses help ensure:
Accurate room availability
Better housekeeping and maintenance coordination
Prevention of bookings on unavailable or restricted rooms
By separating room configuration, pricing (via room types), and operational status, the system ensures clarity, control, and scalability, especially for properties with high room turnover or multiple operational teams.
Check-in & Check-out Times
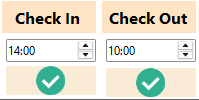
The Check-In & Check-Out Timing feature allows administrators to define the default check-in and check-out times used across all reservations.
These timings are applied automatically when creating bookings, ensuring:
Consistent reservation rules across the property
Clear expectations for guests
Accurate calculation of stay duration and billing
The system allows:
Setting a standard check-in time
Setting a standard check-out time
Centralized control from the ERP, without needing to adjust individual reservations
This configuration acts as a global policy, simplifying reservation management while still allowing operational flexibility where required in later stages of the booking process.
Client Custom Pricing
The Client Custom Pricing feature allows assigning special accommodation rates to specific clients within the system.
In this context, clients are customers whose names are used on invoices or who have credit accounts. A client may have employees or individuals who stay as guests under their account, with all charges billed back to the client.
This feature enables:
Defining custom room rates per client
Automatically applying agreed pricing when a reservation is made under that client
Managing corporate, negotiated, or long-term rates without manual price overrides
The system ensures:
Clear separation between clients (billing entities) and guests (occupants)
Accurate invoicing using the client’s negotiated pricing
Simplified management for businesses, companies, NGOs, or agents that regularly send guests
Client Custom Pricing improves pricing control, consistency, and operational efficiency, especially for properties that work with corporate clients or recurring bookings.
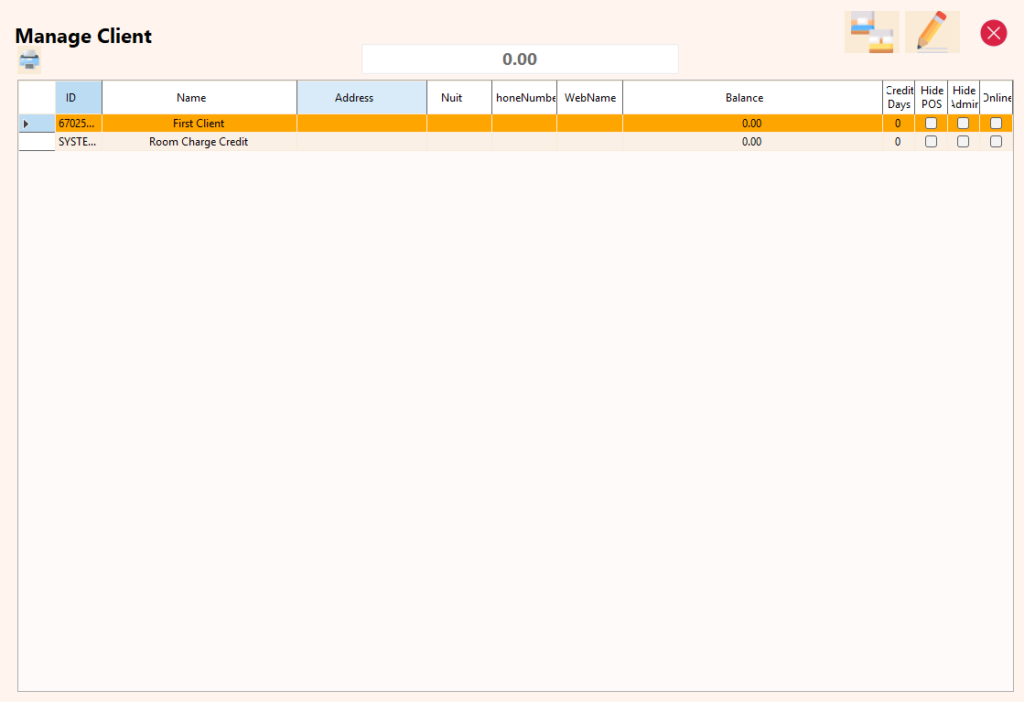
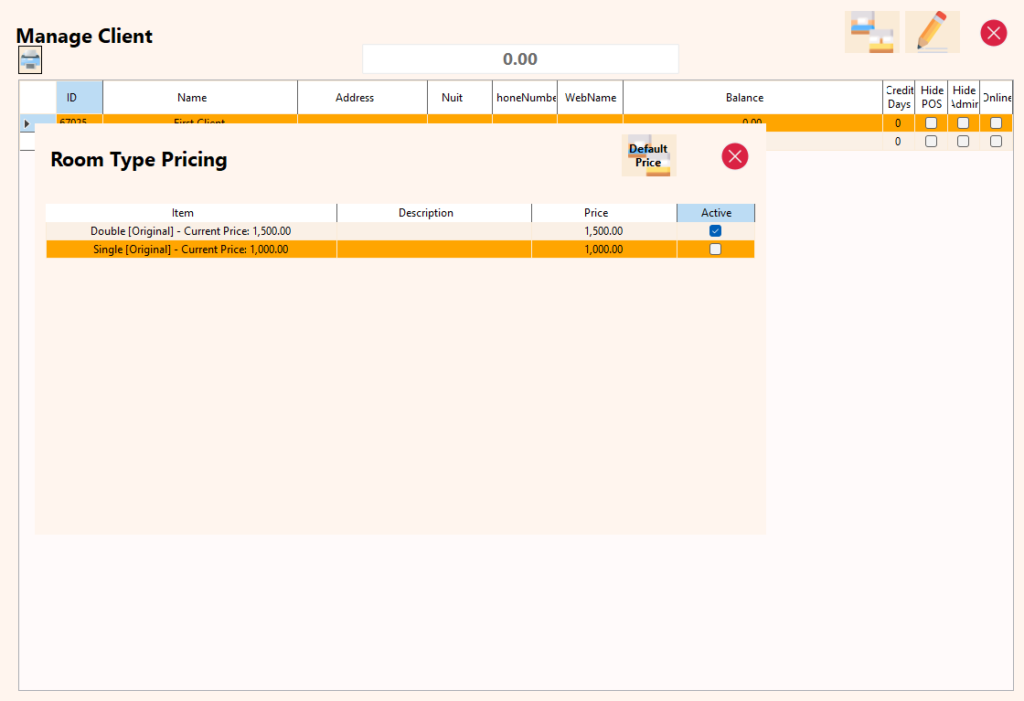
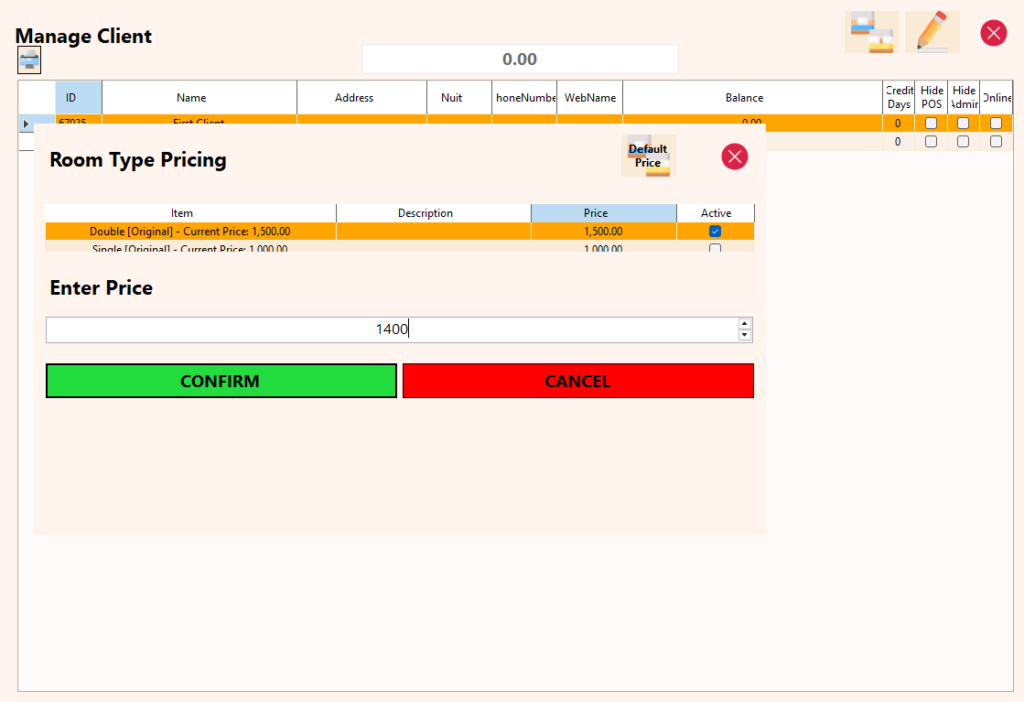
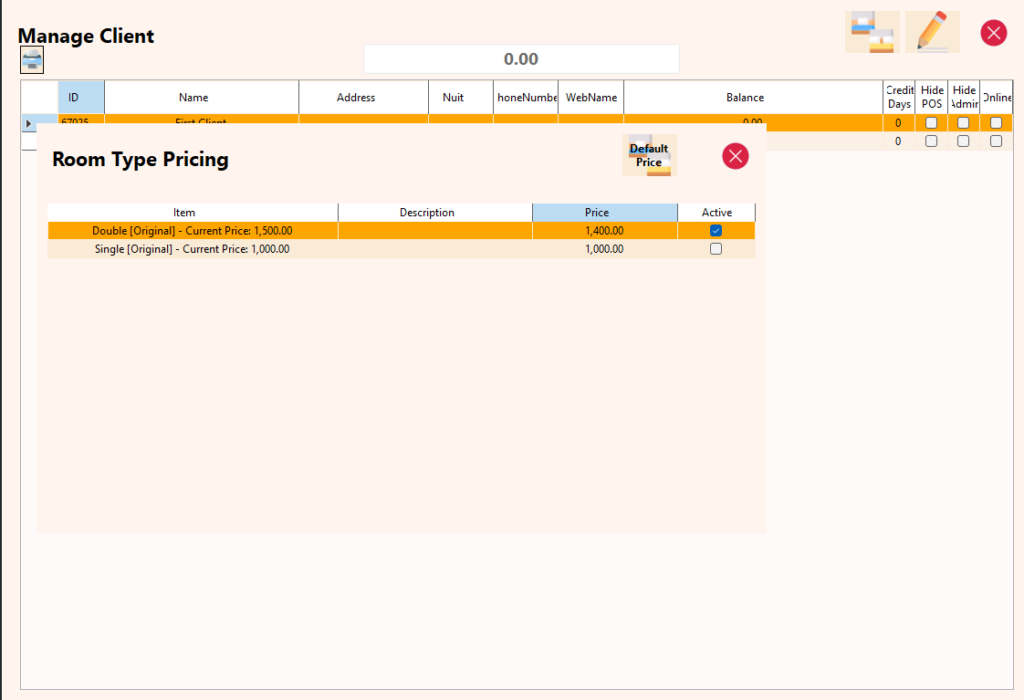
Related Posts
Discover more from One Click Solutions
Subscribe to get the latest posts sent to your email.


